Sunday, October 9, 2011

Another Moving Experience

When we were forced to find a new rental property last year, my guitar-building pursuits were seriously disrupted while we hunted for a suitable house, packed innumerable boxes, moved our accumulation of "stuff", then found homes for everything once we'd made the move. During the weeks that followed, my attention was focussed on building a workbench from scratch and establishing some semblance of order in my new workshop. Having achieved all that, I enjoyed more productive times and was pleased to be able to complete a couple of guitars and make good progress with the others I've featured recently on this blog.

Stability hasn't lasted long however, and barely 12 months later we've taken a critical look at our situation from the point of view of finances and lifestyle and have purchased our own home. As a temporary measure, I'll set up shop in the double garage, but the long-term goal will be to build a workshop at the rear of the property with the luxury of being able to give consideration to the heating and cooling, lighting and storage requirements best suited to our budget and the specialised needs of my guitar building hobby. In many respects it's a distraction I'd rather not face, but I'm confident that the planning, expense and hard work involved will pay off in the long term. It's my hope that I'll be much more inclined to spend time building guitars, particularly through our extreme summers when it's too easy to spend what spare time I do have lounging around in the air-conditioned house!

Updates to my blog will slow to a trickle in the weeks ahead, however, normal service will be resumed as soon as possible.

Cheers
Pete

Sunday, September 25, 2011

Saddle Slots and Bridge Pin Holes

Although I'm nowhere near ready to make use of them, I've spent some time lately working on the bridges destined for the two guitars I have under construction for no other reason than it's a job I can devote short periods of time to in a spare moment, or treat as light relief between more demanding or time-consuming tasks.


To facilitate drilling of the bridge pin holes in a perfectly straight line, parallel to the saddle slot I've previously routed out, I glue a small wooden block to the front edge of the bridge blank on the treble end prior to cutting the bridge outline. I trim the block carefully using my disk sander so that as the bridge is slid along a makeshift fence attached to my bench drill's table, the centre of each hole will be equidistant from the slot. Having guaranteed alignment in that direction, I need only take care then to align the bit with the string spacings marked on the bridge as I prepare to drill each hole (a white ball-point pen is a godsend when marking dark woods like this ebony). A brad-point bit makes accurate alignment much easier and produces a perfectly clean hole provided it breaks out through the lower surface of the bridge into a backing board of MDF or scrap timber.


With the bridge pin holes drilled parallel to the line of the saddle, there's a consistent break angle for the strings as they pass over it. While some reason that this guarantees an equal downward string pressure along the saddle's length, the fact that string gauges and tensions vary from string to string casts doubt on the validity of that argument. A slight increase in the saddle's height towards its centre and the potential use of radically altered tunings such as "Orkney" tuning (CGDGCD low to highcomplicate the matter still further. Whatever its other merits though, it's a neat look and I'm assured of adequate downward pressure on the saddle and therefore good transference of the strings' energy to the soundboard.


It seems there's no hard and fast rule where bridge weights are concerned; popular wisdom has values falling within a fairly wide range. Given that there are a multitude of factors influencing the guitar's sound, I somehow doubt I'll ever build enough instruments to draw any meaningful conclusions where small variations in bridge weight are concerned; there are so many other variables likely to have a more significant and measurable effect should I feel the urge to experiment. That being the case, I'm happy to aim for a more or less consistent bridge weight from one guitar to the next. With ebony bridges such as these, I shoot for a weight of between 30 and 35 grams, making use of a cheap digital gram scale as I shape and shave the bridge wings to their final thickness.

Useful links:
Routing the Saddle Slot

Cheers
Pete

Saturday, September 3, 2011

The Fingerstyle Guitar - Gluing the Soundboard and Back

There are several commonly used methods of clamping the soundboard and back as they're glued to the rims, but the technique pictured here is the one I've adopted; it works very well, and I feel no need to explore other options. I use thin bungee-cord to apply the necessary clamping force, with a caul made from masonite and cork sheet in place to distribute pressure evenly around the guitar's perimeter. The caul focuses clamping pressure on the edge of the back or soundboard, preventing any deformation of the top or back plates which the tightly stretched cord might otherwise cause. It also serves to protect the delicate soundboard wood from damage where the cord breaks sharply over its edge. I trim the top and back plates to within a few millimetres of their final dimensions prior to clamping; there's minimal overhang and therefore no leverage brought to bear by the bungee-cord on the edge of the plates.

Gluing guitar soundboard and back

Gluing guitar soundboard and back

Gluing guitar soundboard and back

I haven't become anywhere near proficient enough with hot hide glue to consider using it to attach the soundboard and back plate to the rims, and in any case, I'm not convinced of the benefits of doing so. That being the case, I'm happy to continue using Titebond Original, applying it the gluing surface of the linings with a 1 inch foam roller after the rim assembly has been securely clamped in the outside mould. The roller allows me a high degree of control over the quantity of glue applied and, if I've judged it well, there's negligible glue squeeze-out at the intersection of the linings with the top and back plates and therefore little need for clean-up inside the guitar body. I attach the back first, the advantage being that once the bungee-cord has been secured, I can flip the entire assembly over and inspect the interior of the guitar through an opening in the base of the mould, cleaning up what squeeze-out there is with a damp sponge.

Click any of the photos for a larger view.

Cheer
Pete

Saturday, August 27, 2011

The Fingerstyle Guitar - Notching the Kerfed Linings

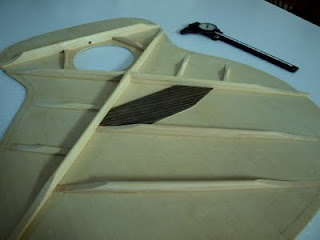
Once the kerfed linings are glued to the sides, the sandpaper-lined concave dishes I made use of when shaping and gluing the top and back braces serve their other purpose by helping me sand a drop-off onto the edges of the rim assembly to match the curvature of the back and top plates.

Sanding guitar rims


Kerfed guitar liningsI can then use a Dremel rotary tool to rout pockets into the linings to accommodate the brace ends. Using the more traditional kerfed linings whose saw kerfs face into the guitar body, there's always a danger that if one or both edges of a brace pocket happen to be in close proximity to the kerfs, a chunk of wood will be dislodged as the pocket is cut. With reverse-kerfed linings, however, the individual sections of wood between the kerfs are firmly glued to the sides and serious chipping of the exposed face of the lining on either side of the brace pocket is far less likely, provided some simple precautions are taken.

When routing the brace pockets, it's important that the Dremel is guided in such a way that the router bit's clockwise rotation doesn't contribute to tearing or chipping of the linings as the pocket is cut. This is particularly important to observe where the left-hand edge of the brace pocket is concerned (i.e., with the guitar side facing me). With that in mind, I make my first cut towards me in the direction of the guitar side along this left-hand margin, easing the router bit into the lining for the equivalent of around half the bit's diameter; a second shallow entry cut on the right-hand side of the pocket defines its width. Several light passes are made from left to right until a single recess is created between the two entry cuts. I repeat this process until the recess extends to the guitar's side and make final adjustments until the end of the brace fits snugly within the pocket. It's difficult to avoid chipping entirely, but by guiding the router in the manner I've described, it's of a minor nature and can be easily cleaned up with sandpaper.


I rout the pockets in pairs, beginning at the tail-block end of the body. If the first pair of pockets is accurately marked and cut, the centre-line of the back will be correctly aligned from that point on. If a minor adjustment to the back alignment is required, the pockets can be modified accordingly. The second, and subsequent pairs of pockets can then be more accurately positioned, with correct alignment of the back more firmly established as each pair is cut.

Some builders postulate that because reverse-kerfed linings stiffen the rim assembly once attached, there are resultant improvements in the sound of the instrument. Occasionally, it seems, views such as this are repeated often enough by individuals held in high regard within the luthier community that they become accepted as fact, whether or not they've been held up to close scrutiny. I acknowledge that I have a lot to learn and always try to have an open mind when reading of the experiences and opinions of other more experienced builders, but after looking at popular wisdom such as this from all angles, I'm left unconvinced. For what it's worth, my personal view is that while it's somewhat helpful having a stiffer rim to work with in the course of constructing the instrument, from the point at which the back and soundboard are attached to the rims, any contribution the linings may have made to the rims' stiffness is eclipsed by the strength of the top and back in compression. I suspect that in the finished instrument, the linings - reversed or otherwise - play little part beyond their primary purpose: to provide a gluing surface for the top and back plates.

Cheers
Pete

Friday, August 26, 2011

The Fingerstyle Guitar - Side Reinforcement

For almost as long as I've been building guitars I've followed the lead of others and have fitted kerfed linings to the rims, then installed wooden reinforcement strips to span the sides between the top and back linings. Although this remains common practice, it seems an increasing number within the lutherie community are coming to the view that this could potentially do more harm than good, the thinking being that if the guitar sustains a significant impact, the area of relative weakness created at the intersection of the side reinforcement and the lining could contribute to a crack developing at that point - it makes sense to me.

Guitar side reinforcement

For this guitar then - and for its rosewood and spruce companion - I've chosen an alternative approach which is to to glue cloth bias tape across the full width of the sides at regular intervals and install the linings over the top of it. The rationale for this is that as the glue-impregnated cloth spans the entire side and will remain somewhat flexible, the weak point I've described is largely avoided. In the unlikely event that a crack develops in one of the sides for whatever reason, the tape will provide a measure of protection against the crack propagating along the length of the side - at least until a permanent repair can be carried out.

Useful Links:
Installing Side Tapes

Cheers
Pete

Monday, August 22, 2011

New Wood Purchases

I have a love/hate relationship with our strong Australian dollar at present. It's too convenient an excuse to click the "Buy Now" button when I spot particularly desirable pieces of wood on favourite web sites such as Allied Lutherie's but, of course, it's also of benefit once I've given in to temptation. Resistance is futile, it would seem.

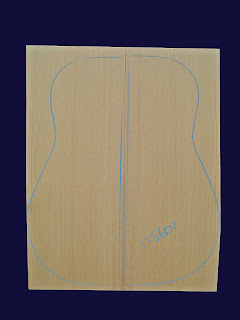
Ample evidence of my recent weakness can be seen below. Those poor souls similarly afflicted with "Wood Acquisition Syndrome" can click the pictures for a closer look. 

European spruce soundboard
European Spruce

Port Orford Cedar soundboard
Port Orford Cedar
European Spruce needs no introduction, but Port Orford Cedar is a relatively uncommon tonewood. Luthier's Mercantile has this to say about it:

Similar in appearance and scent to Alaskan Yellow Cedar, Port Orford Cedar is stiffer, lighter and thus more suitable for soundboards. Indeed, it is highly sought after for the bold, robust, responsive tone that it imparts on an instrument. It is very even textured, with a slight golden-white color and tight, even grain. A great advantage to the builder is that this wood is more immune to splitting than absolutely any other soundboard wood.

The Port Orford Cedar is in transit as I write this and I'm impatient to inspect it, flex it, tap it - and smell it! Aside from its promised tonal and structural advantages, I'm looking forward to experiencing the pungent peppery smell it's said to impart to a completed instrument.  It's almost worth combining it with a back and side set of Claro Walnut for that reason alone given walnut's delicious aroma.  Such an instrument would surely be the ultimate "perfumed guitar"!

Useful links:
Port Ordford Cedar - Stansell Guitars

Cheers
Pete

Tuesday, August 2, 2011

Kerfed Linings

Kerf: a slit or notch made by a saw

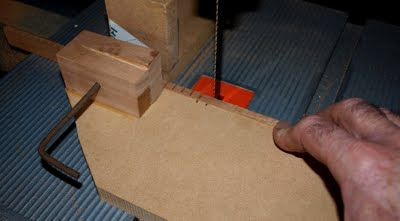
Pre-made kerfed linings are readily available from any number of suppliers, but given their expense and fragility, I prefer to fabricate my own, leaving a little more wood between the termination of each saw cut and the opposite face of the lining than is generally present on those available commercially. Even with that precaution, I like to pre-bend the mahogany strips with the aid of a bending iron to match the contours of the guitar side. Breakages are rare, but if I should happen to snap one, it makes sense to discard it, or at least reserve it for areas where the break won't be visible. Given the attention to detail lavished on the other aspects of a hand-built instrument, I find it incomprehensible when I see pictures of the interior of a guitar in which joins in the linings are in plain view through the soundhole. I'm a little uncomfortable too with saw cuts whose spacing or depth varies noticeably along the length of the strip. Using my band-saw and the crude but effective fixture pictured below, I'm able to produce evenly spaced cuts of a consistent depth.

Making kerfed guitar linings

After several less than satisfactory attempts using a router to apply a rounded profile to what will be the inner corner of the strips, I discovered that by planing a series of facets onto the appropriate edge with a small block plane, I could quickly and easily blend them into a smooth curvature with a sanding block. It reinforces the fact that sometimes, the simple, non-mechanised approach is best!

Cheers
Pete

Sunday, July 31, 2011

A Claro Walnut/Sitka Spruce 000 - Free to Good Home!

I've made great advances with the last two guitars I've completed in terms of build quality and tone and I'm afraid I'm a little lacking in motivation when it comes to completing this one. I guess that's a little strange given my usual passion for guitar building, but considering that I began its construction quite some time ago and would much rather be working on my new instruments, putting into practice important lessons recently learned, I'm inclined to forgive myself for this half-hearted attitude.


The photograph above doesn't do the claro walnut back and sides justice; in its present raw state, the wood looks pretty uninspiring. Under finish, however, its stunning figure will be fully revealed and will be the icing on what I hope will be a very successful cake!

Tapping on this unusually marked Sitka spruce soundboard in its unfinished state gives me reason to be confident. The body is very resonant, the standard of workmanship is acceptable and construction is far enough advanced that I'm sure I can muster the enthusiasm to finish it. This guitar's state of completion will fall into line with my two latest instruments when they are ready to receive bindings. From that point on I'll attempt to complete the remaining steps on all three guitars concurrently.

Click for a closer look.

For what will hopefully be the last time, I plan on finding an appreciative recipient and making a gift of one of my instruments. It's certainly been very satisfying to have delivered my last two guitars to keen players free of charge, but once this guitar finds a new home, foregoing that pleasure and at last deriving some meagre income from my hobby is a prospect that's becoming increasingly attractive.  Semi-retirement (and a new band-saw) beckons!

Cheers
Pete

Sunday, July 10, 2011

The Fingerstyle Guitar - Head Block, Tail Block and Linings

Having braced the top, it's time to temporarily suspend my excitement and spend some time on the rims. For me, this is perhaps the least inspiring stage of construction and the reason I find it preferable to have a ready-made stock of head blocks, tail blocks and kerfed lining strips which I've prepared in batches over the preceding months.  With a supply of blocks and linings on hand, I can make short work of fitting them to the guitar's sides and move on quickly to more interesting tasks.

I laminate my tail blocks using three layers of wood, the middle layer of which has its grain oriented at right angles to the two outer layers, parallel with the grain of the sides. For the little additional effort involved, I can feel confident that the block will remain intact and a side crack will be avoided should the guitar ever be dropped on its end pin.

In the belief that setting modest targets fuels motivation and sustains momentum, I'm setting myself the goal of attaching the head and tail blocks and installing the kerfed linings in the week ahead.

Cheers
Pete

Friday, July 1, 2011

The Fingerstyle Guitar - Soundboard Voicing

Like many novice guitar builders I was inclined to overbuild my early guitars, the mortal fear of them imploding tending to override any suspicion that I was robbing them of their full tonal potential. It's been difficult to leave that mindset behind me, but with a conscious effort to "lighten up", and with the wisdom of more experienced luthiers in mind, I'm venturing further from my previous comfort zone with each guitar in an effort to increase their responsiveness. To that end, I've significantly reduced the mass of my soundboard braces, ever mindful of the delicate balance necessary between lightness and strength. Ironically, it's because of advice from those same sources that I'm inclined to leave the soundboard itself a little thicker than I may once have done.


John Mayes' "Advanced Voicing" DVD provided me with a way forward where carving the soundboard braces is concerned. Without a doubt, watching John shave and shape the soundboard braces then tap on the top to assess the changes he'd brought about has given me a much better insight into the process than I'd been able to gain through simply reading about other luthiers' methods in that regard. As John clearly demonstrates, judicious removal of small amounts of mass from one or more braces can make a big difference to the responsiveness of the soundboard.  It's still a somewhat mysterious and inexact science for me, but recent results suggest that I'm heading in the right direction at last.

There's some carving of brace ends and final finish sanding remaining, but essentially, the redwood top is as resonant as I can confidently make it without sacrificing necessary strength. Its pitch when tapped is significantly different to that of the Sitka spruce top I've recently brought to this level of completion and it will be interesting to compare the two guitars when they're strung up. For my own future reference, I intend to document each top's overall weight and brace dimensions as well as record their tap tones with a hand-held Zoom recorder, the thinking being that over time, as I complete more instruments, I'll be able to correlate these measurements with their sound when played.

Cheers
Pete

Postscript:  Since publishing this post yesterday, I've capped the "X" brace intersection with a small piece of spruce and the relative pitches of the two tops when tapped are now much closer.  It explains the startling difference I noticed yesterday and is a great demonstration of how this small addition can significantly increase the overall stiffness of the top.

Sunday, June 26, 2011

The Fingerstyle Guitar - Fun With Hide Glue


This has been my first attempt at using hot hide glue, and although there were some tense moments - including one abortive attempt at attaching the bridge plate - major disasters were averted.

Because hide glue begins to gel quite rapidly once it cools, it's important to apply it and have the piece being glued clamped in position before that happens. Before I glued each brace, I found it useful to have several practice runs without glue to establish the sequence of steps I'd follow and to make sure I knew in advance where and in what order I would position the "go-bar" clamps. Despite the benefit of those dry-runs, I wasn't able to remain cool, calm and collected at all times and I still managed to make a gooey mess on a couple of occasions.  Thankfully, of all the glues I've used, hide glue is by far the easiest to clean up. As I found out on my first attempt at gluing the bridge plate, the worst that can happen is that the soundboard, brace or bridge plate need to be cleaned of glue with a little warm water, ready for a second attempt when things have dried out. The advice I've read repeatedly - and with some relief - is that using hot hide glue gets easier with practice!

Cheers
Pete

Thursday, June 23, 2011

More Fun With Rosettes

After the recent experience of having several instruments under construction at once, I vowed I'd restrict myself to building one instrument at a time once they were completed. That promise was soon broken however, as evidenced by this East Indian rosewood/Sitka spruce guitar which I'm building alongside my claro walnut/redwood fingerstyle instrument.


Where the rosette is concerned, I decided to contrast the spruce top with a dark wood - again using a radial design. Macassar ebony seemed a natural choice, with a dash of red adding some zing to the combination.  Top, back and side purflings will extend this black/red theme.


Cheers
Pete

Sunday, June 19, 2011

The Fingerstyle Guitar - Installing the Rosette

I'd probably still be fitting abalone rosettes to my guitars but for the fact that the shell blanks are now unavailable from my usual U.S. sources.  Perhaps that's a good thing: the radial designs I've adopted make a welcome and attractive change - at least I think so!

Routing the rosette channel

Dremel rotary tools attract criticism from some quarters due to their questionable robustness (this one is my third), but when combined with one of Stew-Mac's soundhole jigs and their router base, they're well suited to the task and I'm able to achieve a near-perfect fit of the rosette and the adjoining purfling rings.  If there's a secret to success, it's in exercising patience and "sneaking up" on the final channel width in tiny increments, checking the fit of the rings after each cut until they slip into the channel with light pressure.

Dry-fitting the rosette and purfling rings

Once the rosette has been glued in place and allowed to dry, I feed the top through my drum sander until the rosette and the rings are at the same level as the top. I can easily check when I've arrived at that point by holding the top at an angle such that the the scratches left by the sander are clearly revealed against the light from the workshop door. I want to see continuous scratches along the full length and across the full width of the top, including the rosette.  Once that's achieved, I bring the top to the desired thickness using the drum sander to remove material only from its inner face.       


The zebrano rosette - glued and levelled


Click on any of the images for a closer look.

Cheers
Pete

Saturday, June 18, 2011

Guitars for Sale - Perhaps!

Either through ignorance, foolishness or a surplus of enthusiasm, I was only too keen to offer my early guitars for sale - thankfully, none of them have come back to haunt me! I've often wondered what became of the instruments I sold so many years ago, so it was with pleasant surprise that I received an email from a past "customer" who discovered this blog and decided to get in touch - thanks Laurence!  It was great to hear from him, but I was a little startled to hear of his continuing affection for the guitar I built him - now more than ten years ago - given the degree to which the quality of my guitars has improved over the intervening years and how those first few instruments must suffer - quite naturally - by comparison to more recent efforts.

Frequent "reality checks" in the years since I built Laurence's guitar have served to keep my feet on the ground and have convinced me of the wisdom of building instruments for my own use, or for friends and acquaintances free of charge.  It's a cautious approach that's allowed me to gather a much better array of jigs and tools and gradually improve my skills to a level comparable to other emerging builders.  If you've followed this blog over the past couple of years you'll know that improving the standard of my finishes has also been a major factor in my decision to prolong my self-imposed apprenticeship.


Perhaps the two guitars I've recently commenced herald a new era and will give me the renewed confidence - hopefully deserved this time - to offer my guitars for sale.  Both are modelled after Martin's iconic "Orchestra Model" (OM) series of instruments and feature combinations of East Indian Rosewood/Sitka Spruce and Claro Walnut/Redwood respectively.

If there's even a shred of truth in what's written about the tonal characteristics of the various wood species, the finished instruments will be worlds apart when they're eventually equipped to sing. Assuming I work on the instruments concurrently and complete them at the same time, I'll be well placed to make useful comparisons and judgements.

Cheers
Pete

Friday, June 17, 2011

The Fingerstyle Guitar - Progress Report #1

By necessity, progress on all of my instruments takes place in fits and starts and typically drags out over many months - or longer!  It's been especially difficult lately to find large chunks of time to devote to guitar building, although I can't complain too loudly: one of the reasons has been a leisurely three-week trip exploring Australia's east coast between Melbourne and Sydney - a long-awaited and enjoyable break from the normal routine.


Diversions and distractions aside, I have managed to spend some time on the claro walnut/redwood guitar I discussed in a recent post.  The back is complete, the sides are bent and, after stealing a few hours away from my day job through the week, I've managed to join the halves of the redwood top and fabricate a zebrawood rosette.  If all goes to plan, I'll inlay the rosette and thickness the top over the coming weekend.  The really fun part - bracing and tuning the soundboard - will follow.

Cheers
Pete

Wednesday, June 15, 2011

Hot Hide Glue

In an effort to find out first hand why so many luthiers favour the use of hot hide glue when modern alternatives are so readily available, I've finally ordered (and received!) some high clarity 192 gram-strength hide glue granules from the U.S.  I'm sure my Titebond, epoxy and superglue will remain indispensable for many tasks, but I'm keen to introduce this most ancient of glue types into my building process, particularly when it comes to attaching braces to instrument soundboards and backs.


My initial order was intercepted by Australia's occasionally-vigilant quarantine service and ultimately destroyed by them (despite my protestations), but it seems they were distracted by other matters while my second order was entering the country.  I'd be feeling a little guilty right now for having circumvented our quarantine laws, except for the fact that other Australian builders report that their shipments are routinely inspected by quarantine personnel before being sealed up and sent on their way without a fuss. If one-pound packages of hide glue posed any real threat to national security I'm sure they would be confiscated on a more consistent basis!

It's been a long time since I've had any need for a baby bottle warmer; the cheap model pictured will see out its days as a handy glue pot.

Some useful links:
Frank Ford - Using Hide Glue
Luthier's Mercantile - Granular Hide Glue
Wikipedia - Animal Glue


Cheers
Pete

Friday, June 3, 2011

The Fingerstyle Guitar - Prototype #1

Not so long ago, I started a thread on the Acoustic Guitar Forum seeking opinions as to the ultimate fingerstyle guitar with respect to design features and materials; there were some interesting and very informative responses. I have to concede that in the past I've erred in seeking out construction tips from other builders to the exclusion of the views of the people who really matter - the players! It seems to me that the Acoustic Guitar Forum is frequented more by guitar players than by guitar builders, so the opinions offered were particularly illuminating. With the benefit of that feedback, I'm setting out to build the best fingerstyle guitar I possibly can within my own limitations and accepting of course that opinions as to what such an instrument might look and sound like will vary markedly.

Perhaps it's my own slightly flawed tendency to focus on the visual aspects of the guitar which made some suggestions stand out from the pack, but within the comments I received I noted an emphasis on the ergonomics of the instrument I was proposing. As well as responsiveness and lightness, a slightly wider string spacing at the bridge and a wider nut stood out as worthwhile features on a guitar destined as a fingerstyle instrument.  Depending on how adventurous I'm feeling, I may attempt an arm bevel for the first time too.

Where wood choices are concerned, I sense a preference for the responsiveness and warmth of cedar or redwood soundboards, while for back and sides, walnut seems a popular choice, perhaps because its higher damping and tendency towards shorter sustain results in greater clarity and separation of notes when in the hands of a fingerstyle player. That being my summation of the opinions offered, I'm opting for a combination of claro walnut and redwood together with the wider string spacings generally preferred by those who responded.  I'm favouring my take on the ubiquitous Martin OM body shape together with that model's 25.4" scale length. 

I hope you'll join me as I begin my quest for the "ultimate" fingerstyle guitar. If the outcome is anything less than brilliant, I can always laugh the offending instrument off as "a prototype" in an attempt to salvage some self-respect!

Cheers
Pete

Thursday, April 21, 2011

A Belated Gift


If first impressions count for anything, there are a lot of things to like about this guitar which I strung up for the first time last weekend.  I'll let it settle for a while before I make final nut, saddle and action adjustments, but even in its current incomplete state I'm able to play it and assess its tonal potential. I look forward to enjoying the full experience - however briefly - before I deliver it to its new owner.


There were more than my usual number of blunders along the way and I'm still refining my finishing technique, but overall I'm pleased with the outcome.  The minor cosmetic flaws are disappointing, but after riding out the obligatory post-build period of self-recrimination, I'm now able to look beyond them and enjoy the fact that the sound of this guitar surpasses anything I've built previously.  My hope is that where bracing and tuning of the soundboard is concerned, what I've achieved with this guitar signals a permanent leap to the next level.


The guitar is a gift to a very patient musician friend in Melbourne. Maurice is an old rocker with a soft spot for Marshall stacks and Gibson Les Pauls, however, I hold out some faint hope that he'll be impressed enough with this guitar to suppress his natural tendencies and learn some more subdued acoustic pieces. The message will be clear when I present it to him: if he's inclined to mount a humbucker in the soundhole and plug into a wall of Marshalls, I'd rather not know about it!


Soundboard: Engelmann spruce
Back and sides: East Indian rosewood
Neck: Queensland maple
Fretboard and bridge: ebony
Bindings and trim: koa
Rosette and fretboard inlay: green abalone
Tuners: Schaller mini
Fretwire: Gold "Evo"

Cheers
Pete

Monday, April 4, 2011

It's All About the Music!

As a would-be luthier, it's easy to lose sight of the fact that the guitar is a means to an end rather than an end in itself, and that as a builder of musical instruments, the role I play is to facilitate the making of music. Accepting that I gain immense enjoyment from my contribution to the process and that my efforts are worthwhile in their own right - at least at a personal level - ultimately it's the musician who (hopefully!) creates the real magic.


I was privileged to experience some of that magic on Friday night when Tony McManus was in town.  While I don't hold out much hope of ever having my guitars in the hands of the likes of Tony McManus, seeing a player of his calibre play in person strengthens my resolve to build the best guitars I possibly can in the hope that I can contribute in some small way to the creation of beautiful music.

Coincidentally, it was at this same venue that I watched the owner of my one and only commission so far - a 12-fret 000 - put his new guitar through its paces.  That was some years and several guitars ago, but the experience lives on in my memory as the highlight of my guitar building "career" to date.  Perhaps, one day, I'll have the opportunity to repeat it!


Cheers
Pete  

Sunday, March 27, 2011

Hand Tools: Out With the Old, In With the New

I've known for a long time that guitar building will be an activity I'll pursue until failing eyesight, a wayward bus or the grim reaper himself finally put an end to my efforts. Despite that certainty, I've always had great difficulty parting with my hard-earned cash to build a collection of high quality hand tools - second-hand shops and flea markets have been the source of many of them until recently.


I've justified my tight-fisted attitude by reasoning that spending five times as much on a decent hand plane, for example, would be unlikely to result in a corresponding five-fold improvement in the standard of my instruments. While there's still truth in that argument at a superficial level, thinking a little more deeply on the subject leads me to conclude that there are other more subtle benefits to owning quality tools beyond their ability to perform their intended function so much more effectively than the poor substitutes I've made do with in the past. 

In fact, finally clicking the "Buy Now" button on a set of LMI's chisels and a couple of Veritas hand planes - a low-angle jack plane and a #4 smoother - has been beneficial on many levels.  The simple fact that my chisels and planes are now of a much higher quality has instilled a sense of pride in their ownership - a new and pleasurable experience!  That in turn has added to my enjoyment of the job at hand which in itself can only have a positive effect on the standard of my work.  I might also add that acquiring quality tools and experiencing the warm glow their ownership brings has provided the incentive to develop a much more disciplined approach where sharpening is concerned - I've been pretty lazy in the past on that score.

When I'm about to undertake a task demanding the utmost care and attention to detail, I find that clearing my workbench of its usual accumulation of tools and firing up the shop vacuum seems to unclutter my mind as well as my immediate work area; I seem better able to concentrate and my chances of success with whatever task I'm about to begin seem vastly improved as a result.  I'm finding that the joy of using a well-tuned, good quality plane or a sharp, finely made chisel is having a similarly positive effect on my attitude and ability to focus.  Any doubts I might have had brought about by the not-insignificant cost - including the predictably horrendous shipping charges from the U.S. and Canada - are fading rapidly.  Besides (I tell myself!) my amateur status shouldn't stand in the way of my pursuit of professional results.

If there's a downside to all this - other than the hit my wallet has taken of late - it's that I can no longer blame poor quality tools for any work I judge to be less than perfect!

Cheers
Pete

Friday, March 4, 2011

Claro Walnut - a Musical Thud

After joining and thicknessing this walnut back set it was difficult to muster enthusiasm when assessing its resonant qualities, however, the attachment of braces has elevated the response when tapped to a more pleasing musical thud!

Unlike the much-prized rosewood species, claro walnut isn't known for its ringing glassy tap-tone, but with this guitar destined for a fingerstyle player, that's not necessarily a desirable trait anyway. When discussing fingerstyle guitars, popular opinion seems to be that each note should do its thing then get out of the way relatively quickly to make way for those to follow. With a relatively high damping factor, claro walnut supposedly satisfies that requirement well by limiting sustain - or at least not contributing further to it. It's also said to impart little of its own sonic flavour to the completed instrument leaving the top to produce it's signature sound unhindered.

Paired with the tonal warmth and richness characteristic of a redwood top, I'm hopeful that the guitar this back is destined for will be as successful as my previous claro walnut/Engelmann spruce instruments.

Cheers
Pete

Sunday, February 20, 2011

Slow and Steady Wins the Race!

I often rue the fact that I have insufficient time to spend on my hobbies, but the picture below suggests otherwise.  The secret seems to be in looking ahead, determining as best as I can what spare time I might have on my hands and planning in advance how best to make use of it.
   

The back and soundboard halves were joined and thicknessed on separate days some weeks ago, while the braces, bridge patch, cross-grain back reinforcement and headblock have been laying around in readiness having been prepared in short bursts of activity over the past few months.

With higher humidity on several days over the last two weeks, the dehumidifier in the spare room has been running continuously and I've been able to maintain a relative humidity of around 45% - ideal for gluing braces to the soundboard and back.  The temperature in my workshop has been bearable too, and the neck I began yesterday reached its current state of completion this afternoon.  I'm on a roll!

Cheers
Pete

Sunday, February 13, 2011

Voicing the Top - Intuition and Technology

Shaving the soundboard braces to bring out the guitar's tonal potential is one of the more intuitive and mysterious aspects of guitar construction.  For me, it's also one of the more tactile and enjoyable stages when the use of hand tools is mandatory and the senses come strongly into play.  A cycle of tapping, flexing and brace shaving is involved, with a somewhat nebulous goal in mind despite having read everything I can on the subject!


Unfortunately, my hobby builder status dictates that it's often many months after voicing a top then going on to complete and evaluate the instrument before I'm able to repeat the exercise - hardly an ideal situation in terms of being able to build any sort of muscle memory or draw meaningful conclusions. The pertinent questions whose answers seem elusive in terms of being able to adequately articulate them are:
  • What did the top feel like as I flexed it, i.e., how much resistance was there when bending it across the grain and with the grain?
  • How did the top ring as I tapped it and how was the response influenced by the way the top was held or suspended and where it was tapped?
  • What was the correlation between those very subjective assessments and the success of the completed instrument from a tonal perspective?  
  • To what extent did the materials, density and stiffness of the guitar's other components combine with those of the top and contribute to the outcome?
As I review that list of questions, it strikes me that the challenges they pose seem almost insurmountable.  It's obvious that relying on my memory from one instrument to the next isn't a satisfactory approach given the subjective nature of the assessments involved and how infrequently I'm able to repeat this part of the process.

Perhaps the use of technology offers a way forward and can lend a degree of objectivity to what would otherwise be limited to some vague, transient sensory experience. Measuring top deflection both parallel to and across the grain prior to gluing the braces, photographing the top bracing and noting brace heights, recording tap tones with a decent microphone (or perhaps one of the hand-held Zoom recorders) or even videoing myself as I hold the top and tap it seem likely candidates as I seek to minimise the guesswork involved in the voicing process and develop a baseline for subsequent instruments.  Or perhaps I should learn to trust my senses and develop a greater appreciation for the delightful uncertainties inherent in wooden instrument construction!

Cheers
Pete

Friday, February 11, 2011

Glue Clean Up

With the advent of the soundport, the standard of workmanship inside the guitar body is more easily scrutinized and there's perhaps an even greater incentive to clean up surplus glue as the various component parts are assembled - not that I've neglected this previously. If some vintage instruments can be taken as a guide, it seems this wasn't always a priority, even for well-respected manufacturers. Times change though, and as I inspected a new Martin in a local music shop not long ago, I must say I was impressed by the meticulous attention to detail within the guitar body including the fact that all traces of excess glue had been carefully removed from the intersection of the back plate with the linings and back braces. I vowed then and there to emulate this in my own instruments to the best of my ability in recognition of the fact that it's often the little things that make a big impression.


There are several approaches to cleaning up excess glue once clamping pressure is applied to a freshly-glued joint. Regardless of the method used, I always try to plan ahead and give some thought to the arrangement of clamps to ensure unhindered access to glue squeeze-out after they're in place. I'm also careful not to apply an excessive amount of glue in the first place. A 1-inch foam roller is helpful in that regard, with the added advantage that an even coverage of glue is more quickly and easily achieved.

I know that the preferred approach for many builders, whichever glue is used, is to leave glue squeeze-out undisturbed, letting it partially set or gel before attempting to remove the excess. I use Titebond for the majority of gluing tasks, and find that a flattened plastic drinking straw with the end cut at something like a 45 degree angle is a good first step towards removing unwanted glue as soon as clamps are in place. This approach works particularly well when gluing braces to the soundboard or back. The straw is pushed cut-end-first along the freshly-glued joint and much of the surplus glue finds its way inside the straw which is then discarded. It helps of course to have several pre-prepared sections of drinking straw on hand.  Chisel-shaped slivers of spruce or cedar, moistened Q-Tips (cotton buds or ear buds) or a moistened sponge can also be useful as a follow-up and, using a combination of these methods, it's usually possible to remove every last vestige of excess glue without compromising the joint itself.


When gluing braces to the back and soundboard, I exercise patience and generally glue one - or perhaps two - braces at a time. Not only does this slow and steady approach give me ample time to clean up after myself, but I have the luxury of a clear view and unobstructed access to squeeze-out.

Another strategy which contributes to a clean look inside the guitar body is to attach the rim assembly to the back first, rather than to the top. I find it helpful to have a second chance to tidy things up before the top is attached and while the various nooks and crannies which will remain visible after final assembly are still easily accessible.

Cheers
Pete

Tuesday, February 1, 2011

Two Rosettes

The finished rosettes:


I'm pretty happy with them both, and they provide an attractive alternative to my more usual abalone rosettes.

Click on the image for a better view.

Cheers
Pete

What's In a Name?

The back and sides of this guitar are of narra, which is an alternative name for a wood that's most often marketed here in Australia as ...