Showing posts with label Binding and purfling. Show all posts

Monday, January 19, 2015

Binding and End Graft Preparation

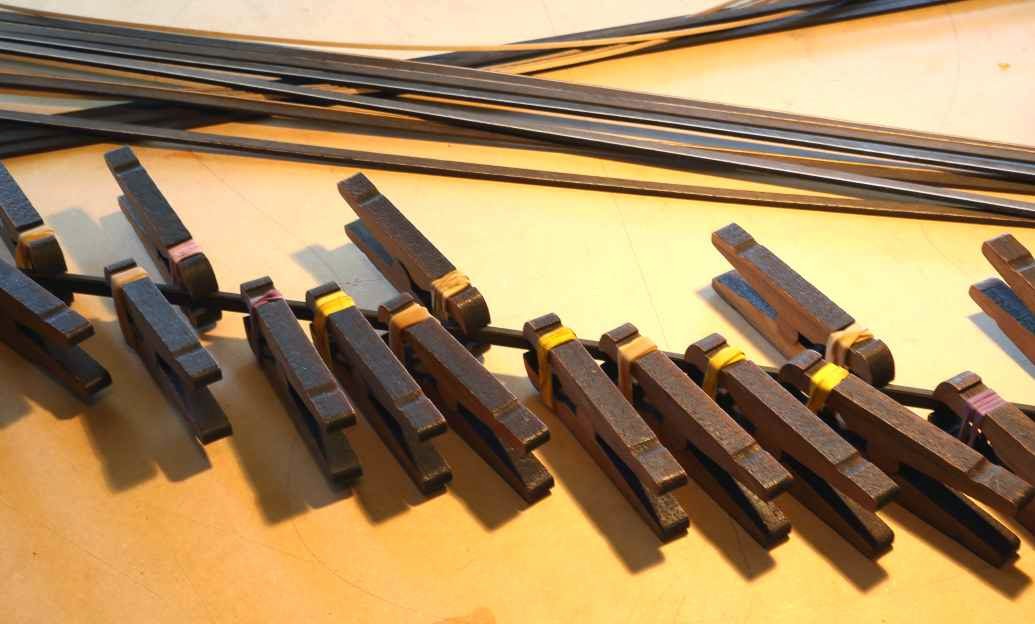
I attach the black and white side purfling strips to the ebony bindings with Titebond 3, a glue that's much more resistant to heat and moisture than the regular Titebond I rely on for so many other guitar-building tasks. The clamps I use when gluing kerfed linings to the sides come in handy for this task too. If only I owned enough to prepare more than one binding strip at a time - tedious! Once the glue is dry, I scrape off any beads of glue and level areas where the edge of the purfling stands proud of the ebony bindings.


Ebony can be stubborn to bend and prone to breakage, particularly if there's run-out present in the binding strips; I always take the pessimistic approach and bend a few spares. In an effort to minimise breakages, I spray them with Super-Soft veneer softener the day prior to bending, and heat the bending blanket to a higher temperature than I'd use for more compliant woods. Although a little spring-back isn't the end of the world where bindings are concerned, I run them through two cycles of heating and cooling to help set the all-important waist bend. On this particular batch of 12 binding strips, I'm pleased to report that all 12 survived intact.


The use of ebony bindings might pose some difficulties in terns of bending, but it does at least provide some latitude when it comes to preparing close fitting joints. I do my utmost to achieve perfection, but usually miss the mark to a greater or lesser degree; fortunately, imperfections are easily disguised with ebony dust and a drop of thin CA glue.

A short length of binding to which I've glued and mitered a piece of purfling is a useful aid when it comes to fitting the end graft. I carefully trim the ends of the end graft using a disc sander, frequently using the binding fragment as a substitute for the actual bindings as a means of checking progress as I sneak up on the final length. Only when I'm completely happy with the fit do I glue and tape the end graft into place. I know many builders trim the graft and miter its corners after it's glued in place but, as much as I'd prefer to avoid the situation, I like having the option of discarding a poorly prepared graft before I've committed glue to it. With the end graft successfully sized and glued in place, I can remove the appropriate length of side purfling from the actual binding strips, then miter the purfling ends to achieve a tight fit where they butt up to the end graft corners.


The point at which the bindings meet at the tail of the instrument is most commonly dealt with by simply butting the ends of the bindings together, but I find I'm more likely to achieve an invisible joint by introducing a matching 45 degree bevel to the end of each piece - commonly known as a scarf joint. The scarf joint is cut in such a way that the end of the binding glued on second wedges tightly under the end of the first. I treat the purflings in the same way. At their full length, the purfling strips extend well past the end graft, so I leave them intact and the location of the scarf joint therefore ends up somewhere other than the half-way point. It's perhaps because the joints aren't where you would expect to find them that they seem much more difficult to detect.

In the interests of achieving a snug fit when it comes time to install the bindings, I find it's helpful to have filed or sanded a facet onto their inner corners. I do the same to the top outer corner of the binding so that the filament tape I use to secure the binding as it's glued isn't cut by the sharp outer edge when force is applied to the tape. To avoid an ugly gap, I'm careful not to round over the top outer binding edge where it will intersect with the fretboard edge. With this in mind, I round over the binding edge in this area with the neck temporarily attached.

On the guitar pictured, which has a florentine cutaway, the curvature of the plates - the back in particular - is such that the sections of binding destined for the cutaway must curve in two dimensions. To achieve a neat, gap-free fit here, I've taken inspiration from the Ervin Somogyi book and fabricated two lengths of binding - one for the top, and one for the back - that have the necessary compound curvature.

To prepare them, I held a piece of stiff card against the inner surface of the cutaway and ran a pencil around the perimeter of the top and back plates; the resulting pencil lines described the curvature I needed to introduce into my ebony strips prior to bending them to match the shape of the cutaway. To make things easier on subsequent guitars, I've prepared a piece of 6mm MDF whose opposing edges conform to these curves. With an ebony headplate attached to the MDF template, a flush-trim router bit gives me a clean edge that's guaranteed to conform to the floor of the binding channels without the need to apply force that would distort the strips and cause gaps between the binding and the adjacent purfling.


Despite the fact that I sprayed the the first pair of strips with Super-Soft and left them to dry overnight, my attempt at bending them to conform to the curvature of the cutaway failed; evidently there was some run-out in my ebony stock, and both strips broke before I'd managed to make much headway. Plan B involved preparing four curved strips - two for the top and two for the back - again using the template pictured. I glued purfling to the edge of one of each of the pairs then, with the help of my drum sander, sanded all of the strips to a thickness representing a fraction more than half the width of the binding channels.


At a thickness of just over 1 millimetre, they bent easily even without the use of Super-Soft, and I was able to laminate the bent pieces to form the two full-width binding sections required. The ebony I used was perfectly black, and the fact that the strips are comprised of two layers will be undetectable once a finish is applied.


Perhaps an overlooked component of binding preparation is the mental aspect. Along with many other (most?) guitar builders, I don't particularly enjoy the task of binding a guitar, and I delay each step until I feel I'm a state of mind conducive to producing a good result. Fabricating and fitting the bindings to the point of the cutaway, for example, requires great patience and precision, and I make sure I'm relaxed but alert before I tackle the job.

Please feel free to offer suggestions and comments - the learning never ceases!


Useful links:
Super-Soft 2
Kerfing Clamps

Cheers
Pete

Thursday, December 18, 2014

Binding Complete - Well, Almost.

With spare time in short supply, any progress I do manage to make seems significant. The cutaway is not yet bound, and there's plenty of scraping and sanding to do but - what the heck - here's where I'm at!


East Indian Rosewood/European Spruce Modified OM
My Claro Walnut/Port Orford Cedar Modified OM is at a similar state of completion and, with another guitar in the form of a Claro Walnut/Redwood OM ready for spraying, I hope to have my compressor and spray gun working overtime very soon.

Cheers
Pete

Sunday, September 21, 2014

More Headstock Binding

Preparing the strips of ebony binding for the headstock can be accomplished gradually in spare moments through the working week, with the more time-consuming task of routing the binding channels, then mitering and installing the strips reserved for a more concerted effort over a weekend. I could probably find time to fire up the laminate trimmer and disc sander on a weeknight, but in a residential setting with neighbours living on either side I figure I'd be pushing my luck. In the interests of suburban harmony, it's probably a wise policy not to disturb them. Note to self: find a quieter shop-vac!

A long-term plan involves leaving the city behind, one of the benefits being that I'll be able to use power tools with far less regard for the noise they generate, comfortable in the knowledge that I'll only be disturbing the local bushland creatures and my patient partner Sandi. Oh, and our chickens of course!


As I described in an earlier post, I find that the tight curve at the extremity of the headstock is best dealt with by thinning the ebony strips to half the required width, then bending them to shape on the bending iron and laminating them into a single full-width piece, with a maple veneer added to what will be the inner surface. Once they're glued in place, it takes a very close inspection to establish that I've used two layers of ebony. Under finish, I'm confident that it will be undetectable.

This is one of many painstaking stages in the construction process, with fabrication of the curved binding strips, then accurate mitering and gluing of each piece adding the best part of a day to the build process, acknowledging that if I was better organised I could be attending to other tasks while I wait for glue to dry. Despite the additional work involved, this treatment of the headstock brings me great satisfaction, assuming of course that everything goes to plan and I'm happy with my workmanship. When I tire of the process, I remind myself that it undoubtedly contributes greatly to the overall aesthetic appeal of the finished instrument. It's just as well I don't build guitars for financial reward however.

Cheers
Pete

Tuesday, February 18, 2014

Fretboard Binding

Gluing the purfling to the binding before it's attached to the fretboard edge seemed to be the most logical approach when I began binding my fretboards, but I found it a challenge to accurately align the lower edge of the purfling with the underside of the board, no matter how careful I was when gluing and clamping it in place.

I managed to achieve acceptable results on the first couple of bound fretboards, but was uncomfortable with the process and felt there must be a better way. After dwelling on the problem off and on for a while, it occurred to me that I could just glue the binding on first - sans purfling - without fussing too much about aligning its lower edge exactly.

To solve the problem, I've knocked together what could best be described as a mini router table. With my laminate trimmer clamped in position from below, and a makeshift fence in place, I make some test cuts on scrap, adjusting the trimmer so that the rebate cut by the router bit will be the exact depth of the purfling strip. The width of the rebate isn't quite as critical, as long as it's less than or equal to the width of the purfling - any overhang can be trimmed off later.


Having set up the trimmer and fence, it's a simple matter of running the bound fretboard along the fence to accurately form the rebate for the purfling. The curved sections at the soundhole end of the board deserve some special treatment, but they're easily addressed using a similar approach.


All that remains is to glue the purfling strips into the rebate, with help from the same clamps used to glue kerfed linings strips in place. The purfling at the soundhole end of the fretboard is mitred to achieve a neat look.


I'm sure there are other equally effective methods, but this one works for me!

Cheers
Pete

Thursday, January 9, 2014

Headstock Binding Completed

Given the effort involved in binding a guitar headstock, I'm curious as to the upcharge a professional builder might reasonably apply, and whether a fee acceptable to the buyer could adequately compensate the builder!

Not only does my chosen headstock shape dictate that one of the sections of binding must conform to the tight curve at the extremity of the headstock, but mitering the individual binding pieces prior to gluing requires painstaking attention to detail. I know many builders cut these miters in-situ with a sharp chisel, but for better or worse, I choose to use my disc sander to do so prior to gluing them in place. As they're fitted dry in the first instance, I have the luxury of being able to discard any pieces whose miters don't meet my standards, with the need to start all over again acting as a strong incentive to get them right on the first attempt! With a light touch, and a patient approach that involves constantly checking for an exact fit, I'm able to produce tight fitting miters using this method.

Before I can think about mitres, however, I need to prepare the sections of ebony strip. The first step is to glue a black/natural purfling to one edge of the binding. I do so with the help of the clamps normally reserved for gluing kerfed linings, as the photo below shows. For the straight sections of binding, regular Titebond is adequate, but for those sections that will be bent into a curve - excluding the piece that fits the tightest curve and is treated differently - I like to use Titebond III, which is better able to withstand the heat involved in shaping the strips on my bending iron. Unless a piece of ebony is particularly reluctant to bend, I find they can usually be coaxed into shape without the use of water.

Gluing the black dyed and natural maple(?) purfling to the binding edge.

Maple veneer glued to what will become the inner face of the bindings.

Test fitting the first of the mitred corners, minus glue.

It goes without saying that accurately positioning the binding pieces as they're glued and taped into position, then tightly butting up the adjoining piece as it in turn is glued, contributes to an acceptable outcome. Call me strange, but when carrying out tasks like this that demand my close attention, I find that tidying up my work space before I begin unclutters my mind as well as my workbench - the Zen of guitar building in action perhaps!

One concession I make these days is to acknowledge that the tightly curved section can more easily be fabricated from two thin pieces of ebony rather than a single full width piece. As anyone who has attempted to bend ebony into a tight curve on a bending iron can attest, this makes life a lot easier. Once glued, scraped and sanded, it's almost impossible to detect that this section of binding has been laminated. To begin with, I run two pieces of ebony binding through the drum sander until they're half the desired binding width. The pieces can then be bent on the bending iron until they conform to the curve without the need to be forced into position. Once I'm happy with the fit, I laminate the two pieces of ebony, adding a layer of maple veneer to what will be the inner face as I do so.

Because this section of binding is fabricated from two layers of ebony, it's not possible to edge the piece with a strip of black and white purfling prior to bending as I did for the other pieces. Instead, I wait for the glue to dry, then clean up and glue one of the edges to a piece of black and white veneer sheet that has been prepared earlier. Once the glue has dried, the surplus veneer is trimmed from the inner and outer faces of the ebony strip, duplicating the look of the other binding pieces.

Completed headstock

Cheers
Pete 

Sunday, December 29, 2013

Preparing the Headstock for Binding

I tell myself with each guitar I make that I'd save myself a lot of trouble if I left my headstocks unbound. Nevertheless, despite the fact that many of the top makers choose to omit this feature, and still manage to produce the kind of elegant, beautifully appointed instruments I aspire to build, the Macassar Ebony headstock overlay on my latest guitar was always destined to be bound in ebony, with a thin maple line inboard of the binding for the sake of contrast. Were I building guitars commercially, there would surely be an added incentive to leave the edge of the headstock overlay unadorned, perhaps offering the bound look only as an option - for an appropriate upcharge of course!

An earlier guitar featuring a bound headstock 
I use a laminate trimmer to cut the ledge for the binding. I select the appropriate bearing and make a test cut on a piece of scrap to confirm that the resulting rebate will match the width of my ebony bindings, with additional allowance for the maple veneer. Having done so, I adjust the depth of cut so that my first circuit of the headstock will cut the ledge just shy of the full depth required. My ancient Hitachi laminate trimmer isn't renowned for ease of vertical adjustment, so I repeat the process, increasing the depth of cut in tiny increments until the bit barely removes the last of the headstock material on the bottom of the ledge.

Routing the binding rebate
It's imperative when routing the ledge that I think carefully about the grain direction of the headstock overlay and the router bit's direction of rotation, with the potential for chipping and tearout always in mind. Proceeding carefully, I can climb-cut the most susceptible areas and end up with a clean, chip-free binding ledge.

The completed binding rebate.
I'll describe the fiddly process of preparing the individual binding pieces in my next post.

Cheers
Pete

Wednesday, May 22, 2013

From Ugly Duckling to Beautiful Swan

There's still a long way to go with this guitar, but the full effect of the black and red theme is beginning to emerge now that the top bindings are in place. As gradual as the process is, I'm pleased to be leaving the "ugly duckling" stage behind at last.


More soon!

Cheers
Pete

Saturday, May 18, 2013

The Black and Red Guitar

I've been working on this East Indian Rosewood/Sitka Spruce OM at more or less the same pace as I have the Claro Walnut/Redwood guitar featured in recent posts, but progress has fallen behind a little in recent weeks as I've focussed my attention on preparing the Walnut/Redwood guitar for finishing.

While I wait patiently for a trio of fine days suitable for spraying, it's a good opportunity to catch up a little where this black and red OM is concerned. The purfling has been in place for a week or two, and with the end wedge now installed, I've begun the process of gluing the ebony bindings in place. It's not a task I particularly look forward to, which hints at the fact that I'm yet to feel I've attained any level of mastery over this particular aspect of guitar construction.


It will certainly be intriguing to assess the two guitars' responsiveness and tonal characteristics individually, but I'll be especially interested to make comparisons between them. Shaping of the soundboard braces on both guitars was completed at around the same time, the end result being what I perceived to be similarly responsive tops once I'd concluded the cycle of brace shaving, tapping and flexing. If popular wisdom proves to be well founded, the wood species used in these guitars will have a significant influence on the sound I'm ultimately able to coax out of them, and they'll show themselves to be very different from one another, tonally speaking. On the other hand, my assessment could lend weight to the theory that the sound of an instrument reflects the builder's individual style and methods as much as it does the materials used in its construction, in which case their tonal differences might be more difficult to detect. Whatever the result, and for the first time ever, I can confidently predict that I'll be able to share sound files and/or videos with you here on this blog. Eventually, that is!


Cheers
Pete

Saturday, January 19, 2013

Mitre Madness!

With the aid of lutherie's most underappreciated item of machinery, the disk sander, I've been preparing binding mitres and have almost finished these fingerboards and headstocks. 


Should I ever find myself building guitars for profit, bound fretboards and headstocks will definitely be an optional extra, priced accordingly. The rewards are great, but there's a lot of additional work involved.

Cheers
Pete

Saturday, December 22, 2012

Pore Filling With Epoxy

After installing purflings and bindings, it's very rewarding to scrape them level, carefully round over the edges, then sand the top, back and sides in readiness for the first steps in the finishing process. It feels like the end of a journey while at the same time signifying the beginning of another equally challenging one.


With final sanding on this guitar complete, I've taken the first steps towards pore-filling the back and sides with epoxy, a process that finally reveals the true beauty of the wood. As a hobby builder, many months have inevitably elapsed before I get to this stage, but the rewards make the effort and the wait worthwhile. Along with stringing a completed guitar up for the first time, seeing the figure and colour of the wood magically appear as the first coat of epoxy is applied is surely one of the highlights of the building process.

On a cautionary note, a problem with some epoxies is that of amine blush, a waxy residue that forms as the epoxy cures that can interfere with adhesion and curing of subsequent top coats. From what I've read on the topic, spending a little more on a good quality epoxy is worth considering as they're less likely to be susceptible to blushing. Whichever product you choose, once the epoxy has fully cured a thorough rub down with a damp cloth - or, better still, one dampened with a 50/50 mixture of water and denatured alcohol - is a simple precaution that eliminates potential problems. There's wisdom too in avoiding the application of epoxy when the ambient temperature is falling and relative humidity is therefore likely to be rising - conditions said to exacerbate blushing.

Sunday, June 24, 2012

Preparing Bindings and Purflings

When it came to preparing purflings for two of the guitars I'm currently building, the first step was to laminate veneer sheets into a black/white/mahogany/white/black sandwich. Rather than the black-dyed maple I used as the outer veneers when preparing an earlier batch of strips, I substituted black fibre sheet (sometimes called fish paper) this time to minimise the risk of deformation or splitting when the strips are bent to fit the purfling channels; the last time around, some of the black maple veneers collapsed slightly in the area of the waist and had to be discarded.


The brayer pictured above is a tool commonly used by printmakers - I sourced mine from a local art supplies store. It's the ideal tool to quickly and evenly spread glue when laying up the veneer sandwich. Titebond III is a glue well suited to this task; it's relatively heat and moisture resistant and the layers of veneer are less inclined to de-laminate when the strips are moistened and bent to shape.

With a small circular saw mounted under my table-saw bench and equipped with one of Stewart-MacDonald's fret slotting blades, I switched the saw on and raised it slowly, cutting through a masonite sheet I'd clamped over the table until the blade was fractionally higher than the thickness of the veneer sandwich, at which point I locked the saw's adjusting lever. Feeding the veneer sandwich through this very fine blade minimised wastage and resulted in an extremely clean cut. I was quickly able to produce enough purfling strips for two guitars, with a couple of strips left over as spares in case of breakage or buckling.


Preparing purflings for the rosewood guitar was an even simpler exercise; they're a simple combination of one black and one red veneer strip - thin enough that strips could be cut from the veneer sheet using a steel rule and a craft knife and pliable enough that pre-bending the strips is unnecessary.

Where the bindings are concerned, I chose to glue contrasting veneers to the edges of the binding strips - again using Titebond III - prior to bending them. Ebony bindings can be a pain to bend so I took the precaution of spraying them lightly with SuperSoft 2 veneer softener the day before I bent them - the softener plasticises the wood strips somewhat, reducing the chance of breakage. Taking care to arrange them into matched pairs, I taped the strips together, misted them with distilled water then wrapped the assembly of strips in brown paper and aluminium foil and bent them in my Fox bender. I began cranking down the press screw at the waist when the thermometer reached 240F and, when I'd bent the upper and lower bouts and applied full tension at the waist, let the heating blanket climb to 310F where I let it sit for a further 5 minutes. I switched the blanket off and removed the binding strips when the machine had cooled to room temperature.


Despite the fact that I'm currently working full time and distracted by those unpleasant but unavoidable weekend chores, I'm setting myself modest targets every week and making steady progress. Installing these purflings and bindings on the three guitar bodies is my next task.

Cheers
Pete

What's In a Name?

The back and sides of this guitar are of narra, which is an alternative name for a wood that's most often marketed here in Australia as ...