Showing posts with label Finishing. Show all posts

Saturday, May 27, 2023

Winter Is Coming!

As I immersed myself in the task of designing my workshop a few years ago, I looked into the possibility of dedicating a corner of the building to a spray booth. As inviting as the idea was, I was discouraged by the prospective cost of the necessary explosion-proof extraction fan and lights and abandoned the idea. I'm left with Plan B, which is to erect a temporary insect-proof enclosure in a sheltered area of our property which, unfortunately, limits my ability to spray through the winter months when daytime temperatures are typically in single digits and high humidity is problematic.


I came close recently to buying fresh supplies of lacquer and thinners in readiness for spraying this crop of guitar bodies; however, although there are still stretches of fine weather, they are unreliable and increasingly uncommon. As keen as I am to complete some guitars, I've come to accept that I've probably left my run too late.

I'm impatient and more than a little frustrated, but I'm sure I'll find plenty to occupy me through our winter months. Obviously, I'm looking forward to spring when I'll finally be able to string up some guitars!


Cheers

Pete

Thursday, January 19, 2023

A Finishing Problem Solved

I had the use of an unoccupied shop here in town for a few months in 2016 and was able to work on some instruments there until the owner asked that I vacate so he could begin renovations. I had recently sprayed lacquer on three guitar bodies and their necks at the time, and they hung inside a cupboard with a computer fan porting the fumes to the exterior of the building for a few weeks while I got on with other things. When it finally came time to pack up and move out, I placed the guitar bodies and necks in some cheap new cases, comfortable in the knowledge that they’d be protected throughout the move and beyond.

From that point on, construction of my workshop became a priority that occupied me for more than three years. When the dust had settled and I was ready to complete those guitars, I found that dye from the lining of the guitar cases had penetrated the lacquer on the soundboards to an unknown degree, although I figured it was likely that the staining extended to a significant depth. I pondered how best to remedy the situation for some time, often practicing avoidance behaviour for months at a time as I moved ahead with new instruments.


Scraping and sanding the lacquer off the soundboards and respraying was one option, but I worried that merging new lacquer into old may have given less than optimal results; I’d used a pre-catalysed lacquer that supposedly doesn’t melt into previous coats as effectively as nitrocellulose.

The alternative was to use a chemical stripper over the entire body which would essentially take me back to square one in the finishing process. The degree to which I’d be successful in neutralising the stripper before I applied new sealer and top coats gave me cause for concern though.

After weighing up the advice kindly offered by a couple of Facebook friends, I decided to strip the finish from the bodies entirely. While acetone softened the finish to the extent that it was at least sticky and could be removed with difficulty using steel wool or a single edged razor, it was a painfully slow process, and I concluded that removing all of the lacquer in this way was far too onerous a task. I opted for regular paint stripper which proved very effective in softening the lacquer, allowing it to be easily scraped off. I was careful to remove all traces of the stripper using generous quantities of denatured alcohol, and I'm ready - once again - to pore fill in readiness for spraying.


As I began work on these guitars up to twelve years ago, you'll no doubt appreciate how keen I am to complete them and resume work on other instruments I've commenced more recently.


Cheers

Pete

Sunday, March 29, 2015

Positioning the Bridge

There are several handy gauges and gadgets available that help the guitar builder determine the position of the bridge, but the method I've adopted works well enough that I haven't felt the need to try them out. To give credit where it's due, I believe I first saw the method I'm about to describe on Matt Mustapick's now defunct and sorely missed workshop blog.


On this particular Port Orford Cedar soundboard, the grain is incredibly fine and the centre join is extremely difficult to detect. I've lightly pencilled a line along the join to highlight it, then taped a sheet of graph paper to the soundboard with the centre grid line aligned with the pencil line. With the neck securely attached, I measure from the nut end of the fret board and mark the notional scale length on the graph paper - it's the longer of the three marks in the picture below.


I make a second mark a little under four millimetres further along the centreline to allow adequately for compensation, acknowledging that with wider saddles gaining favour among many builders these days - myself included - there's plenty of scope for fine-tuning of intonation once the guitar is strung up.

I measure the distance from the centre of  the saddle slot to the front of the bridge at its mid-point, then measure back from the compensated mark on the paper towards the nut by the same distance, placing a third mark on the graph paper to represent the front edge of the bridge. I extend this mark outwards in either direction.

The underside of the bridge has been sanded to conform to the dome of the soundboard, initally using a domed platform to which I've stuck some 120-grit sandpaper, and then, by way of fine tuning, by taping some 240-grit sandpaper to the soundboard itself then moving the bridge to and fro across the sandpaper until the white pen marks I covered the bridge underside with have been removed.

I insert a clamp through the soundhole, positioning a piece of MDF that conforms to the bridge plate outline inside the body and over the bridge plate as I do so. With the bridge clamped lightly in place over the graph paper, I wriggle it into position, using my third mark to align the bridge's front edge at its mid-point, and the grid lines that run perpendicular to the soundboard centreline to align the bridge's front corners. The clamp is tightened, and I drill through the first and sixth bridge pin holes so that the bridge can be accurately pinned in position when the time comes to permanently attach it to the soundboard. The MDF inside the body prevents chipping when the point of the drill bit exits the bridge plate.


Removing the bridge, I replace the graph paper with a thin, low-tack adhesive film known as frisket film. I give the film a light scuff with fine sandpaper so it's easier to mark. I pin the bridge into position through the first and sixth bridge pin holes, and lightly mark the bridge outline onto the frisket. I remove the bridge and, using a craft knife, carefully cut through the frisket around 3/16" inboard of the pencil line, being careful not to cut into the top wood. I can then peel off the frisket that sits outside the scored line. I've found that by leaving a generous margin between the edge of the remaining film and the actual bridge outline, it's much easier to level-sand and buff the finish in the area of the bridge perimeter, bearing in mind that the frisket film is removed only when the finish has been buffed and I'm ready to remove the remainder of the finish within the bridge outline prior to permanently gluing the bridge.


In the interests of a neatness, I'll leave around 1/16" of finish inboard of the bridge outline, and rout a ledge fractionally over 1/16" wide around the underside of the bridge perimeter to a depth equivalent to the target finish thickness. To do so, I clamp my laminate trimmer to a MDF platform that's been domed to replicate the curvature of my soundboard. To prepare the MDF, I laminated two 3mm layers of MDF in my go-bar deck using a 25' radius dish as a base, then drilled a hole in the centre large enough to accept my chosen router bit. As previously described, the underside of the bridge has been sanded to conform to the dome of the soundboard before I rout the ledge.

As always, I'm open to suggestions and I welcome any comments.

Cheers
Pete

Sunday, March 15, 2015

Pop Goes the Rosewood!

I know it's unfashionable in some quarters to get too enthusiastic about East Indian Rosewood, but after applying a first coat of epoxy pore-fill to the back of this guitar, I feel justified in getting just a little bit excited. Let's hope it sounds as good as it looks!


Cheers
Pete

Monday, September 22, 2014

DIY Guitar Finishing

Living in Australia, I don’t share the luxury of access to a specialist finisher such as Joe White or Addam Stark, and I can’t avoid the time-consuming job of pore-filling, sealing and applying finish top-coats myself. Would I farm my finishing out if that option was available to me? I have to say, I’m really not sure.

As a hobby builder, I don't impose deadlines on myself, nor do I have impatient customers eagerly awaiting progress updates; the time I spend finishing my instruments therefore doesn't weigh too heavily on me. As the standard of my finishes has improved over time, my enjoyment of this part of the process has increased significantly; what was once an onerous task has now become just another series of steps along the way to completing a guitar. The final result relies less and less on chance as my tally of completed guitars grows. In fact, there’s a great sense of satisfaction at having done the hard yards, and in acknowledging that I've gone a long way towards negotiating the learning curve inherent in producing a professional standard of finish.


KTM-SV over Sitka Spruce
Those of you who have followed my blog will know that I've been pretty happy finishing recent guitars with Grafted Coatings’ KTM-SV, a water-based oil-modified urethane. While I’m more than satisfied with the end results I've been able to achieve, I'm deterred by the horrendous shipping charges from the U.S., and the fact that its adhesion over shellac is less than satisfactory. The Ilva two-pack sealer I'm forced to use is nasty stuff, which largely defeats the purpose of using a safe, environmentally-friendly water-based finish, and adds to the already prohibitive cost. As a result, I’m forever on the look out for new products, knowing that what’s on the market is constantly evolving and improving, particularly where water-based products are concerned. Grafted Coatings' recently developed water-based finish material, Ten!, has received great reviews from the few who have trialed it, and I'm keen to hear further reports when it's eventually in widespread use. As the release date is unknown, I'm about to experiment with another product that's new to me. 

Bona Mega is a water-based polyurethane interior floor finish recommended to me by a well known and very well-regarded U.S. luthier, who is himself an ex-KTM-SV user. In case there's a negative bias towards using a floor finish on a guitar, I won't name him. Suffice to say that the standard of his finishes has drawn glowing praise from those attending guitar shows in which he's been a participant. The advantage of Bona Mega for me is that it's readily available locally, and supposedly demonstrates excellent adhesion over a simple shellac seal coat, something that can't be said for KTM-SV. Bona Mega is expensive, but I'll avoid the shock of the shipping charges I pay when I purchase products from the U.S., and benefit from the fact that it bonds well with shellac.

I’m comforted by the fact that some of our more experienced and admired U.S.-based luthiers have also chosen the DIY route, despite the fact that they have access to the aforementioned specialist finishers, and I'm pleased to note that a growing number of them are prepared to use alternatives to the traditional nitrocellulose lacquers and the modern, more robust polyesters. Most importantly, it seems that the players willing to outlay large wads of their hard-earned cash on a hand-made instrument are becoming more knowledgeable and less bound by convention, and are slowly accepting these alternatives even if it means that their prized instruments are slightly more susceptible to damage because of it.

How about you, fellow builders? Do you undertake finishing work yourself? If so, what's your finish product of choice?

Product links:
Bona Mega
Grafted Coatings Ten!

Cheers
Pete

Saturday, September 13, 2014

Finishing Necks - a New Approach

I've been keen to try a new approach where finishing necks is concerned, and have opted to experiment with some oil finish products on a couple of the necks I'm currently constructing. Gloss finishes certainly look classy, but many players express a preference for a matte or satin neck finish that doesn't "grab", as some gloss finishes are prone to do.

Like many other aspiring builders, I finished my first couple of guitars with Birchwood Casey's Tru-Oil. It's easy to apply, relatively benign, and seems impervious to moisture once cured. What's more, it's readily available locally - always a plus for someone like me, living in far-away Australia. I recall reading of tests that showed it doesn't penetrate the wood surface deeply, which adds to its appeal for those builders unwilling to make the leap into sprayed or french polished finishes.


Despite Tru-Oil's attractions, I've recently investigated some alternatives and purchased small quantities of the products pictured above. A local gunsmith told me preferred the Livos product rather than Tru-Oil, and I've read reports by builders in the solid-body electric world who have used the Osmo product with great success. I guess it's best that I find out for myself!

The manufacturers' web sites describe how each of these products penetrate the wood and dry within it, rather than on top of it as Tru-Oil does. If I was finishing the body of an instrument, this would ring alarm bells - particularly where the soundboard is involved - but where necks are concerned, I'm not at all worried about the oil penetrating the wood surface; in fact, to my mind, this characteristic could offer advantages. Although I'm not expecting significantly different outcomes, I plan on trialing each of the two finishes to satisfy my curiosity once and for all.

As a nod to convention, I'll spray a gloss finish on the headstock face and the heel cap before I fine-sand, then oil, the remainder of the neck.

Product links:
Birchwood Casey Tru-Oil

Friday, May 10, 2013

Spray Day Delay

With epoxy pore filling of the back, sides, neck and rosette of this guitar completed, it’s a case now of waiting for a string of fine days and a concurrent break in my regular daily work commitments. Without an enclosed spray booth, I need three consecutive days of good weather to complete my spraying schedule, with a day off work an unfortunate additional requirement.


In readiness for spraying, I've calculated the bridge position and masked the top in the area of the bridge and fretboard extension with a thin, low-tack adhesive film known as frisket film. The edges of the frisket film in the area of the bridge are around 3/16" inside the bridge outline. I've found that by leaving such a margin, it's much easier to level sand and buff the finish in the vicinity of the bridge perimeter. The frisket film is removed only after the body is buffed and I'm preparing to glue the bridge.

After two brushed coats of Ilva TF23 sealer, I'll spray a maximum of five coats of Grafted Coatings’ KTM-SV per day, for a final result of 15 coats of KTM-SV on back, sides and neck, with 10 coats on the soundboard. After level sanding and buffing, I’ll end up with a thin, flexible finish that has minimal impact on the responsiveness of the soundboard while still providing an adequate level of protection.

More soon - good weather permitting!

Cheers
Pete

Sunday, March 31, 2013

The Fingerstyle Guitar - Epoxy Pore Fill

While it's perhaps not in the same league as the Claro Walnut used on the guitar I've recently finished, applying the first coat of epoxy pore fill to the instrument pictured reminds me that each piece of wood has its very own character and unique appeal. Once again, walnut has cast its spell over me and I'm very pleased with the way this guitar is shaping up.


It's an unfamiliar feeling to be pore-filling an instrument so soon after completing the previous one. Typically, many months pass after finishing an instrument before I'm ready to repeat the process, but as I work my way through this current batch of three guitars, I'm no sooner finished with one part of the process than I'm ready to repeat it on the next guitar.

With the necessity of a day job to distract me, the prospect of spraying the finish coats presents something of a problem: to apply the necessary number of coats to the back, sides and neck, I need to devote three consecutive days to the task if I'm to limit the number of coats per day to five. As I'm employed on a contract basis and paid by the hour, the bad news is that I'll need to sacrifice a day's pay if I'm to successfully apply a sprayed finish to the guitar - all the more reason to begin selling my instruments!

Cheers
Pete

Saturday, March 9, 2013

KTM-SV - Sanding and Buffing

There are a multitude of guitar finish products available, and it's generally acknowledged that each of them have their advantages as well as their shortcomings. The dilemma for the guitar builder, then, is in deciding which particular compromise they can live with, and what product best suits their particular circumstances.

My current choice is Grafted Coatings' KTM-SV, a water-based, oil-modified urethane that a growing number of musical instrument makers are using with great success. I'm in the throes of completing the guitar pictured - my third using KTM-SV. Although I've been pleased with this product so far, if a little of its flexibility could be sacrificed for the sake of hardness, I'd be truly ecstatic. I'm keeping an eye out for the release of the manufacturer's new product - which I believe will be marketed as KTM-10 - in the hope that it makes up for what KTM-SV lacks in terms of hardness. Early reports sound very encouraging.


My technique with the spray gun tends to improve over the course of finishing a guitar, and by the time I've applied the last of the top coats, I've generally sorted myself and the gun out to the extent that the guitar's finish is level and reasonably smooth. After the finish has cured for a few days, the process of sanding through the grades of sandpaper can proceed. With the paper wrapped around a cork block, I begin sanding with 600 or 800 grit paper, depending on the quality of my last coat. I'm pretty cautious when sanding the edges of the body and the headstock; I skip the coarser grades and begin my sanding of those areas with 1200 grit paper, dispensing with the sanding block. I use soapy water as a lubricant throughout this process, and constantly check my progress by squeegeeing off the water and holding the body or neck up the the light to check for rogue sanding scratches.


Inevitably, I'll sand through the topmost finish coat to one or more of the underlying coats; witness lines are evidence of that, even after a thorough sanding with the finest of the papers. It's at this point, of course, that my attention turns to the buffing wheel, but I've learned that this finish needs a couple of weeks to harden enough that buffing will completely remove these witness lines. I've wasted a lot of time and effort and become quite frustrated when attempting to achieve a mirror-like gloss before the finish has had time to harden - it's just not going to happen! Not unexpectedly, it's also apparent that the finish shrinks ever so slightly over the first few weeks. On future guitars, I plan to delay sanding with 1500 and 2000 grit papers - if not all of them - until a couple of weeks has elapsed and I'm about to buff. Perhaps that's not so much of a consideration where the soundboard is concerned as ridges in the finish corresponding to grain lines seem to be accepted, given their inevitability when any of the more traditional nitrocellulose lacquers are used.

Links to Grafted Coatings' web site:
KTM-SV
KTM-10

To view previous posts dealing with KTM-SV, click here.

Cheers
Pete

Saturday, December 22, 2012

Pore Filling With Epoxy

After installing purflings and bindings, it's very rewarding to scrape them level, carefully round over the edges, then sand the top, back and sides in readiness for the first steps in the finishing process. It feels like the end of a journey while at the same time signifying the beginning of another equally challenging one.


With final sanding on this guitar complete, I've taken the first steps towards pore-filling the back and sides with epoxy, a process that finally reveals the true beauty of the wood. As a hobby builder, many months have inevitably elapsed before I get to this stage, but the rewards make the effort and the wait worthwhile. Along with stringing a completed guitar up for the first time, seeing the figure and colour of the wood magically appear as the first coat of epoxy is applied is surely one of the highlights of the building process.

On a cautionary note, a problem with some epoxies is that of amine blush, a waxy residue that forms as the epoxy cures that can interfere with adhesion and curing of subsequent top coats. From what I've read on the topic, spending a little more on a good quality epoxy is worth considering as they're less likely to be susceptible to blushing. Whichever product you choose, once the epoxy has fully cured a thorough rub down with a damp cloth - or, better still, one dampened with a 50/50 mixture of water and denatured alcohol - is a simple precaution that eliminates potential problems. There's wisdom too in avoiding the application of epoxy when the ambient temperature is falling and relative humidity is therefore likely to be rising - conditions said to exacerbate blushing.

Thursday, January 20, 2011

Lessons in Finishing


Having completed only a handful of instruments with sprayed finishes, it's not terribly difficult to identify flaws and aspects of the process I've yet to come to terms with. Having said that, it helps to keep things in perspective and remind myself occasionally that the perfect finish - if there is such a thing - is an impossible dream for us mere mortals, a fact apparently acknowledged by many U.S.-based builders who happily farm out the finishing of their instruments to a professional. I'm sure the health and safety aspects of working with solvent-based materials play a significant part in that decision too. Down here at the bottom of the world, however, I'm left with the task of identifying problems with my technique, improving my finishing processes, finding materials that suit my situation and hobbyist status and developing the most effective means to combine and apply them. Although it's been a laborious and sometimes frustrating process, I'm cautiously optimistic about my next guitar - but then I always am!

I've made some mental notes of late where finishing is concerned:
  • Do a thorough job when pore-filling. At this point in time I'm using epoxy, as do many others. Aside from its effectiveness in filling the pores, I like the way it enhances the figure and colour of the wood it's applied to. Briefly described, pore-filling consists of applying the epoxy to the wood with an old credit card or spatula, then removing as much as possible from the wood's surface, leaving epoxy only in the pores. It often takes several sessions, allowing the epoxy to cure and sanding off dust nibs and ridges before the next application, before all visible pores are filled, but it's worth the extra effort given all the hard work that's preceded it.
  • Wipe down cured epoxy thoroughly. A by-product produced as epoxy cures is something called "amine blush", a waxy residue that can have an adverse effect on subsequent coatings. Thankfully, a good rub down with a damp cloth, or one dampened with a mix of denatured alcohol and water is sufficient to remove it. From what I've read, it's worth spending a little extra on a good quality epoxy and applying it in a warm, low-humidity environment to reduce the impact of blushing. The manufacturer of the boat-building epoxy I use contends that their product is not prone to amine blush, but I tend to give it a precautionary wipe down anyway as added insurance.
  • Find a compatible sealer. Oily species such as rosewood can be particularly problematic and can adversely affect or even prevent curing of top coats. It's worth experimenting with sealers or barrier coats to find one compatible with epoxy and your chosen top coat material. While some builders sand the epoxy pore fill back to the wood, in which case an effective sealer becomes particularly vital when using any of the oily wood species, I choose to leave a thin layer of epoxy on the wood - excluding the soundboard. The epoxy serves to lock in any oils present in the substrate and the task remaining for me has been to find a effective product to act as a tie-coat between the epoxy and the top coats of KTM-SV. Adhesion of my top coats has been a recent concern, but hopefully I've identified a compatible set of finishing products as I described in an earlier post.
  • Find a suitable top-coat. Having set myself the long-term goal of selling my instruments, I've pondered the various features that a prospective purchaser might commonly be looking for. A durable, high-gloss finish is one them, and is one aspect of instrument building that continues to test me, particularly as I've vowed to avoid solvent-based materials such as the much-used but far more hazardous nitrocellulose lacquer.
  • Drop-fill early. Any small gaps in the bindings are evident once the first top coats are applied. It's worthwhile dealing with gaps and pin holes while there are plenty of remaining top coats to even out these repairs, the caution being that with only a couple of coats of finish in place, extra care needs to be taken so as not to sand through to the wood when levelling.
  • Level sand with the finest grade of abrasive paper which will get the job done, i.e., top-coats are necessarily thin and remnant scratches from coarser grades of paper are difficult to fill. With practice, sprayed finishes shouldn't need much in the way of leveling and, as I've become more comfortable with the settings on my spray gun, I've not found it necessary to level sand with anything coarser than 600-grit.
  • Final level sanding of the cured top coats can't be rushed, i.e., don't be in too much of a hurry to crank up the buffer! Patience and a generous helping of elbow grease are pre-requisites as the instrument is wet-sanded in readiness for final buffing.
  • Be careful when sanding the edges of the guitar, and especially so around the headstock, where it's easy to "roll-over" an edge with the sanding block and remove more finish than is necessary or, heaven forbid, sand through to the wood. I haven't sanded through yet, but I'm keenly aware of the potential to do so.
Cheers
Pete

Monday, December 20, 2010

Grafted Coatings' KTM-SV - A Sticky Problem

With two guitar necks and a body almost ready for finishing, it's an ideal opportunity to refine my spray finishing techniques as well as experiment with a new seal coat material.

As I've reported previously, I'm pretty happy with Grafted Coatings' KTM-SV, the finish material I've used on my last two guitars, however, as I removed the finish in readiness for gluing the bridge in place on both guitars, I was a little concerned by the poor adhesion of the top-coats to the shellac beneath it. Shellac is well known as a material that readily sticks to almost anything, however, it seems the same can't always be said for the adhesive properties of other coatings when applied to shellac. Most notably perhaps, shellac adheres well to epoxy, but epoxy cannot be used on top of shellac. Go figure.

A recent thread on the Official Luthier's Forum discussed this issue and attracted some interesting responses. It's comforting in a way to read that others have had similar experiences and are also looking for solutions. It's also pleasing to see that Grafted Coatings themselves are taking a keen interest and have volunteered to prepare some test panels with a view to recommending a suitable sealer for their KTM-SV product.

I'm looking forward to Grafted Coatings presenting their findings, but in the meantime, I'm keen to try a two-pack polyurethane barrier coat manufactured by Ilva which luthier Randy Muth uses and recommends. I'm pleasantly surprised to have discovered a local source for Ilva products and relieved that the distributor - who commonly deals in commercial quantities - could be persuaded to decant a couple of litres each of the resin, hardener and thinners for me.

If I have any qualms, it's that I'll be reverting to use of a solvent-based product when it was the safe, environmentally-friendly aspects of KTM-SV that attracted my attention in the first place. Thankfully, use of this product is likely to be limited to two light coats, and with the usual precautions of good ventilation and a twin-filter respirator with vapor cartridges, I'm prepared to give it a trial run.

Cheers
Pete

Saturday, October 23, 2010

Some Final Observations on KTM-SV

I realise I've banged on about Grafted Coatings' KTM-SV water-based finish a bit over recent months but, as a final word on the subject, it's probably worth reviewing what I've read or found out for myself for the benefit of others who find themselves facing the same challenges I did with the finishing process.


From memory, I was alerted to this finish by Rolfe Gerhard’s article “KTM-SV – An Overlooked Finish”. The way Rolfe described it, Grafted Coatings’ KTM-SV sounded like the safe, environmentally-friendly finish material I’d been vainly searching for to that point, possessing most of the positive attributes of the other commonly used water-based products, with some important differences. Grafted Coatings’ web site describes it as “a waterborne, oil-modified, self-crosslinking urethane”, which immediately separates it from the better known waterborne acrylics.

On the plus side, it’s reportedly harder than the likes of Target Coatings’ EM6000 or Grafted Coatings’ other instrument finish, KTM9, although how that’s been determined with certainty I’m not quite sure. Also, not having an acrylic base as they do, it doesn’t display any of the blue cast some report with those products. For me, however, the most telling statement in Rolfe’s article is that he’s had instruments in the hands of players for two or three years and no problems have arisen in that time. For my own peace of mind I wish it were longer, but I’m comforted by that information nevertheless. For me, this is the acid test in terms of any new or newly adopted product’s suitability as an instrument finish. How many stories are there of instruments finished with KTM9 developing bubbling or sticky necks over time for instance? KTM9 still has its fans, but I think it’s fair to say the enthusiasm for that particular product has diminished over the past few years, due in part perhaps since prominent advocates such as Mike Doolin and Charles Fox have reportedly jumped ship and turned to polyester and nitro respectively. The disappointments with U-Beaut’s original Hard Shellac are well documented and, although it’s been reformulated, I’m still unconvinced of its suitability given my recent experience with it as a sprayed finish – French polishers (and Australian ones for that matter!) may have more luck. In any case, I don’t think it’s proven itself over a long enough period to be considered seriously, particularly if you’re as cautious as I am and share my view that warranty work is bad advertising, even if it’s expertly carried out.

Because I avoid mineral spirits (turpentine) whenever possible, another plus for me is that unlike other waterborne products, KTM-SV can apparently be wet-sanded using water as the lubricant. In his article, Rolfe says that witness lines buff out invisibly, which I’m able to confirm with greater conviction since I steeled myself and ordered a buffing arbor from LMI in the U.S. Used together with two grades of Menzerna buffing compound, buffing is now an easy task, and the gloss I’m able to achieve effortlessly is pretty impressive. My wallet may be lighter, but my finishes have improved out of sight as compensation.

Of course, with any finish material there are trade-offs and compromises and KTM-SV is perhaps no different in that regard. One of KTM-SV’s supposed disadvantages is that, unlike Target’s EM6000, once it’s cured, subsequent coats don’t burn into the preceding ones meaning that invisible finish repairs are difficult to achieve. I’ve come across some conflicting advice, however, which says that rubbing the area to be repaired with acetone or lacquer thinner softens the finish enough to allow an invisible repair, but I have no first-hand experience where that’s concerned and can only repeat here what I’ve read elsewhere. Less significantly in my view, it’s said that it can’t be buffed to as high a gloss as nitro, although I’m pretty happy with the gloss level on the guitars pictured. The only other real negative - which I'm all too used to living in Australia - is that freight from the U.S. is more costly than the material itself.

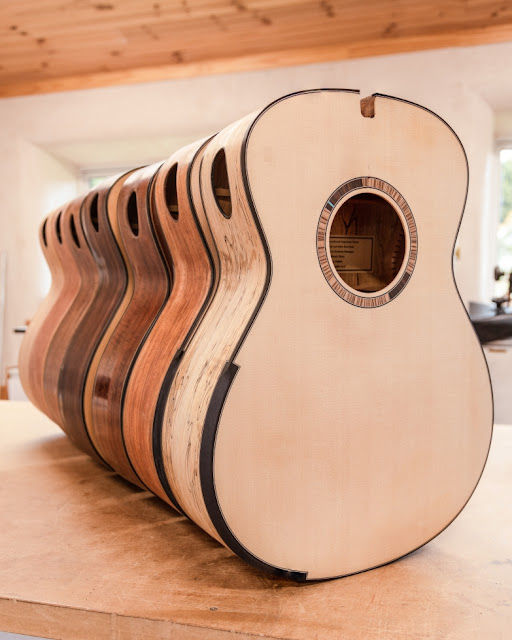
The guitars pictured in my last two posts were finished with KTM-SV top coats over epoxy pore fill and three seal coats of de-waxed white shellac. I followed the finish schedule described by Randy Muth in a thread on the OLF, whose prescription is for six coats per day over two days, with the exception of the soundboard which receives two coats fewer for a total of ten, i.e., only four coats on the second day. Following Rolfe’s suggestion, I added 30ml of distilled water to my quart tin of KTM-SV which seemed to help with flow-out and leveling, although it’s also possible that the coats began to lay down more smoothly for me as my novice spraying technique improved; by the time I applied the last top coats on the second of these guitars, it was laying down beautifully, to the extent that I was able to begin my level-sanding with 800-grit paper.

Interestingly, Rolfe also remarks that there’s very little shrink back as the finish cures, however, I notice that minute ridges corresponding to the grain lines are evident on both tops; in fact, it looks a lot like a typical thin nitro finish which isn’t necessarily a bad thing given that for many, nitro is still the standard by which all other finishes are judged. As best as I could determine with dial calipers, my ten coats on the soundboard measured around 0.1mm, or 4 thou in thickness after leveling and buffing – a very crude guide to be sure, but nevertheless helpful in the absence of any more accurate means of measurement.

At some point I may try Target Coatings’ EM6000 (Stew-Mac’s Colortone Waterbase Lacquer) purely for the sake of comparison, but for the foreseeable future I’m a KTM-SV convert, and greatly relieved to have at last a found a finish product which allows amateurs like me to produce near professional results without the bother and expense of a spray booth, explosion-proof fan, etc. I know I could cross my fingers and shoot nitrocellulose in the back yard as many others do, but I’ve been there and done that and as I’ve grown older, a little wiser, and a lot more conscious of health and safety issues, I’ve decided not to repeat that experience and expose myself and others to the attendant risks. Like a reformed smoker, I’m still tempted at times to ignore the risks and revert to past practice, but I’m confident that good sense will prevail on both counts!

Some relevant links:
Official Luthier's Forum discussion

Cheers
Pete

Friday, July 16, 2010

Reaching the Finish Line - KTM-SV

I've made significant advances with many aspects of guitar construction in the recent past, but achieving a quality finish has proven to be a persistent frustration as well as one of the last major hurdles. It's especially pleasing then to be able to report that the finish used on this guitar - Grafted Coatings' KTM-SV - has proven to be a watershed where confidence in the standard of my guitars is concerned.


While there's still plenty of scope for further improvement of my skills and knowledge - most noticeably in the area of fretwork and setup - I'm quietly confident that my guitars are approaching a standard comparable to that of other fledgling independent builders. If I ever make the leap and decide I'm ready to sell my guitars, the prices I ask will of course reflect this cautious assessment!


Finding a finish product which works for me is cause for celebration, but rubbing it out to the high gloss that guitar owners expect has been yet another challenge. Thankfully, after taking the plunge recently and ordering a buffing arbor from LMI in the US, I'm pleased at last to be able to bid farewell to the more laborious hand-polishing methods. Not only was it an onerous task, but I was never entirely satisfied with the end result. With motor-driven buffing wheels and two grades of Menzerna dry buffing compounds at my disposal, the process is an absolute breeze and the gloss I'm now able to achieve reduces the pain of having purchased a hefty piece of equipment from overseas. International freight charges - as always - are a real headache!


I guess some vital statistics are in order:
  • Back and sides: Australian blackwood
  • Soundboard: Sitka spruce
  • Neck: Queensland maple
  • Bridge and fingerboard: ebony
  • Bindings: ebony
  • Frets: EVO gold
  • Tuners: Gotoh 510 minis
  • Rosette and fingerboard inlay: paua abalone
  • Finish: Grafted Coatings KTM-SV
  • Scale length: 24.9"

Click any of the photos for a larger view.

Cheers
Pete

Thursday, January 14, 2010

In Pursuit of a Glossy Finish


Without access to a buffing wheel, it's a case of gritting my teeth and rubbing out the finish on this guitar using more tedious methods. It's a good workout if nothing else!


I was careful to level the finish thoroughly as the spraying of the 12 top-coats proceeded. As a result, it was a relatively easy task to carry out the final levelling with 800-grit wet-or-dry paper and water once the finish had been allowed to cure for a few days. To allow for the curvature of the guitar's surfaces - including the domed top and back plates - I wrap my abrasive paper around a small rectangle of cork floor tile. The cork provides a solid backing for the paper but has just enough flex to conform to the curves. I've had better results since I began sanding with the grain, the significance of which is that by sanding in one direction, the sanding scratches seem more easily removed by the grade of paper to follow.


Other water-based finish products require that mineral spirits (turpentine) be used when wet sanding, however, I detest turpentine for any application and it's a blessing that KTM-SV can be safely wet-sanded using water as the lubricant, - the proviso being that it's been given time to cure. It's become very clear to me that a little extra time spent sanding thoroughly through 800, 1200, 1500 and 2000 grit papers to remove sanding scratches before the polishing compounds are brought into play makes a high gloss much, much easier to achieve. If you noticed the large gap between 800 and 1200, it's only because my usual local sources seem to have run out of 1000-grit paper temporarily. Sanding is a tedious task, but I found that reaching for the polishing compounds too soon invariably saw me return to wet-sanding soon afterwards when polishing revealed remnant sanding scratches - there are NO short-cuts!


As I mentioned in an earlier post, I use Autoglym's 03B Fine Abrasive and 02B Ultrafine Renovator once I'm done with sanding. With limited experience with sprayed finishes, I'm still pretty tentative when it comes to levelling and polishing for fear of rubbing through the layers of finish to the wood and, although a random-orbital sander equipped with hook-and-loop Surbuf pads helps with the polishing to a degree, I've been careful to stay away from the perimeter of the guitar's top and back plates as well as the edge of the soundhole, the area of the side soundport and the cutaway region while using it. As a result, I'm left with the option of a cork-backed sanding block wrapped with a polishing cloth to rub out these areas. It's not a difficult job, but patience and persistence are valuable assets - ones I wish I had in greater measure!


Click on any of the photos for a larger view.

Cheers
Pete

Friday, December 11, 2009

U-Beaut Hard Shellac - Once Bitten, Twice Shy


I didn't want to die wondering whether U-Beaut's Hard Shellac could have been the answer to my finishing dreams and I experimented with it on this little Claro Walnut/Engelmann Spruce 12-fret double-0, destined for my own use. Having been distracted by other projects recently I've only just strung the guitar up and, although it's still a little tight and is yet to have its initial fret job and setup, it sounds very promising already. What's more, I love the way it looks - up to a point.

Reports from those who had used an earlier formulation of this finish were encouraging, but there were occasional angry mutterings about serious crazing which sometimes materialised weeks or even months after application. In response to criticism, the manufacturer added a plasticiser to the recipe and re-released the product, advertising the fact that it was now suitable for musical instruments. I certainly found it a dream to spray after reducing it 50/50 with denatured alcohol to a 2lb cut and, after waiting three weeks or so for it to fully cross-link and harden, I was able to rub it out to an impressive shine. I was an instant but cautious convert! My optimism was tempered by the recognition that any finish - particularly a shellac variant - has to prove its resistance to use and abuse over time before it can be declared commercially viable. With neither use nor abuse to blame in this instance, my hopes have been dashed already however and, after six months, the finish on the neck of this guitar shows the first barely discernible but unmistakeable signs of the same crazing which so frustrated (some) users of the earlier formulation. There's an equally faint suggestion of the same thing happening at the waist on one side and there's no telling if it will worsen or appear elsewhere over time. I must say, I'm not too upset though; it was a risk I was willing to take and at least it's answered the questions I had once and for all - in my mind anyway.


Interestingly, this Australian product has recently been added to the inventory of one of the leading U.S. lutherie suppliers and there's been a good deal of excited chatter about it on one of the on-line guitar building forums. Based on my very limited experience, I can only urge caution; either the additional plasticiser hasn't been entirely successful in curing the crazing problem, or skilful application is absolutely critical to success. Although I was at pains to spray thin coats, waiting an hour or so between them (it was a hot day), it just may be that the ambient conditions at the time weren't ideal, or that my rudimentary skills with the spray gun weren't up to the task. Perhaps those applying it as a french-polished finish will have better luck, but after this experience, I'm fearful that the results are likely to be unpredictable at best - not a recipe for good customer relations. For the time being at least, I'm inclined to stick with the water-based KTM-SV I discussed in my previous post.

Cheers
Pete

Thursday, December 10, 2009

KTM-SV - The Bee's Knees

As I'd hoped, the top coats of Grafted Coatings' KTM-SV went onto my OM beautifully, particularly after I'd added some distilled water to the finish prior to spraying. The advice I'd read suggested adding 1 ounce of distilled water to a quart of finish which equates to around 30ml for us metric types. I used approximately half of my quart tin which should leave enough for the Australian Blackwood/Sitka Spruce triple-0 waiting in the finishing queue.

Other than it being an opportunity to become better acquainted with my spray equipment, I learned that acceptable results are probably more likely when the temperature is lower and the humidity higher than it was on my first day of spraying. With the temperature climbing to around 35C through the day and the relative humidity sitting on 20%, I was probably foolish to have proceeded and it was difficult to achieve the wet coats I wanted. I'm sure my inexperience played a large part in the less than perfect results I had with the initial coats too. Although it didn't dry with the gritty appearance that suggests that the finish has dried en-route, between the spray nozzle and the guitar, I suspect it was dry very shortly thereafter, before it had a chance to self-level completely. As a result, some "orange peel" was evident after the first couple of coats. With more practice, the addition of the distilled water and cooler, more humid weather on the second day of spraying, however, I was pretty happy with the appearance of the later coats straight off the gun.

I waited a couple of days to level sand and a few more days before attempting to polish out the finish. Without a buffing wheel at my disposal I use a random orbital sander and Surbuf polishing pads purchased from Lee Valley Tools in the U.S. The polishing compounds I used are made by Autoglym and are branded 03B Fine Abrasive and 02B Ultrafine Renovator. They replace the Meguiar's products I used previously which I found unsatisfactory for my purposes. After a week, the finish on this guitar is HARD, and it's a slow but satisfying process sanding through the grits then rubbing out to a high gloss with the polishing compounds. Perhaps as I hone my skills I'll think about building a buffing wheel, but I feel there's less chance of buffing through to the wood with my current method, which is certainly slower but much less prone to burn-through.

Having progressed this far, I'm increasingly confident that the KTM-SV is the safe, environmentally-friendly finish I've been looking for. Those who've used it for some time and have had instruments out in the real world for two or three years have reported no issues with it which strengthens my belief that this is the ultimate finish for the the health-conscious amateur luthier with limited resources and a less than ideal working environment. For an even more low-tech approach, I understand it can be brushed on which makes this product suitable for even the rawest of beginners.

I'll post glamour shots soon - minus the scantily-clad model - when the guitar is strung up and ready for delivery!

Cheers
Pete

Sunday, November 22, 2009

OM Nearing Completion


Click for a larger view

With its new owner due to visit in a couple of weeks, I've been spending a lot of time lately preparing this guitar for finish.

Here's a shot taken this afternoon after shooting a couple of seal coats of 2lb-cut de-waxed white shellac. Prior to spraying, I inflated a couple of party balloons inside the body of the guitar to seal off the soundhole and the soundport, preventing any contamination of the interior.

Given my limited experience with sprayed finishes, it's a case of "so far, so good". I arrived at what I think was the right combination of spray gun settings more by trial and error than anything else. Setting the correct air pressure at the compressor, then adjusting spray pattern, air flow and material flow at the gun took some patience but, as with anything unfamiliar, the secret lies in constant practice.

Without a dust-free environment to work in my finishes are never going to be flawless but, under the circumstances, I'm pretty happy with the results so far. My hope is that the top coats of KTM-SV are as easy to apply as the shellac seal coats were. I guess I'll find out over the next few days!

Cheers
Pete

Bridge Day

With a template describing the bridge outline, and an appropriate jig to facilitate routing of the saddle slot, it's a fairly quick and ...