Sunday, September 2, 2012

What's on the Bench?

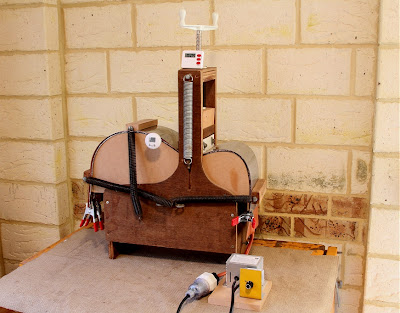
Having swapped plane and chisel for scalpel and scissors, here's a picture of a recent project!

A Cane Toad gives his life for science.

I may have left it a little late in life to go "back to school", but the move has at least provided me with a new and exciting challenge as well as a much-needed sense of direction. Having said that, I'm already looking forward to a break at the end of the year and the opportunity to resume my regular woodworking pursuits.

I'll be back!

Cheers
Pete

Sunday, June 24, 2012

Preparing Bindings and Purflings

When it came to preparing purflings for two of the guitars I'm currently building, the first step was to laminate veneer sheets into a black/white/mahogany/white/black sandwich. Rather than the black-dyed maple I used as the outer veneers when preparing an earlier batch of strips, I substituted black fibre sheet (sometimes called fish paper) this time to minimise the risk of deformation or splitting when the strips are bent to fit the purfling channels; the last time around, some of the black maple veneers collapsed slightly in the area of the waist and had to be discarded.


The brayer pictured above is a tool commonly used by printmakers - I sourced mine from a local art supplies store. It's the ideal tool to quickly and evenly spread glue when laying up the veneer sandwich. Titebond III is a glue well suited to this task; it's relatively heat and moisture resistant and the layers of veneer are less inclined to de-laminate when the strips are moistened and bent to shape.

With a small circular saw mounted under my table-saw bench and equipped with one of Stewart-MacDonald's fret slotting blades, I switched the saw on and raised it slowly, cutting through a masonite sheet I'd clamped over the table until the blade was fractionally higher than the thickness of the veneer sandwich, at which point I locked the saw's adjusting lever. Feeding the veneer sandwich through this very fine blade minimised wastage and resulted in an extremely clean cut. I was quickly able to produce enough purfling strips for two guitars, with a couple of strips left over as spares in case of breakage or buckling.


Preparing purflings for the rosewood guitar was an even simpler exercise; they're a simple combination of one black and one red veneer strip - thin enough that strips could be cut from the veneer sheet using a steel rule and a craft knife and pliable enough that pre-bending the strips is unnecessary.

Where the bindings are concerned, I chose to glue contrasting veneers to the edges of the binding strips - again using Titebond III - prior to bending them. Ebony bindings can be a pain to bend so I took the precaution of spraying them lightly with SuperSoft 2 veneer softener the day before I bent them - the softener plasticises the wood strips somewhat, reducing the chance of breakage. Taking care to arrange them into matched pairs, I taped the strips together, misted them with distilled water then wrapped the assembly of strips in brown paper and aluminium foil and bent them in my Fox bender. I began cranking down the press screw at the waist when the thermometer reached 240F and, when I'd bent the upper and lower bouts and applied full tension at the waist, let the heating blanket climb to 310F where I let it sit for a further 5 minutes. I switched the blanket off and removed the binding strips when the machine had cooled to room temperature.


Despite the fact that I'm currently working full time and distracted by those unpleasant but unavoidable weekend chores, I'm setting myself modest targets every week and making steady progress. Installing these purflings and bindings on the three guitar bodies is my next task.

Cheers
Pete

Thursday, June 7, 2012

Guitar-Shaped Objects

With these guitar bodies assembled at last, I'm better able to imagine what the completed instruments might look like. It's very satisfying to have reached this stage, but I know there's a lot of work remaining.

Sitka Spruce/Claro Walnut; Sitka Spruce/East Indian Rosewood; Redwood/Claro Walnut

Having laminated the veneers from which I'll slice the purflings, my next job is to prepare purfling and binding strips, then rout out the ledges on the bodies to accommodate them. With the right jigs and tools this shouldn't be a particularly challenging job, but as a "hobby builder", the interval between guitars is significant; I'm not usually able to perform this task frequently enough that I ever feel entirely at ease with the process. With three instruments in the pipeline though, I should be feeling more confident by the time I carry out this step on the last of the current crop.

Cheers
Pete

Monday, June 4, 2012

Soundports

I've posted Matt Mustapick's observations on soundports before, but it seems an opportune time to do so again:

"This concept came originally from the great classical maker Robert Ruck, who puts two small holes on each side of the guitar, very close to where the neck joins the body, rather than one larger hole. The main advantage of the soundport is that it gives the player a "front row seat" to enjoy a strong direct signal from the soundbox. This feature takes nothing away from the forward projection of the instrument. From 20 feet away the guitar is just as loud. For anyone closer to the guitar, it adds a great deal of richness to the sound, owing to the dual sound source which creates a stereo field."

Prior to marking and cutting the side soundports, I took the precaution of gluing two thin layers of veneer to the inner surface of the sides as reinforcement.


Cross-grain veneers provide a measure of protection against cracks

In recognition of the veneers' primary purpose which is to strengthen the area around the ports, their grain runs perpendicular to that of the sides. Some builders argue that cross-grain veneers actually promote cracking by restricting the expansion and contraction of the sides that would otherwise occur. While I accept that such veneers do indeed limit the capacity of the sides to move with fluctuations in humidity, the distance between the linings in this area of the upper bout is small and any potential dimensional change is minimal. If it was a credible risk, we'd surely see cracks developing where the headblock and tailblock similarly restrict the sides' movement across the grain.

In addition to their practical role of protecting against cracks, the veneers also provide me with an opportunity to introduce a contrasting maple line around the walnut guitar's port and extend the rosewood guitar's black and red theme.


Dremel extension handpiece with mini circular saw blade fitted - before and after

A mini sanding drum in the Dremel handpiece takes me to the line

Final sanding required, but essentially, they're done

Very soon, I'll prepare myself mentally for the onerous job of installing purflings and bindings - a task that never seems to get any easier or less stressful!

A recent guitar, with soundport


Useful links:
The Shrinkulator is an online tool that calculates dimensional change in wood with variations in moisture content or relative humidity.


Cheers
Pete

Sunday, May 13, 2012

Back at the Bench - Headstocks

Hopefully, this post marks a transition to business as usual after the disruptive and sometimes stressful process of moving house. As if that wasn't enough of a distraction, our newly acquired house and garden required a time-consuming facelift, but with much of that work now behind us, I can at last devote some guilt-free time to my hobbies.

Macassar ebony headplate
To ease myself back into normality, I've spent a little time working on the headstocks of the two guitars I'm currently building. Using a masonite template as a guide, I've band-sawn the headstocks to within a couple of millimetres of their final shape then accurately affixed the template to the headstock face using the indispensable and ever-present double-sided tape; a few taps from a soft-faced hammer ensures that the template is firmly attached to the headstock's face. The laminate trimmer I use to complete this job is adjusted so that a bearing on the shaft of the router bit rides along the edges of the template. Using this arrangement, it's then a relatively straightforward task to reduce the headstock to its final shape.

I've learned the hard way that when using this method consideration needs to be given to grain direction and the trimmer's direction of travel if damage to the headstock is to be avoided. Trimming the extremities of the headstock's end where they transition into its long edges demands special attention. On the upper corner of the headstock corresponding to the bass side of the neck, I guide the trimmer in a clockwise direction, effectively "climb-cutting" as the bit begins trimming the headstock's end adjacent to that corner; on the opposite upper corner of the headstock corresponding to the treble side of the neck, I guide the trimmer in an anti-clockwise direction. As an added precaution, I trim the end of the headstock before I trim its sides so that any minor chipping will be removed when the long edges are trimmed as a final step. Needless to say, different headstock shapes will require their own unique approach.

Observing the same precautions described above, I've also routed out the ledge that accommodates the headstocks' purflings and bindings, this time using a spiral-downcut router bit and the trimmer's adjustable guide. The rebate on one of the headstocks is pictured below, with the final result on the other shown for comparison. Hopefully, I'll have both of the headstocks completed before the weekend is over.

Laminate trimmer, with bearing guide fitted
Binding rebate prepared
Bound and ready for clean-up

I mentioned in my previous post that my plan was to construct a purpose-built workshop at the rear of the house. It's still an attractive proposition, but after much thought, I decided that at this point in time I'm unwilling to sacrifice what could easily be another twelve months of my life to such a major project - spare time is in short supply as it is. Another significant factor in my shelving of those plans is that once we'd found homes for the assortment of bits and pieces we all seem compelled to accumulate, a generous amount of usable space remained in the double garage at the front of the house. Importantly, with an abundance of fluorescent ceiling lights in the garage, lighting is more than adequate for my purposes. If there's a downside to my use of the garage for guitar building, it's that my partner may find her car coated in wood dust from time to time - I'm sure she'll understand!

Cheers
Pete

Sunday, October 9, 2011

Another Moving Experience

When we were forced to find a new rental property last year, my guitar-building pursuits were seriously disrupted while we hunted for a suitable house, packed innumerable boxes, moved our accumulation of "stuff", then found homes for everything once we'd made the move. During the weeks that followed, my attention was focussed on building a workbench from scratch and establishing some semblance of order in my new workshop. Having achieved all that, I enjoyed more productive times and was pleased to be able to complete a couple of guitars and make good progress with the others I've featured recently on this blog.

Stability hasn't lasted long however, and barely 12 months later we've taken a critical look at our situation from the point of view of finances and lifestyle and have purchased our own home. As a temporary measure, I'll set up shop in the double garage, but the long-term goal will be to build a workshop at the rear of the property with the luxury of being able to give consideration to the heating and cooling, lighting and storage requirements best suited to our budget and the specialised needs of my guitar building hobby. In many respects it's a distraction I'd rather not face, but I'm confident that the planning, expense and hard work involved will pay off in the long term. It's my hope that I'll be much more inclined to spend time building guitars, particularly through our extreme summers when it's too easy to spend what spare time I do have lounging around in the air-conditioned house!

Updates to my blog will slow to a trickle in the weeks ahead, however, normal service will be resumed as soon as possible.

Cheers
Pete

Sunday, September 25, 2011

Saddle Slots and Bridge Pin Holes

Although I'm nowhere near ready to make use of them, I've spent some time lately working on the bridges destined for the two guitars I have under construction for no other reason than it's a job I can devote short periods of time to in a spare moment, or treat as light relief between more demanding or time-consuming tasks.


To facilitate drilling of the bridge pin holes in a perfectly straight line, parallel to the saddle slot I've previously routed out, I glue a small wooden block to the front edge of the bridge blank on the treble end prior to cutting the bridge outline. I trim the block carefully using my disk sander so that as the bridge is slid along a makeshift fence attached to my bench drill's table, the centre of each hole will be equidistant from the slot. Having guaranteed alignment in that direction, I need only take care then to align the bit with the string spacings marked on the bridge as I prepare to drill each hole (a white ball-point pen is a godsend when marking dark woods like this ebony). A brad-point bit makes accurate alignment much easier and produces a perfectly clean hole provided it breaks out through the lower surface of the bridge into a backing board of MDF or scrap timber.


With the bridge pin holes drilled parallel to the line of the saddle, there's a consistent break angle for the strings as they pass over it. While some reason that this guarantees an equal downward string pressure along the saddle's length, the fact that string gauges and tensions vary from string to string casts doubt on the validity of that argument. A slight increase in the saddle's height towards its centre and the potential use of radically altered tunings such as "Orkney" tuning (CGDGCD low to highcomplicate the matter still further. Whatever its other merits though, it's a neat look and I'm assured of adequate downward pressure on the saddle and therefore good transference of the strings' energy to the soundboard.


It seems there's no hard and fast rule where bridge weights are concerned; popular wisdom has values falling within a fairly wide range. Given that there are a multitude of factors influencing the guitar's sound, I somehow doubt I'll ever build enough instruments to draw any meaningful conclusions where small variations in bridge weight are concerned; there are so many other variables likely to have a more significant and measurable effect should I feel the urge to experiment. That being the case, I'm happy to aim for a more or less consistent bridge weight from one guitar to the next. With ebony bridges such as these, I shoot for a weight of between 30 and 35 grams, making use of a cheap digital gram scale as I shape and shave the bridge wings to their final thickness.

Useful links:
Routing the Saddle Slot

Cheers
Pete

Bridge Day

With a template describing the bridge outline, and an appropriate jig to facilitate routing of the saddle slot, it's a fairly quick and ...