When it came to preparing purflings for two of the guitars I'm currently building, the first step was to laminate veneer sheets into a black/white/mahogany/white/black sandwich. Rather than the black-dyed maple I used as the outer veneers when preparing an earlier batch of strips, I substituted black fibre sheet (sometimes called fish paper) this time to minimise the risk of deformation or splitting when the strips are bent to fit the purfling channels; the last time around, some of the black maple veneers collapsed slightly in the area of the waist and had to be discarded.

The brayer pictured above is a tool commonly used by printmakers - I sourced mine from a local art supplies store. It's the ideal tool to quickly and evenly spread glue when laying up the veneer sandwich. Titebond III is a glue well suited to this task; it's relatively heat and moisture resistant and the layers of veneer are less inclined to de-laminate when the strips are moistened and bent to shape.

The brayer pictured above is a tool commonly used by printmakers - I sourced mine from a local art supplies store. It's the ideal tool to quickly and evenly spread glue when laying up the veneer sandwich. Titebond III is a glue well suited to this task; it's relatively heat and moisture resistant and the layers of veneer are less inclined to de-laminate when the strips are moistened and bent to shape.
With a small circular saw mounted under my table-saw bench and equipped with one of Stewart-MacDonald's fret slotting blades, I switched the saw on and raised it slowly, cutting through a masonite sheet I'd clamped over the table until the blade was fractionally higher than the thickness of the veneer sandwich, at which point I locked the saw's adjusting lever. Feeding the veneer sandwich through this very fine blade minimised wastage and resulted in an extremely clean cut. I was quickly able to produce enough purfling strips for two guitars, with a couple of strips left over as spares in case of breakage or buckling.

Preparing purflings for the rosewood guitar was an even simpler exercise; they're a simple combination of one black and one red veneer strip - thin enough that strips could be cut from the veneer sheet using a steel rule and a craft knife and pliable enough that pre-bending the strips is unnecessary.

Preparing purflings for the rosewood guitar was an even simpler exercise; they're a simple combination of one black and one red veneer strip - thin enough that strips could be cut from the veneer sheet using a steel rule and a craft knife and pliable enough that pre-bending the strips is unnecessary.
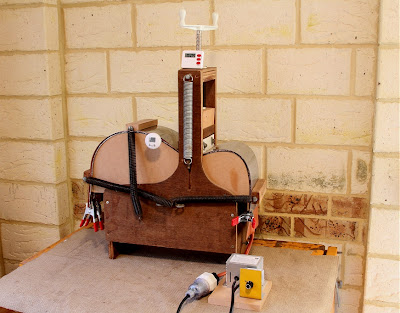
Where the bindings are concerned, I chose to glue contrasting veneers to the edges of the binding strips - again using Titebond III - prior to bending them. Ebony bindings can be a pain to bend so I took the precaution of spraying them lightly with SuperSoft 2 veneer softener the day before I bent them - the softener plasticises the wood strips somewhat, reducing the chance of breakage. Taking care to arrange them into matched pairs, I taped the strips together, misted them with distilled water then wrapped the assembly of strips in brown paper and aluminium foil and bent them in my Fox bender. I began cranking down the press screw at the waist when the thermometer reached 240F and, when I'd bent the upper and lower bouts and applied full tension at the waist, let the heating blanket climb to 310F where I let it sit for a further 5 minutes. I switched the blanket off and removed the binding strips when the machine had cooled to room temperature.

Despite the fact that I'm currently working full time and distracted by those unpleasant but unavoidable weekend chores, I'm setting myself modest targets every week and making steady progress. Installing these purflings and bindings on the three guitar bodies is my next task.


Despite the fact that I'm currently working full time and distracted by those unpleasant but unavoidable weekend chores, I'm setting myself modest targets every week and making steady progress. Installing these purflings and bindings on the three guitar bodies is my next task.
Cheers
Pete


