Showing posts with label Fingerstyle guitar. Show all posts

Friday, May 10, 2013

Spray Day Delay

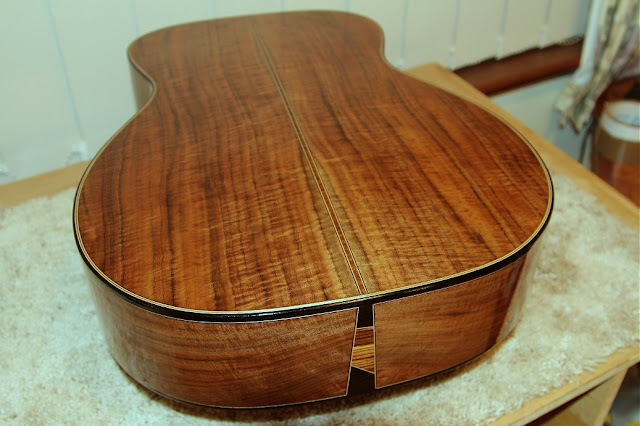
With epoxy pore filling of the back, sides, neck and rosette of this guitar completed, it’s a case now of waiting for a string of fine days and a concurrent break in my regular daily work commitments. Without an enclosed spray booth, I need three consecutive days of good weather to complete my spraying schedule, with a day off work an unfortunate additional requirement.


In readiness for spraying, I've calculated the bridge position and masked the top in the area of the bridge and fretboard extension with a thin, low-tack adhesive film known as frisket film. The edges of the frisket film in the area of the bridge are around 3/16" inside the bridge outline. I've found that by leaving such a margin, it's much easier to level sand and buff the finish in the vicinity of the bridge perimeter. The frisket film is removed only after the body is buffed and I'm preparing to glue the bridge.

After two brushed coats of Ilva TF23 sealer, I'll spray a maximum of five coats of Grafted Coatings’ KTM-SV per day, for a final result of 15 coats of KTM-SV on back, sides and neck, with 10 coats on the soundboard. After level sanding and buffing, I’ll end up with a thin, flexible finish that has minimal impact on the responsiveness of the soundboard while still providing an adequate level of protection.

More soon - good weather permitting!

Cheers
Pete

Sunday, March 31, 2013

The Fingerstyle Guitar - Epoxy Pore Fill

While it's perhaps not in the same league as the Claro Walnut used on the guitar I've recently finished, applying the first coat of epoxy pore fill to the instrument pictured reminds me that each piece of wood has its very own character and unique appeal. Once again, walnut has cast its spell over me and I'm very pleased with the way this guitar is shaping up.


It's an unfamiliar feeling to be pore-filling an instrument so soon after completing the previous one. Typically, many months pass after finishing an instrument before I'm ready to repeat the process, but as I work my way through this current batch of three guitars, I'm no sooner finished with one part of the process than I'm ready to repeat it on the next guitar.

With the necessity of a day job to distract me, the prospect of spraying the finish coats presents something of a problem: to apply the necessary number of coats to the back, sides and neck, I need to devote three consecutive days to the task if I'm to limit the number of coats per day to five. As I'm employed on a contract basis and paid by the hour, the bad news is that I'll need to sacrifice a day's pay if I'm to successfully apply a sprayed finish to the guitar - all the more reason to begin selling my instruments!

Cheers
Pete

Friday, March 29, 2013

The Fingerstyle Guitar - I Can Smell the Finish Line!

After a few days' break from guitar building during which I've enjoyed noodling on Tiani's Claro Walnut /Sitka Spruce 000, it's time to get back to the workbench.


I delude myself with the notion that this Claro Walnut/Redwood OM is essentially complete, ignoring the fact - because it pleases me to - that the lengthy process of filling, finishing and buffing lies ahead of me. After a solid day's work installing the remainder of the purfling and bindings, a few hours' final sanding sees me ready to apply epoxy pore fill to the back, sides and neck. The walnut back and sides are not as spectacular as those of the 000 I've just finished, but there's enough subtle flame evident that I'm confident the final package will look pretty slick - the Macassar Ebony and Zebrano components almost guarantee it.


Cheers
Pete 

Sunday, February 10, 2013

The Fingerstyle Guitar - Latest Photos

I seem bogged down in the details at present, and it feels I'm making little headway. Nevertheless, here are some more progress shots.


Cheers
Pete

Thursday, February 7, 2013

The Fingerstyle Guitar - Slow Progress

Despite the fact that I'm devoting most of my available spare time to completing a claro walnut and spruce instrument for a friend's daughter, there has at least been some movement with this redwood and claro walnut guitar lately. I'm content to proceed patiently, and I'm currently gluing purflings and bindings one piece at a time, through the week after I arrive home from work.


Acknowledging that the tuners and bridge are yet to be attached, the guitar is very light and, knowing how much I strived to brace the soundboard as lightly as I dared, I have great hopes that I'll achieve my goal of producing a very responsive instrument well suited to a fingerstyle player.

Cheers
Pete

Thursday, June 7, 2012

Guitar-Shaped Objects

With these guitar bodies assembled at last, I'm better able to imagine what the completed instruments might look like. It's very satisfying to have reached this stage, but I know there's a lot of work remaining.

Sitka Spruce/Claro Walnut; Sitka Spruce/East Indian Rosewood; Redwood/Claro Walnut

Having laminated the veneers from which I'll slice the purflings, my next job is to prepare purfling and binding strips, then rout out the ledges on the bodies to accommodate them. With the right jigs and tools this shouldn't be a particularly challenging job, but as a "hobby builder", the interval between guitars is significant; I'm not usually able to perform this task frequently enough that I ever feel entirely at ease with the process. With three instruments in the pipeline though, I should be feeling more confident by the time I carry out this step on the last of the current crop.

Cheers
Pete

Monday, June 4, 2012

Soundports

I've posted Matt Mustapick's observations on soundports before, but it seems an opportune time to do so again:

"This concept came originally from the great classical maker Robert Ruck, who puts two small holes on each side of the guitar, very close to where the neck joins the body, rather than one larger hole. The main advantage of the soundport is that it gives the player a "front row seat" to enjoy a strong direct signal from the soundbox. This feature takes nothing away from the forward projection of the instrument. From 20 feet away the guitar is just as loud. For anyone closer to the guitar, it adds a great deal of richness to the sound, owing to the dual sound source which creates a stereo field."

Prior to marking and cutting the side soundports, I took the precaution of gluing two thin layers of veneer to the inner surface of the sides as reinforcement.


Cross-grain veneers provide a measure of protection against cracks

In recognition of the veneers' primary purpose which is to strengthen the area around the ports, their grain runs perpendicular to that of the sides. Some builders argue that cross-grain veneers actually promote cracking by restricting the expansion and contraction of the sides that would otherwise occur. While I accept that such veneers do indeed limit the capacity of the sides to move with fluctuations in humidity, the distance between the linings in this area of the upper bout is small and any potential dimensional change is minimal. If it was a credible risk, we'd surely see cracks developing where the headblock and tailblock similarly restrict the sides' movement across the grain.

In addition to their practical role of protecting against cracks, the veneers also provide me with an opportunity to introduce a contrasting maple line around the walnut guitar's port and extend the rosewood guitar's black and red theme.


Dremel extension handpiece with mini circular saw blade fitted - before and after

A mini sanding drum in the Dremel handpiece takes me to the line

Final sanding required, but essentially, they're done

Very soon, I'll prepare myself mentally for the onerous job of installing purflings and bindings - a task that never seems to get any easier or less stressful!

A recent guitar, with soundport


Useful links:
The Shrinkulator is an online tool that calculates dimensional change in wood with variations in moisture content or relative humidity.


Cheers
Pete

Saturday, September 3, 2011

The Fingerstyle Guitar - Gluing the Soundboard and Back

There are several commonly used methods of clamping the soundboard and back as they're glued to the rims, but the technique pictured here is the one I've adopted; it works very well, and I feel no need to explore other options. I use thin bungee-cord to apply the necessary clamping force, with a caul made from masonite and cork sheet in place to distribute pressure evenly around the guitar's perimeter. The caul focuses clamping pressure on the edge of the back or soundboard, preventing any deformation of the top or back plates which the tightly stretched cord might otherwise cause. It also serves to protect the delicate soundboard wood from damage where the cord breaks sharply over its edge. I trim the top and back plates to within a few millimetres of their final dimensions prior to clamping; there's minimal overhang and therefore no leverage brought to bear by the bungee-cord on the edge of the plates.

Gluing guitar soundboard and back

Gluing guitar soundboard and back

Gluing guitar soundboard and back

I haven't become anywhere near proficient enough with hot hide glue to consider using it to attach the soundboard and back plate to the rims, and in any case, I'm not convinced of the benefits of doing so. That being the case, I'm happy to continue using Titebond Original, applying it the gluing surface of the linings with a 1 inch foam roller after the rim assembly has been securely clamped in the outside mould. The roller allows me a high degree of control over the quantity of glue applied and, if I've judged it well, there's negligible glue squeeze-out at the intersection of the linings with the top and back plates and therefore little need for clean-up inside the guitar body. I attach the back first, the advantage being that once the bungee-cord has been secured, I can flip the entire assembly over and inspect the interior of the guitar through an opening in the base of the mould, cleaning up what squeeze-out there is with a damp sponge.

Click any of the photos for a larger view.

Cheer
Pete

Saturday, August 27, 2011

The Fingerstyle Guitar - Notching the Kerfed Linings

Once the kerfed linings are glued to the sides, the sandpaper-lined concave dishes I made use of when shaping and gluing the top and back braces serve their other purpose by helping me sand a drop-off onto the edges of the rim assembly to match the curvature of the back and top plates.

Sanding guitar rims


Kerfed guitar liningsI can then use a Dremel rotary tool to rout pockets into the linings to accommodate the brace ends. Using the more traditional kerfed linings whose saw kerfs face into the guitar body, there's always a danger that if one or both edges of a brace pocket happen to be in close proximity to the kerfs, a chunk of wood will be dislodged as the pocket is cut. With reverse-kerfed linings, however, the individual sections of wood between the kerfs are firmly glued to the sides and serious chipping of the exposed face of the lining on either side of the brace pocket is far less likely, provided some simple precautions are taken.

When routing the brace pockets, it's important that the Dremel is guided in such a way that the router bit's clockwise rotation doesn't contribute to tearing or chipping of the linings as the pocket is cut. This is particularly important to observe where the left-hand edge of the brace pocket is concerned (i.e., with the guitar side facing me). With that in mind, I make my first cut towards me in the direction of the guitar side along this left-hand margin, easing the router bit into the lining for the equivalent of around half the bit's diameter; a second shallow entry cut on the right-hand side of the pocket defines its width. Several light passes are made from left to right until a single recess is created between the two entry cuts. I repeat this process until the recess extends to the guitar's side and make final adjustments until the end of the brace fits snugly within the pocket. It's difficult to avoid chipping entirely, but by guiding the router in the manner I've described, it's of a minor nature and can be easily cleaned up with sandpaper.


I rout the pockets in pairs, beginning at the tail-block end of the body. If the first pair of pockets is accurately marked and cut, the centre-line of the back will be correctly aligned from that point on. If a minor adjustment to the back alignment is required, the pockets can be modified accordingly. The second, and subsequent pairs of pockets can then be more accurately positioned, with correct alignment of the back more firmly established as each pair is cut.

Some builders postulate that because reverse-kerfed linings stiffen the rim assembly once attached, there are resultant improvements in the sound of the instrument. Occasionally, it seems, views such as this are repeated often enough by individuals held in high regard within the luthier community that they become accepted as fact, whether or not they've been held up to close scrutiny. I acknowledge that I have a lot to learn and always try to have an open mind when reading of the experiences and opinions of other more experienced builders, but after looking at popular wisdom such as this from all angles, I'm left unconvinced. For what it's worth, my personal view is that while it's somewhat helpful having a stiffer rim to work with in the course of constructing the instrument, from the point at which the back and soundboard are attached to the rims, any contribution the linings may have made to the rims' stiffness is eclipsed by the strength of the top and back in compression. I suspect that in the finished instrument, the linings - reversed or otherwise - play little part beyond their primary purpose: to provide a gluing surface for the top and back plates.

Cheers
Pete

Friday, August 26, 2011

The Fingerstyle Guitar - Side Reinforcement

For almost as long as I've been building guitars I've followed the lead of others and have fitted kerfed linings to the rims, then installed wooden reinforcement strips to span the sides between the top and back linings. Although this remains common practice, it seems an increasing number within the lutherie community are coming to the view that this could potentially do more harm than good, the thinking being that if the guitar sustains a significant impact, the area of relative weakness created at the intersection of the side reinforcement and the lining could contribute to a crack developing at that point - it makes sense to me.

Guitar side reinforcement

For this guitar then - and for its rosewood and spruce companion - I've chosen an alternative approach which is to to glue cloth bias tape across the full width of the sides at regular intervals and install the linings over the top of it. The rationale for this is that as the glue-impregnated cloth spans the entire side and will remain somewhat flexible, the weak point I've described is largely avoided. In the unlikely event that a crack develops in one of the sides for whatever reason, the tape will provide a measure of protection against the crack propagating along the length of the side - at least until a permanent repair can be carried out.

Useful Links:
Installing Side Tapes

Cheers
Pete

Sunday, July 10, 2011

The Fingerstyle Guitar - Head Block, Tail Block and Linings

Having braced the top, it's time to temporarily suspend my excitement and spend some time on the rims. For me, this is perhaps the least inspiring stage of construction and the reason I find it preferable to have a ready-made stock of head blocks, tail blocks and kerfed lining strips which I've prepared in batches over the preceding months.  With a supply of blocks and linings on hand, I can make short work of fitting them to the guitar's sides and move on quickly to more interesting tasks.

I laminate my tail blocks using three layers of wood, the middle layer of which has its grain oriented at right angles to the two outer layers, parallel with the grain of the sides. For the little additional effort involved, I can feel confident that the block will remain intact and a side crack will be avoided should the guitar ever be dropped on its end pin.

In the belief that setting modest targets fuels motivation and sustains momentum, I'm setting myself the goal of attaching the head and tail blocks and installing the kerfed linings in the week ahead.

Cheers
Pete

Friday, July 1, 2011

The Fingerstyle Guitar - Soundboard Voicing

Like many novice guitar builders I was inclined to overbuild my early guitars, the mortal fear of them imploding tending to override any suspicion that I was robbing them of their full tonal potential. It's been difficult to leave that mindset behind me, but with a conscious effort to "lighten up", and with the wisdom of more experienced luthiers in mind, I'm venturing further from my previous comfort zone with each guitar in an effort to increase their responsiveness. To that end, I've significantly reduced the mass of my soundboard braces, ever mindful of the delicate balance necessary between lightness and strength. Ironically, it's because of advice from those same sources that I'm inclined to leave the soundboard itself a little thicker than I may once have done.


John Mayes' "Advanced Voicing" DVD provided me with a way forward where carving the soundboard braces is concerned. Without a doubt, watching John shave and shape the soundboard braces then tap on the top to assess the changes he'd brought about has given me a much better insight into the process than I'd been able to gain through simply reading about other luthiers' methods in that regard. As John clearly demonstrates, judicious removal of small amounts of mass from one or more braces can make a big difference to the responsiveness of the soundboard.  It's still a somewhat mysterious and inexact science for me, but recent results suggest that I'm heading in the right direction at last.

There's some carving of brace ends and final finish sanding remaining, but essentially, the redwood top is as resonant as I can confidently make it without sacrificing necessary strength. Its pitch when tapped is significantly different to that of the Sitka spruce top I've recently brought to this level of completion and it will be interesting to compare the two guitars when they're strung up. For my own future reference, I intend to document each top's overall weight and brace dimensions as well as record their tap tones with a hand-held Zoom recorder, the thinking being that over time, as I complete more instruments, I'll be able to correlate these measurements with their sound when played.

Cheers
Pete

Postscript:  Since publishing this post yesterday, I've capped the "X" brace intersection with a small piece of spruce and the relative pitches of the two tops when tapped are now much closer.  It explains the startling difference I noticed yesterday and is a great demonstration of how this small addition can significantly increase the overall stiffness of the top.

Sunday, June 26, 2011

The Fingerstyle Guitar - Fun With Hide Glue


This has been my first attempt at using hot hide glue, and although there were some tense moments - including one abortive attempt at attaching the bridge plate - major disasters were averted.

Because hide glue begins to gel quite rapidly once it cools, it's important to apply it and have the piece being glued clamped in position before that happens. Before I glued each brace, I found it useful to have several practice runs without glue to establish the sequence of steps I'd follow and to make sure I knew in advance where and in what order I would position the "go-bar" clamps. Despite the benefit of those dry-runs, I wasn't able to remain cool, calm and collected at all times and I still managed to make a gooey mess on a couple of occasions.  Thankfully, of all the glues I've used, hide glue is by far the easiest to clean up. As I found out on my first attempt at gluing the bridge plate, the worst that can happen is that the soundboard, brace or bridge plate need to be cleaned of glue with a little warm water, ready for a second attempt when things have dried out. The advice I've read repeatedly - and with some relief - is that using hot hide glue gets easier with practice!

Cheers
Pete

Sunday, June 19, 2011

The Fingerstyle Guitar - Installing the Rosette

I'd probably still be fitting abalone rosettes to my guitars but for the fact that the shell blanks are now unavailable from my usual U.S. sources.  Perhaps that's a good thing: the radial designs I've adopted make a welcome and attractive change - at least I think so!

Routing the rosette channel

Dremel rotary tools attract criticism from some quarters due to their questionable robustness (this one is my third), but when combined with one of Stew-Mac's soundhole jigs and their router base, they're well suited to the task and I'm able to achieve a near-perfect fit of the rosette and the adjoining purfling rings.  If there's a secret to success, it's in exercising patience and "sneaking up" on the final channel width in tiny increments, checking the fit of the rings after each cut until they slip into the channel with light pressure.

Dry-fitting the rosette and purfling rings

Once the rosette has been glued in place and allowed to dry, I feed the top through my drum sander until the rosette and the rings are at the same level as the top. I can easily check when I've arrived at that point by holding the top at an angle such that the the scratches left by the sander are clearly revealed against the light from the workshop door. I want to see continuous scratches along the full length and across the full width of the top, including the rosette.  Once that's achieved, I bring the top to the desired thickness using the drum sander to remove material only from its inner face.       


The zebrano rosette - glued and levelled


Click on any of the images for a closer look.

Cheers
Pete

Friday, June 17, 2011

The Fingerstyle Guitar - Progress Report #1

By necessity, progress on all of my instruments takes place in fits and starts and typically drags out over many months - or longer!  It's been especially difficult lately to find large chunks of time to devote to guitar building, although I can't complain too loudly: one of the reasons has been a leisurely three-week trip exploring Australia's east coast between Melbourne and Sydney - a long-awaited and enjoyable break from the normal routine.


Diversions and distractions aside, I have managed to spend some time on the claro walnut/redwood guitar I discussed in a recent post.  The back is complete, the sides are bent and, after stealing a few hours away from my day job through the week, I've managed to join the halves of the redwood top and fabricate a zebrawood rosette.  If all goes to plan, I'll inlay the rosette and thickness the top over the coming weekend.  The really fun part - bracing and tuning the soundboard - will follow.

Cheers
Pete

Friday, June 3, 2011

The Fingerstyle Guitar - Prototype #1

Not so long ago, I started a thread on the Acoustic Guitar Forum seeking opinions as to the ultimate fingerstyle guitar with respect to design features and materials; there were some interesting and very informative responses. I have to concede that in the past I've erred in seeking out construction tips from other builders to the exclusion of the views of the people who really matter - the players! It seems to me that the Acoustic Guitar Forum is frequented more by guitar players than by guitar builders, so the opinions offered were particularly illuminating. With the benefit of that feedback, I'm setting out to build the best fingerstyle guitar I possibly can within my own limitations and accepting of course that opinions as to what such an instrument might look and sound like will vary markedly.

Perhaps it's my own slightly flawed tendency to focus on the visual aspects of the guitar which made some suggestions stand out from the pack, but within the comments I received I noted an emphasis on the ergonomics of the instrument I was proposing. As well as responsiveness and lightness, a slightly wider string spacing at the bridge and a wider nut stood out as worthwhile features on a guitar destined as a fingerstyle instrument.  Depending on how adventurous I'm feeling, I may attempt an arm bevel for the first time too.

Where wood choices are concerned, I sense a preference for the responsiveness and warmth of cedar or redwood soundboards, while for back and sides, walnut seems a popular choice, perhaps because its higher damping and tendency towards shorter sustain results in greater clarity and separation of notes when in the hands of a fingerstyle player. That being my summation of the opinions offered, I'm opting for a combination of claro walnut and redwood together with the wider string spacings generally preferred by those who responded.  I'm favouring my take on the ubiquitous Martin OM body shape together with that model's 25.4" scale length. 

I hope you'll join me as I begin my quest for the "ultimate" fingerstyle guitar. If the outcome is anything less than brilliant, I can always laugh the offending instrument off as "a prototype" in an attempt to salvage some self-respect!

Cheers
Pete

An Enjoyable Distraction

I had some spare time recently as I waiting for the lacquer I'd sprayed on my current batch of acoustic guitars to cure in readiness for...