Friday, January 23, 2015

Progress - Slow, But Relentless

Despite my slow progress, I'm pretty happy with the way this one's shaping up and amazed - yet again - how completing the gluing of the bindings restores the resonance that's lost when the channels for the purfling and bindings are routed.


Cheers
Pete

Monday, January 19, 2015

Binding and End Graft Preparation

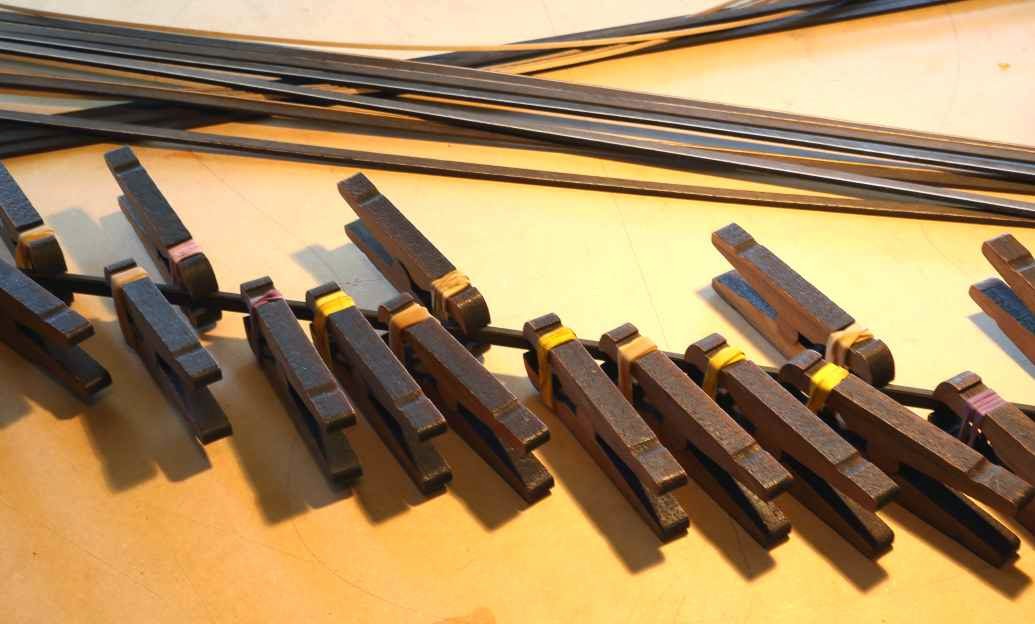
I attach the black and white side purfling strips to the ebony bindings with Titebond 3, a glue that's much more resistant to heat and moisture than the regular Titebond I rely on for so many other guitar-building tasks. The clamps I use when gluing kerfed linings to the sides come in handy for this task too. If only I owned enough to prepare more than one binding strip at a time - tedious! Once the glue is dry, I scrape off any beads of glue and level areas where the edge of the purfling stands proud of the ebony bindings.


Ebony can be stubborn to bend and prone to breakage, particularly if there's run-out present in the binding strips; I always take the pessimistic approach and bend a few spares. In an effort to minimise breakages, I spray them with Super-Soft veneer softener the day prior to bending, and heat the bending blanket to a higher temperature than I'd use for more compliant woods. Although a little spring-back isn't the end of the world where bindings are concerned, I run them through two cycles of heating and cooling to help set the all-important waist bend. On this particular batch of 12 binding strips, I'm pleased to report that all 12 survived intact.


The use of ebony bindings might pose some difficulties in terns of bending, but it does at least provide some latitude when it comes to preparing close fitting joints. I do my utmost to achieve perfection, but usually miss the mark to a greater or lesser degree; fortunately, imperfections are easily disguised with ebony dust and a drop of thin CA glue.

A short length of binding to which I've glued and mitered a piece of purfling is a useful aid when it comes to fitting the end graft. I carefully trim the ends of the end graft using a disc sander, frequently using the binding fragment as a substitute for the actual bindings as a means of checking progress as I sneak up on the final length. Only when I'm completely happy with the fit do I glue and tape the end graft into place. I know many builders trim the graft and miter its corners after it's glued in place but, as much as I'd prefer to avoid the situation, I like having the option of discarding a poorly prepared graft before I've committed glue to it. With the end graft successfully sized and glued in place, I can remove the appropriate length of side purfling from the actual binding strips, then miter the purfling ends to achieve a tight fit where they butt up to the end graft corners.


The point at which the bindings meet at the tail of the instrument is most commonly dealt with by simply butting the ends of the bindings together, but I find I'm more likely to achieve an invisible joint by introducing a matching 45 degree bevel to the end of each piece - commonly known as a scarf joint. The scarf joint is cut in such a way that the end of the binding glued on second wedges tightly under the end of the first. I treat the purflings in the same way. At their full length, the purfling strips extend well past the end graft, so I leave them intact and the location of the scarf joint therefore ends up somewhere other than the half-way point. It's perhaps because the joints aren't where you would expect to find them that they seem much more difficult to detect.

In the interests of achieving a snug fit when it comes time to install the bindings, I find it's helpful to have filed or sanded a facet onto their inner corners. I do the same to the top outer corner of the binding so that the filament tape I use to secure the binding as it's glued isn't cut by the sharp outer edge when force is applied to the tape. To avoid an ugly gap, I'm careful not to round over the top outer binding edge where it will intersect with the fretboard edge. With this in mind, I round over the binding edge in this area with the neck temporarily attached.

On the guitar pictured, which has a florentine cutaway, the curvature of the plates - the back in particular - is such that the sections of binding destined for the cutaway must curve in two dimensions. To achieve a neat, gap-free fit here, I've taken inspiration from the Ervin Somogyi book and fabricated two lengths of binding - one for the top, and one for the back - that have the necessary compound curvature.

To prepare them, I held a piece of stiff card against the inner surface of the cutaway and ran a pencil around the perimeter of the top and back plates; the resulting pencil lines described the curvature I needed to introduce into my ebony strips prior to bending them to match the shape of the cutaway. To make things easier on subsequent guitars, I've prepared a piece of 6mm MDF whose opposing edges conform to these curves. With an ebony headplate attached to the MDF template, a flush-trim router bit gives me a clean edge that's guaranteed to conform to the floor of the binding channels without the need to apply force that would distort the strips and cause gaps between the binding and the adjacent purfling.


Despite the fact that I sprayed the the first pair of strips with Super-Soft and left them to dry overnight, my attempt at bending them to conform to the curvature of the cutaway failed; evidently there was some run-out in my ebony stock, and both strips broke before I'd managed to make much headway. Plan B involved preparing four curved strips - two for the top and two for the back - again using the template pictured. I glued purfling to the edge of one of each of the pairs then, with the help of my drum sander, sanded all of the strips to a thickness representing a fraction more than half the width of the binding channels.


At a thickness of just over 1 millimetre, they bent easily even without the use of Super-Soft, and I was able to laminate the bent pieces to form the two full-width binding sections required. The ebony I used was perfectly black, and the fact that the strips are comprised of two layers will be undetectable once a finish is applied.


Perhaps an overlooked component of binding preparation is the mental aspect. Along with many other (most?) guitar builders, I don't particularly enjoy the task of binding a guitar, and I delay each step until I feel I'm a state of mind conducive to producing a good result. Fabricating and fitting the bindings to the point of the cutaway, for example, requires great patience and precision, and I make sure I'm relaxed but alert before I tackle the job.

Please feel free to offer suggestions and comments - the learning never ceases!


Useful links:
Super-Soft 2
Kerfing Clamps

Cheers
Pete

Thursday, December 18, 2014

Binding Complete - Well, Almost.

With spare time in short supply, any progress I do manage to make seems significant. The cutaway is not yet bound, and there's plenty of scraping and sanding to do but - what the heck - here's where I'm at!


East Indian Rosewood/European Spruce Modified OM
My Claro Walnut/Port Orford Cedar Modified OM is at a similar state of completion and, with another guitar in the form of a Claro Walnut/Redwood OM ready for spraying, I hope to have my compressor and spray gun working overtime very soon.

Cheers
Pete

Tuesday, October 14, 2014

Lutherie, and the Life-Cycle of the Guitar

While the beginning and end points of the guitar-building process can be clearly defined, it's instructive - not to mention humbling - to reflect on the fact that the work of a guitar builder represents only the first stage in the life of the guitar.


If we acknowledge that the luthier's weeks or months of toil serves only to produce a tool whose ultimate purpose is to produce music (hopefully beautiful music!) for many decades, then there's perhaps less of a temptation to view our instruments as ends in themselves. I certainly accept the fact that some of the guitars being built today can truly be regarded as works of art in their own right, but even in the unlikely event that my own instruments one day reach those same lofty heights, the reward I would most like to receive for my efforts would be to see them in the hands of skilled musicians, fulfilling their intended role to the limits of their potential, and contributing in some small way to the magic that music creates.

Cheers
Pete

Tuesday, September 30, 2014

Towards Better Tone

Living in Australia as I do, I have little exposure to the work of other guitar builders, and I sometimes feel I'm working in a vacuum, with very few opportunities to compare my own instruments with those of other builders. In fact, here on the west coast, I'm isolated even by Australian standards.

Practice makes perfect where fit and finish are concerned, and even without access to the work of other builders, I find it's easy to critically evaluate my own workmanship, identify areas where there's scope for improvement, and develop a strategy to address shortcomings. Personally, however, I find that making progress on the all-important tonal considerations is as easy as wading through mud. 

Part the problem, perhaps, is that there's no universally understood vocabulary when it comes to describing tone and, even if there were, correlating the complex properties of tone with the physical characteristics of the guitar's structure is problematic given that the individual elements behave as a single entity once the parts become a whole. The best I've been able to achieve is to slowly develop the courage to lighten my soundboard bracing.as much as I dare, in the hope that all will be miraculously revealed in a flash of inspiration. I'm still waiting.

So, fellow builders, what's the path to tonal nirvana? How do you evaluate your instruments' tone, how do you describe it, and what steps are you taking with a view to making better sounding instruments? And what does that even mean, given that we all hear things differently?

Cheers
Pete

Sunday, September 28, 2014

A Neck Takes Shape

There are aspects of guitar building I don't particularly look forward to, but they are a necessary part of the whole, without which the finished product could not exist.


Along with carving the soundboard braces, shaping the neck is surely one of the more enjoyable tasks. What the two processes have in common is that hand tools are a necessary part of the equation, and success is dependent upon intense concentration and an elevated sensory awareness. I could concede that there's a lesson to be had from that observation and attempt to lessen my reliance on power tools and machinery, but the sad fact is that I acknowledge my limitations and accept that for many steps I really do need mechanical assistance!


How about you, fellow builders? What are the best and worst parts of the guitar building journey for you? 

Cheers
Pete

Monday, September 22, 2014

DIY Guitar Finishing

Living in Australia, I don’t share the luxury of access to a specialist finisher such as Joe White or Addam Stark, and I can’t avoid the time-consuming job of pore-filling, sealing and applying finish top-coats myself. Would I farm my finishing out if that option was available to me? I have to say, I’m really not sure.

As a hobby builder, I don't impose deadlines on myself, nor do I have impatient customers eagerly awaiting progress updates; the time I spend finishing my instruments therefore doesn't weigh too heavily on me. As the standard of my finishes has improved over time, my enjoyment of this part of the process has increased significantly; what was once an onerous task has now become just another series of steps along the way to completing a guitar. The final result relies less and less on chance as my tally of completed guitars grows. In fact, there’s a great sense of satisfaction at having done the hard yards, and in acknowledging that I've gone a long way towards negotiating the learning curve inherent in producing a professional standard of finish.


KTM-SV over Sitka Spruce
Those of you who have followed my blog will know that I've been pretty happy finishing recent guitars with Grafted Coatings’ KTM-SV, a water-based oil-modified urethane. While I’m more than satisfied with the end results I've been able to achieve, I'm deterred by the horrendous shipping charges from the U.S., and the fact that its adhesion over shellac is less than satisfactory. The Ilva two-pack sealer I'm forced to use is nasty stuff, which largely defeats the purpose of using a safe, environmentally-friendly water-based finish, and adds to the already prohibitive cost. As a result, I’m forever on the look out for new products, knowing that what’s on the market is constantly evolving and improving, particularly where water-based products are concerned. Grafted Coatings' recently developed water-based finish material, Ten!, has received great reviews from the few who have trialed it, and I'm keen to hear further reports when it's eventually in widespread use. As the release date is unknown, I'm about to experiment with another product that's new to me. 

Bona Mega is a water-based polyurethane interior floor finish recommended to me by a well known and very well-regarded U.S. luthier, who is himself an ex-KTM-SV user. In case there's a negative bias towards using a floor finish on a guitar, I won't name him. Suffice to say that the standard of his finishes has drawn glowing praise from those attending guitar shows in which he's been a participant. The advantage of Bona Mega for me is that it's readily available locally, and supposedly demonstrates excellent adhesion over a simple shellac seal coat, something that can't be said for KTM-SV. Bona Mega is expensive, but I'll avoid the shock of the shipping charges I pay when I purchase products from the U.S., and benefit from the fact that it bonds well with shellac.

I’m comforted by the fact that some of our more experienced and admired U.S.-based luthiers have also chosen the DIY route, despite the fact that they have access to the aforementioned specialist finishers, and I'm pleased to note that a growing number of them are prepared to use alternatives to the traditional nitrocellulose lacquers and the modern, more robust polyesters. Most importantly, it seems that the players willing to outlay large wads of their hard-earned cash on a hand-made instrument are becoming more knowledgeable and less bound by convention, and are slowly accepting these alternatives even if it means that their prized instruments are slightly more susceptible to damage because of it.

How about you, fellow builders? Do you undertake finishing work yourself? If so, what's your finish product of choice?

Product links:
Bona Mega
Grafted Coatings Ten!

Cheers
Pete

Dry Sanding With Super Assilex and Super Buflex Abrasive Sheets

I put this East Indian rosewood/European spruce guitar to one side as I proceeded with my usual process of wet sanding and buffing four othe...