Showing posts with label Irish Bouzouki. Show all posts

Thursday, September 8, 2016

Irish Bouzouki #1

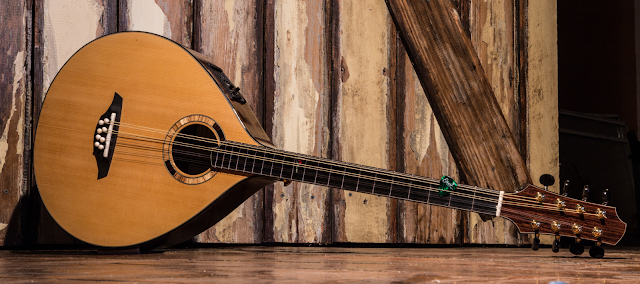
Historically speaking, it's not often I get the chance to post photos of a newly completed instrument, so I'm pleased to be able to do so once again. Hopefully, my recent change of circumstances will see an increase in productivity!


With the benefit of hindsight, there are aspects of this instrument I could have approached differently, or done better, but I can't imagine a time when that won't be the case! Overall, I'm pretty happy with this bouzouki, and I hope its new owner feels the same way.


  • Soundboard: Port Orford Cedar
  • Back and sides: East Indian Rosewood
  • Neck: Honduran Mahogany
  • Fingerboard and bridge: Ebony
  • Rosette: Zebrano and Macassar Ebony
  • Tuners: Gotoh 510 mini
  • Pre-amp: Fishman Prefix Pro
  • Finish: pre-catalysed lacquer (oil-finished neck)
  • Scale length: 24.9"

Now, back to those guitars...


Cheers
Pete

Monday, September 5, 2016

Irish Bouzouki - Nearing Completion

As this is my first attempt at constructing an Irish bouzouki, the adventure has been a prolonged one - even more so than is usual.

Before I began the instrument, I thought long and hard about the preliminary design. It seems there are few established standards where even the most fundamental elements of the Irish bouzouki are concerned, to the extent that there's even debate online as to what constitutes a bouzouki in the first place. Throw the terms "octave mandolin", "mandocello" and "cittern" into the mix with "Irish bouzouki", and you'll find there's plenty of scope for healthy debate and disagreement!

After I'd drawn and redrawn the body outline any number of times, settled on a headstock shape that seemed to be in keeping with my guitar headstocks, decided on the number of frets to the body and the scale length, construction of a half-body template, then a full-body template, were necessary first steps even before I could consider fabricating the all-important outer body mold.  

Given its narrow width, I was a little dubious about the strength of the first neck I made, and the second version, pictured hereabouts, incorporates two carbon fibre bars extending up into the headstock to provide additional strength and stability. In conjunction with the carbon fibre, a double-action truss rod has been installed in the usual manner.

After I'd fabricated the first ebony bridge and marked the position of the bridge pin holes, I was uneasy about their proximity to the rear edge of the bridge. That bridge was discarded, and I redrew the bridge outline and started again, taking into account what I'd learned from the first attempt.

The instrument body was sprayed and buffed out, using yet another waterbased product that promised so much but fell short of the mark in my estimation. Despite having invested a lot of time and effort, I judged it to be unsuitable, due mainly to its softness and the likely difficulty of future touch-ups. The finish was sanded off, a new finish material chosen, and it was back to the spray gun to begin the entire finishing process all over again.


Even now, with the instrument very nearly completed, I have plans to revisit the body outline I'll use on future instruments. I guess this is a natural process with any "prototype", so I'll think of this bouzouki as a first iteration and the basis for further experimentation and refinement in the months and years ahead.

Fortunately, I enjoy problem solving and learning new skills; this instrument has certainly provided many opportunities in that regard. I'll post photos of the completed bouzouki in the next week or two.


Cheers
Pete
Monday, April 18, 2016

Irish Bouzouki - The Parts Become a Whole

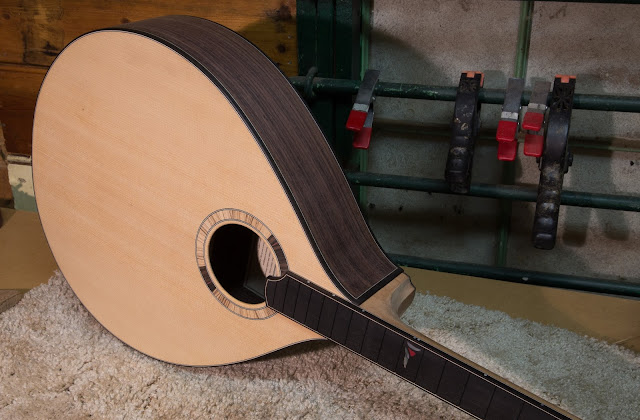
With the woodworking component of this bouzouki project almost complete, it's gratifying to finally see the results of my efforts in an assembled form, and be able to visualise what the completed instrument will look like.


As this project entailed a number of design decisions, as well as fabrication of the necessary moulds and templates, I'm sure the significant investment of time and effort involved will encourage me to construct more of these Irish bouzoukis. It's certainly been an enjoyable process, enhanced without doubt by the fact that, for the first time ever, I've been able to devote entire days to my passion rather than grab the odd hour here and there as my old day-job allowed.

As this is my first bouzouki I guess it's reasonable to regard it as a prototype. Nevertheless, I'm pleased to find that the construction itself has turned out as well as I could have hoped for. The all-important tonal evaluation will have to wait a little longer, of course.

Before I breathe a sigh of relief and pat myself on the back, a reality check tells me that the long and arduous finishing process awaits me!

Cheers
Pete

Monday, January 18, 2016

Irish Bouzouki - The Rosette

I managed to complete the rosette this morning. There's no hint of chipping which has frustrated me in the past, thanks to a tip I picked up from a long-forgotten source.

Prior to routing the inner and outer purfling channels that border the rosette, which I complete after the inner tiles have been glued in place, I applied Titebond to the soundboard in the immediate vicinity of the rings and let it dry overnight. The rationale for doing so is that the wood fibres of the soundboard are less likely to tear or chip when the channels are routed as they are supported and stabilised by the glue. I believe the original suggestion involved the application of shellac in the vicinity of the rosette, but as I'd already managed to smear some Titebond on the soundboard when gluing the inner tiles, I figured it would achieve the same goal. Mission accomplished!


Cheers
Pete

Wednesday, January 13, 2016

Irish Bouzouki - Fun With Moulds

Making jigs and moulds is a messy and time-consuming affair. There are definitely more enjoyable ways to spend one's time, so I figure it's worthwhile investing a little extra effort and expense to get it right the first time.

Half-body and full-body templates
Half-body and full-body templates, with headstock template

While I wait for suitable weather and a break in my IT work long enough to afford me the opportunity to spray finish coats on the four guitars I've been constructing (seemingly forever!), I'm taking the first steps in building an Irish bouzouki - a first for me. After deliberating for some time where design and dimensions are concerned, fabrication of an outside body mould and templates for the bridge and headstock have been my focus in spare moments over the past couple of weeks.

Where construction of the body mould was concerned, my first task was to decide on the overall dimensions in the absence of any universal standards. In the guitar world, the iconic factory models manufactured by Martin and Gibson for many decades have at least served as a loose benchmark for the independent builder. However, as the Irish bouzouki was appropriated to a large extent from the Greek instrument and randomly modified to suit the requirements of a motley band of Irish folk musicians, its evolution appears to have been driven less by tradition than by the whims of the builders and musicians who have adopted it. It seems there are any number of combinations of scale length, body shape and body dimensions in common use, and I finally decided that in the absence of any agreed formula I'd develop something largely on what appeals to my aesthetic tastes. I was influenced a little too by the length of the truss rods I have on hand, my available fretting templates, and my concerns that an extreme scale length and a body join at the 17th fret - as is common practice - would result in a cumbersome, neck-heavy instrument. For better or worse, I've decided on a more conservative 632mm (24.9") scale length, a body width of ~350mm (14"), and a neck to body join at the 15th fret.

Using a set of French curves and a flexible ruler, I tidied up the half-body outline I'd drawn freehand on paper so that the curves transitioned and flowed smoothly. I traced the final outline onto a piece of baking paper, then transferred the outline to a piece of 6mm (1/4") MDF using transfer paper sourced from an art supplies shop.

I jig-sawed the MDF just inside the body outline I'd transferred from the tracing paper, then carefully removed the rest of the waste up to the line using a spindle sander. This yielded me a half-body template that would guarantee symmetry when used as a routing master. To fabricate the full-body master template, I aligned the centreline of the half-body template to a line I'd ruled on a second piece of 6mm MDF, traced the body outline and jig-sawed within the line, then clamped the two pieces together and routed to the line with a flush-cut router bit riding along the inner edge of the half-body template. Flipping the half-body template over and again carefully aligning the centrelines, I routed the other half in a similar fashion. The half-body and full-body templates are shown above.

I know from experience what a dusty mess MDF makes when machined, and of its tendency to deform and deteriorate over time, and made the decision to spend a little more money and fabricate the outside body mould from ply. To do so, I traced inside my full-body template onto a piece of 18mm ply, then jig-sawed inside the line leaving a small margin. Once again, having carefully aligned and clamped the full-body template in place, a flush-cut router bit removed the remaining waste.

I've struggled in the past to accurately align the individual layers when fabricating new moulds, and the solution - now that it's dawned on me - seems embarrassingly obvious. On the second layer of ply, I once again jig-sawed inside the pencilled body outline transferred from the full-body master template, then aligned and glued the two layers of ply together. It was then a matter of routing the waste to the line on the second layer of ply using the first layer itself as the bearing surface for the flush-cut router bit. The process was repeated for the third and fourth layers, with the final mould therefore comprised of four perfectly aligned layers of ply yielding a total thickness of 72mm.


Useful links:
Graham McDonald's, "The Bouzouki Book"
Nigel Forster Guitars - Irish bouzouki page


Cheers
Pete

What's In a Name?

The back and sides of this guitar are of narra, which is an alternative name for a wood that's most often marketed here in Australia as ...