Kerf: a slit or notch made by a saw
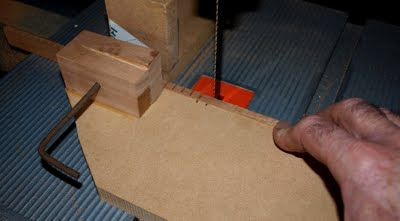
 Pre-made kerfed linings are readily available from any number of suppliers, but given their expense and fragility, I prefer to fabricate my own, leaving a little more wood between the termination of each saw cut and the opposite face of the lining than is generally present on those available commercially. Even with that precaution, I like to pre-bend the mahogany strips with the aid of a bending iron to match the contours of the guitar side. Breakages are rare, but if I should happen to snap one, it makes sense to discard it, or at least reserve it for areas where the break won't be visible. Given the attention to detail lavished on the other aspects of a hand-built instrument, I find it incomprehensible when I see pictures of the interior of a guitar in which joins in the linings are in plain view through the soundhole. I'm a little uncomfortable too with saw cuts whose spacing or depth varies noticeably along the length of the strip. Using my band-saw and the crude but effective fixture pictured below, I'm able to produce evenly spaced cuts of a consistent depth.
 Pre-made kerfed linings are readily available from any number of suppliers, but given their expense and fragility, I prefer to fabricate my own, leaving a little more wood between the termination of each saw cut and the opposite face of the lining than is generally present on those available commercially. Even with that precaution, I like to pre-bend the mahogany strips with the aid of a bending iron to match the contours of the guitar side. Breakages are rare, but if I should happen to snap one, it makes sense to discard it, or at least reserve it for areas where the break won't be visible. Given the attention to detail lavished on the other aspects of a hand-built instrument, I find it incomprehensible when I see pictures of the interior of a guitar in which joins in the linings are in plain view through the soundhole. I'm a little uncomfortable too with saw cuts whose spacing or depth varies noticeably along the length of the strip. Using my band-saw and the crude but effective fixture pictured below, I'm able to produce evenly spaced cuts of a consistent depth.
After several less than satisfactory attempts using a router to apply a rounded profile to what will be the inner corner of the strips, I discovered that by planing a series of facets onto the appropriate edge with a small block plane, I could quickly and easily blend them into a smooth curvature with a sanding block. It reinforces the fact that sometimes, the simple, non-mechanised approach is best!
Cheers
Pete


No comments:
Post a Comment