Sunday, September 25, 2011

Saddle Slots and Bridge Pin Holes

Although I'm nowhere near ready to make use of them, I've spent some time lately working on the bridges destined for the two guitars I have under construction for no other reason than it's a job I can devote short periods of time to in a spare moment, or treat as light relief between more demanding or time-consuming tasks.


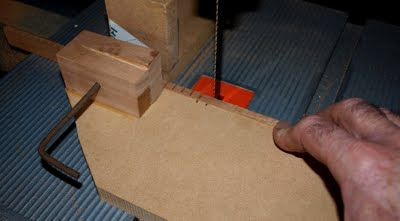
To facilitate drilling of the bridge pin holes in a perfectly straight line, parallel to the saddle slot I've previously routed out, I glue a small wooden block to the front edge of the bridge blank on the treble end prior to cutting the bridge outline. I trim the block carefully using my disk sander so that as the bridge is slid along a makeshift fence attached to my bench drill's table, the centre of each hole will be equidistant from the slot. Having guaranteed alignment in that direction, I need only take care then to align the bit with the string spacings marked on the bridge as I prepare to drill each hole (a white ball-point pen is a godsend when marking dark woods like this ebony). A brad-point bit makes accurate alignment much easier and produces a perfectly clean hole provided it breaks out through the lower surface of the bridge into a backing board of MDF or scrap timber.


With the bridge pin holes drilled parallel to the line of the saddle, there's a consistent break angle for the strings as they pass over it. While some reason that this guarantees an equal downward string pressure along the saddle's length, the fact that string gauges and tensions vary from string to string casts doubt on the validity of that argument. A slight increase in the saddle's height towards its centre and the potential use of radically altered tunings such as "Orkney" tuning (CGDGCD low to highcomplicate the matter still further. Whatever its other merits though, it's a neat look and I'm assured of adequate downward pressure on the saddle and therefore good transference of the strings' energy to the soundboard.


It seems there's no hard and fast rule where bridge weights are concerned; popular wisdom has values falling within a fairly wide range. Given that there are a multitude of factors influencing the guitar's sound, I somehow doubt I'll ever build enough instruments to draw any meaningful conclusions where small variations in bridge weight are concerned; there are so many other variables likely to have a more significant and measurable effect should I feel the urge to experiment. That being the case, I'm happy to aim for a more or less consistent bridge weight from one guitar to the next. With ebony bridges such as these, I shoot for a weight of between 30 and 35 grams, making use of a cheap digital gram scale as I shape and shave the bridge wings to their final thickness.

Useful links:
Routing the Saddle Slot

Cheers
Pete

Saturday, September 3, 2011

The Fingerstyle Guitar - Gluing the Soundboard and Back

There are several commonly used methods of clamping the soundboard and back as they're glued to the rims, but the technique pictured here is the one I've adopted; it works very well, and I feel no need to explore other options. I use thin bungee-cord to apply the necessary clamping force, with a caul made from masonite and cork sheet in place to distribute pressure evenly around the guitar's perimeter. The caul focuses clamping pressure on the edge of the back or soundboard, preventing any deformation of the top or back plates which the tightly stretched cord might otherwise cause. It also serves to protect the delicate soundboard wood from damage where the cord breaks sharply over its edge. I trim the top and back plates to within a few millimetres of their final dimensions prior to clamping; there's minimal overhang and therefore no leverage brought to bear by the bungee-cord on the edge of the plates.

Gluing guitar soundboard and back

Gluing guitar soundboard and back

Gluing guitar soundboard and back

I haven't become anywhere near proficient enough with hot hide glue to consider using it to attach the soundboard and back plate to the rims, and in any case, I'm not convinced of the benefits of doing so. That being the case, I'm happy to continue using Titebond Original, applying it the gluing surface of the linings with a 1 inch foam roller after the rim assembly has been securely clamped in the outside mould. The roller allows me a high degree of control over the quantity of glue applied and, if I've judged it well, there's negligible glue squeeze-out at the intersection of the linings with the top and back plates and therefore little need for clean-up inside the guitar body. I attach the back first, the advantage being that once the bungee-cord has been secured, I can flip the entire assembly over and inspect the interior of the guitar through an opening in the base of the mould, cleaning up what squeeze-out there is with a damp sponge.

Click any of the photos for a larger view.

Cheer
Pete

Saturday, August 27, 2011

The Fingerstyle Guitar - Notching the Kerfed Linings

Once the kerfed linings are glued to the sides, the sandpaper-lined concave dishes I made use of when shaping and gluing the top and back braces serve their other purpose by helping me sand a drop-off onto the edges of the rim assembly to match the curvature of the back and top plates.

Sanding guitar rims


Kerfed guitar liningsI can then use a Dremel rotary tool to rout pockets into the linings to accommodate the brace ends. Using the more traditional kerfed linings whose saw kerfs face into the guitar body, there's always a danger that if one or both edges of a brace pocket happen to be in close proximity to the kerfs, a chunk of wood will be dislodged as the pocket is cut. With reverse-kerfed linings, however, the individual sections of wood between the kerfs are firmly glued to the sides and serious chipping of the exposed face of the lining on either side of the brace pocket is far less likely, provided some simple precautions are taken.

When routing the brace pockets, it's important that the Dremel is guided in such a way that the router bit's clockwise rotation doesn't contribute to tearing or chipping of the linings as the pocket is cut. This is particularly important to observe where the left-hand edge of the brace pocket is concerned (i.e., with the guitar side facing me). With that in mind, I make my first cut towards me in the direction of the guitar side along this left-hand margin, easing the router bit into the lining for the equivalent of around half the bit's diameter; a second shallow entry cut on the right-hand side of the pocket defines its width. Several light passes are made from left to right until a single recess is created between the two entry cuts. I repeat this process until the recess extends to the guitar's side and make final adjustments until the end of the brace fits snugly within the pocket. It's difficult to avoid chipping entirely, but by guiding the router in the manner I've described, it's of a minor nature and can be easily cleaned up with sandpaper.


I rout the pockets in pairs, beginning at the tail-block end of the body. If the first pair of pockets is accurately marked and cut, the centre-line of the back will be correctly aligned from that point on. If a minor adjustment to the back alignment is required, the pockets can be modified accordingly. The second, and subsequent pairs of pockets can then be more accurately positioned, with correct alignment of the back more firmly established as each pair is cut.

Some builders postulate that because reverse-kerfed linings stiffen the rim assembly once attached, there are resultant improvements in the sound of the instrument. Occasionally, it seems, views such as this are repeated often enough by individuals held in high regard within the luthier community that they become accepted as fact, whether or not they've been held up to close scrutiny. I acknowledge that I have a lot to learn and always try to have an open mind when reading of the experiences and opinions of other more experienced builders, but after looking at popular wisdom such as this from all angles, I'm left unconvinced. For what it's worth, my personal view is that while it's somewhat helpful having a stiffer rim to work with in the course of constructing the instrument, from the point at which the back and soundboard are attached to the rims, any contribution the linings may have made to the rims' stiffness is eclipsed by the strength of the top and back in compression. I suspect that in the finished instrument, the linings - reversed or otherwise - play little part beyond their primary purpose: to provide a gluing surface for the top and back plates.

Cheers
Pete

Friday, August 26, 2011

The Fingerstyle Guitar - Side Reinforcement

For almost as long as I've been building guitars I've followed the lead of others and have fitted kerfed linings to the rims, then installed wooden reinforcement strips to span the sides between the top and back linings. Although this remains common practice, it seems an increasing number within the lutherie community are coming to the view that this could potentially do more harm than good, the thinking being that if the guitar sustains a significant impact, the area of relative weakness created at the intersection of the side reinforcement and the lining could contribute to a crack developing at that point - it makes sense to me.

Guitar side reinforcement

For this guitar then - and for its rosewood and spruce companion - I've chosen an alternative approach which is to to glue cloth bias tape across the full width of the sides at regular intervals and install the linings over the top of it. The rationale for this is that as the glue-impregnated cloth spans the entire side and will remain somewhat flexible, the weak point I've described is largely avoided. In the unlikely event that a crack develops in one of the sides for whatever reason, the tape will provide a measure of protection against the crack propagating along the length of the side - at least until a permanent repair can be carried out.

Useful Links:
Installing Side Tapes

Cheers
Pete

Monday, August 22, 2011

New Wood Purchases

I have a love/hate relationship with our strong Australian dollar at present. It's too convenient an excuse to click the "Buy Now" button when I spot particularly desirable pieces of wood on favourite web sites such as Allied Lutherie's but, of course, it's also of benefit once I've given in to temptation. Resistance is futile, it would seem.

Ample evidence of my recent weakness can be seen below. Those poor souls similarly afflicted with "Wood Acquisition Syndrome" can click the pictures for a closer look. 

European spruce soundboard
European Spruce

Port Orford Cedar soundboard
Port Orford Cedar
European Spruce needs no introduction, but Port Orford Cedar is a relatively uncommon tonewood. Luthier's Mercantile has this to say about it:

Similar in appearance and scent to Alaskan Yellow Cedar, Port Orford Cedar is stiffer, lighter and thus more suitable for soundboards. Indeed, it is highly sought after for the bold, robust, responsive tone that it imparts on an instrument. It is very even textured, with a slight golden-white color and tight, even grain. A great advantage to the builder is that this wood is more immune to splitting than absolutely any other soundboard wood.

The Port Orford Cedar is in transit as I write this and I'm impatient to inspect it, flex it, tap it - and smell it! Aside from its promised tonal and structural advantages, I'm looking forward to experiencing the pungent peppery smell it's said to impart to a completed instrument.  It's almost worth combining it with a back and side set of Claro Walnut for that reason alone given walnut's delicious aroma.  Such an instrument would surely be the ultimate "perfumed guitar"!

Useful links:
Port Ordford Cedar - Stansell Guitars

Cheers
Pete

Tuesday, August 2, 2011

Kerfed Linings

Kerf: a slit or notch made by a saw

Pre-made kerfed linings are readily available from any number of suppliers, but given their expense and fragility, I prefer to fabricate my own, leaving a little more wood between the termination of each saw cut and the opposite face of the lining than is generally present on those available commercially. Even with that precaution, I like to pre-bend the mahogany strips with the aid of a bending iron to match the contours of the guitar side. Breakages are rare, but if I should happen to snap one, it makes sense to discard it, or at least reserve it for areas where the break won't be visible. Given the attention to detail lavished on the other aspects of a hand-built instrument, I find it incomprehensible when I see pictures of the interior of a guitar in which joins in the linings are in plain view through the soundhole. I'm a little uncomfortable too with saw cuts whose spacing or depth varies noticeably along the length of the strip. Using my band-saw and the crude but effective fixture pictured below, I'm able to produce evenly spaced cuts of a consistent depth.

Making kerfed guitar linings

After several less than satisfactory attempts using a router to apply a rounded profile to what will be the inner corner of the strips, I discovered that by planing a series of facets onto the appropriate edge with a small block plane, I could quickly and easily blend them into a smooth curvature with a sanding block. It reinforces the fact that sometimes, the simple, non-mechanised approach is best!

Cheers
Pete

Sunday, July 31, 2011

A Claro Walnut/Sitka Spruce 000 - Free to Good Home!

I've made great advances with the last two guitars I've completed in terms of build quality and tone and I'm afraid I'm a little lacking in motivation when it comes to completing this one. I guess that's a little strange given my usual passion for guitar building, but considering that I began its construction quite some time ago and would much rather be working on my new instruments, putting into practice important lessons recently learned, I'm inclined to forgive myself for this half-hearted attitude.


The photograph above doesn't do the claro walnut back and sides justice; in its present raw state, the wood looks pretty uninspiring. Under finish, however, its stunning figure will be fully revealed and will be the icing on what I hope will be a very successful cake!

Tapping on this unusually marked Sitka spruce soundboard in its unfinished state gives me reason to be confident. The body is very resonant, the standard of workmanship is acceptable and construction is far enough advanced that I'm sure I can muster the enthusiasm to finish it. This guitar's state of completion will fall into line with my two latest instruments when they are ready to receive bindings. From that point on I'll attempt to complete the remaining steps on all three guitars concurrently.

Click for a closer look.

For what will hopefully be the last time, I plan on finding an appreciative recipient and making a gift of one of my instruments. It's certainly been very satisfying to have delivered my last two guitars to keen players free of charge, but once this guitar finds a new home, foregoing that pleasure and at last deriving some meagre income from my hobby is a prospect that's becoming increasingly attractive.  Semi-retirement (and a new band-saw) beckons!

Cheers
Pete

Dry Sanding With Super Assilex and Super Buflex Abrasive Sheets

I put this East Indian rosewood/European spruce guitar to one side as I proceeded with my usual process of wet sanding and buffing four othe...