Monday, September 27, 2021

Too Good to Burn!

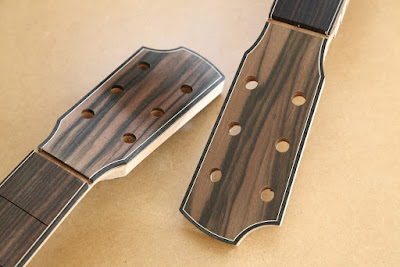
Pictured are some chunks of red gum (Eucalyptus camaldulensis) that I snatched from the wood delivery man's hands as he stacked a delivery of firewood at the rear of my house.


I guess this only goes to show that we're not always conscious of the beauty surrounding us, and that more enduring and meaningful use can be made of such precious materials if only we are open to their possibilities.

I'm sure this wood will find its way into a future guitar in the form of a bridge, rosette, or headstock veneer.

Cheers, Pete


Thursday, June 7, 2018

There's Nothing New Under the Sun!

Over the years, I've given a lot of thought to developing a signature look for my guitars and, for the most part, I'm satisfied with that aspect of their construction. Having said that, I'm sure there will be further evolution, as well as minor variations from one instrument to the next.


It's probably inevitable that with the limited canvas afforded by the guitar I'll often find instances of others' instrument designs having arrived at a similar destination in an aesthetic sense; my initial reaction when I discover that the headstock, heel cap, bridge shape or rosette design I invested so much time on exists elsewhere is one of mild disappointment. However, rather than seeking to change my own designs and embark on an endless exercise in tail chasing, I'm learning to accept that there's nothing new under the sun, and that there's no point in pursuing that particular mirage - no good can come from it, and constant disappointment can be the only predictable outcome!


As much as I admire design elements such as, for example, Kevin Ryan's "acoustic flutes", Michael Greenfield's ever-so-cool bridge shape, or Sheldon Schwarz's multiple oval soundholes, they strike me as truly unique designs that help identify those builders' instruments - part of their "brand", if you like. Although they're very inspiring, out of admiration and respect I would never seek to imitate those examples. Instead, I'll continue to be receptive to new ideas that drift into my consciousness, rejecting any that tend towards deliberate mimicry - assuming that I know they do!


With that in mind, I have some exciting "new" design features brewing that will unfortunately only see the light of day once I've built my workshop. I can't wait to turn them into reality!

Cheers
Pete

Wednesday, March 8, 2017

Self-Motivation!

Just so visitors to this blog don't think that I've forgotten about guitars completely, I took a few photos earlier this week showing the state of play with the three guitars currently sitting in their cases under the bed. With little chance of progress until I've constructed a workshop, I tend to drag these guitars out into the light occasionally in an effort to maintain my motivation levels.

Finish was applied a few months ago, but without a work space, I'm unable to sand and buff them, attach bridges and install frets. The walnut/redwood guitar is an exception in some respects, and is tantalisingly close to completion; the neck on this guitar has an oil finish, so I was more easily able to install and dress the frets before I vacated my previous workshop here in town.

Construction of my workshop is a significant undertaking given that a shortage of funds necessitates that I complete as much of the work as I can myself. As a lifelong procrastinator, I need to constantly remind myself what a big part of my life this hobby/obsession has become and, therefore, just how important it is that I take concrete steps towards realising my dream of having a purpose-built workshop in which I can build guitars on a more-or-less full-time basis.

East Indian Rosewood/European Spruce Modified OM
Claro Walnut/Port Orford Cedar Modified OM
Claro Walnut/Redwood OM

Cheers
Pete

Tuesday, January 24, 2017

A Workshop, a Workshop, My Kingdom for a Workshop!

With several guitars 90% completed, it's a little frustrating to once again find myself without a workshop, or even a makeshift workspace I can use temporarily.


In moving interstate into a much smaller and cheaper house in 2015, the ultimate vision was that my partner and I would be financially able to engage a builder to construct a purpose-built workshop in which I could fulfil my dream of building guitars on a more-or-less full-time basis. Reality has bitten hard, however, and the quoted price for such a building has been a little shocking, to say the least.

Plan B - the cheaper option - involves me learning a new set of skills in order to build a suitable workshop myself. My preferred building method will involve a post-and-beam framework, with straw bales used as infill between the timbers comprising the walls. The interior and exterior of the bales will be rendered so as to seal them against the elements and provide the necessary rigidity.

Proposed workshop site, with a view over an adjacent reserve.
Step 1, which I have almost achieved, involves settling on a rough design. The second, more challenging step, requires negotiation with the appropriate authorities to secure the necessary planning and building permits. I'm prepared for this to be a long, drawn-out process, complicated somewhat by the fact that our property sits in a zone susceptible to bushfires.

Needless to say, this is something of a departure from my usual instrument building adventures and is at odds with the nature of this blog, but I'll post progress reports and photographs here from time to time for anyone interested. Unfortunately, photos of guitars will have to wait a while!

As usual, please feel free to ask questions, or make comments.

Interesting links:
Why Build With Straw Bales?
Building a Home Using Straw Bale Construction


Cheers
Pete

Thursday, September 8, 2016

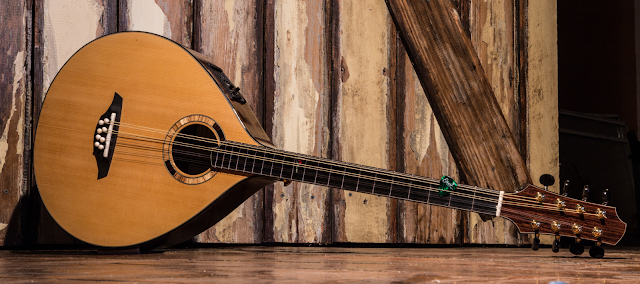
Irish Bouzouki #1

Historically speaking, it's not often I get the chance to post photos of a newly completed instrument, so I'm pleased to be able to do so once again. Hopefully, my recent change of circumstances will see an increase in productivity!


With the benefit of hindsight, there are aspects of this instrument I could have approached differently, or done better, but I can't imagine a time when that won't be the case! Overall, I'm pretty happy with this bouzouki, and I hope its new owner feels the same way.


  • Soundboard: Port Orford Cedar
  • Back and sides: East Indian Rosewood
  • Neck: Honduran Mahogany
  • Fingerboard and bridge: Ebony
  • Rosette: Zebrano and Macassar Ebony
  • Tuners: Gotoh 510 mini
  • Pre-amp: Fishman Prefix Pro
  • Finish: pre-catalysed lacquer (oil-finished neck)
  • Scale length: 24.9"

Now, back to those guitars...


Cheers
Pete

Monday, September 5, 2016

Irish Bouzouki - Nearing Completion

As this is my first attempt at constructing an Irish bouzouki, the adventure has been a prolonged one - even more so than is usual.

Before I began the instrument, I thought long and hard about the preliminary design. It seems there are few established standards where even the most fundamental elements of the Irish bouzouki are concerned, to the extent that there's even debate online as to what constitutes a bouzouki in the first place. Throw the terms "octave mandolin", "mandocello" and "cittern" into the mix with "Irish bouzouki", and you'll find there's plenty of scope for healthy debate and disagreement!

After I'd drawn and redrawn the body outline any number of times, settled on a headstock shape that seemed to be in keeping with my guitar headstocks, decided on the number of frets to the body and the scale length, construction of a half-body template, then a full-body template, were necessary first steps even before I could consider fabricating the all-important outer body mold.  

Given its narrow width, I was a little dubious about the strength of the first neck I made, and the second version, pictured hereabouts, incorporates two carbon fibre bars extending up into the headstock to provide additional strength and stability. In conjunction with the carbon fibre, a double-action truss rod has been installed in the usual manner.

After I'd fabricated the first ebony bridge and marked the position of the bridge pin holes, I was uneasy about their proximity to the rear edge of the bridge. That bridge was discarded, and I redrew the bridge outline and started again, taking into account what I'd learned from the first attempt.

The instrument body was sprayed and buffed out, using yet another waterbased product that promised so much but fell short of the mark in my estimation. Despite having invested a lot of time and effort, I judged it to be unsuitable, due mainly to its softness and the likely difficulty of future touch-ups. The finish was sanded off, a new finish material chosen, and it was back to the spray gun to begin the entire finishing process all over again.


Even now, with the instrument very nearly completed, I have plans to revisit the body outline I'll use on future instruments. I guess this is a natural process with any "prototype", so I'll think of this bouzouki as a first iteration and the basis for further experimentation and refinement in the months and years ahead.

Fortunately, I enjoy problem solving and learning new skills; this instrument has certainly provided many opportunities in that regard. I'll post photos of the completed bouzouki in the next week or two.


Cheers
Pete

Bridge Day

With a template describing the bridge outline, and an appropriate jig to facilitate routing of the saddle slot, it's a fairly quick and ...