Tuesday, August 2, 2011

Kerfed Linings

Kerf: a slit or notch made by a saw

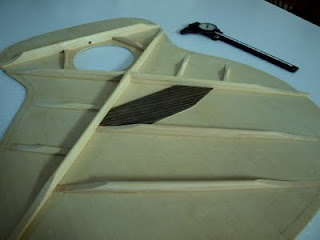
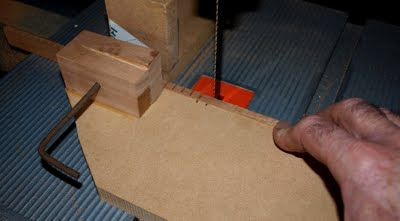
Pre-made kerfed linings are readily available from any number of suppliers, but given their expense and fragility, I prefer to fabricate my own, leaving a little more wood between the termination of each saw cut and the opposite face of the lining than is generally present on those available commercially. Even with that precaution, I like to pre-bend the mahogany strips with the aid of a bending iron to match the contours of the guitar side. Breakages are rare, but if I should happen to snap one, it makes sense to discard it, or at least reserve it for areas where the break won't be visible. Given the attention to detail lavished on the other aspects of a hand-built instrument, I find it incomprehensible when I see pictures of the interior of a guitar in which joins in the linings are in plain view through the soundhole. I'm a little uncomfortable too with saw cuts whose spacing or depth varies noticeably along the length of the strip. Using my band-saw and the crude but effective fixture pictured below, I'm able to produce evenly spaced cuts of a consistent depth.

Making kerfed guitar linings

After several less than satisfactory attempts using a router to apply a rounded profile to what will be the inner corner of the strips, I discovered that by planing a series of facets onto the appropriate edge with a small block plane, I could quickly and easily blend them into a smooth curvature with a sanding block. It reinforces the fact that sometimes, the simple, non-mechanised approach is best!

Cheers
Pete
Sunday, July 31, 2011

A Claro Walnut/Sitka Spruce 000 - Free to Good Home!

I've made great advances with the last two guitars I've completed in terms of build quality and tone and I'm afraid I'm a little lacking in motivation when it comes to completing this one. I guess that's a little strange given my usual passion for guitar building, but considering that I began its construction quite some time ago and would much rather be working on my new instruments, putting into practice important lessons recently learned, I'm inclined to forgive myself for this half-hearted attitude.


The photograph above doesn't do the claro walnut back and sides justice; in its present raw state, the wood looks pretty uninspiring. Under finish, however, its stunning figure will be fully revealed and will be the icing on what I hope will be a very successful cake!

Tapping on this unusually marked Sitka spruce soundboard in its unfinished state gives me reason to be confident. The body is very resonant, the standard of workmanship is acceptable and construction is far enough advanced that I'm sure I can muster the enthusiasm to finish it. This guitar's state of completion will fall into line with my two latest instruments when they are ready to receive bindings. From that point on I'll attempt to complete the remaining steps on all three guitars concurrently.

Click for a closer look.

For what will hopefully be the last time, I plan on finding an appreciative recipient and making a gift of one of my instruments. It's certainly been very satisfying to have delivered my last two guitars to keen players free of charge, but once this guitar finds a new home, foregoing that pleasure and at last deriving some meagre income from my hobby is a prospect that's becoming increasingly attractive.  Semi-retirement (and a new band-saw) beckons!

Cheers
Pete

Sunday, July 10, 2011

The Fingerstyle Guitar - Head Block, Tail Block and Linings

Having braced the top, it's time to temporarily suspend my excitement and spend some time on the rims. For me, this is perhaps the least inspiring stage of construction and the reason I find it preferable to have a ready-made stock of head blocks, tail blocks and kerfed lining strips which I've prepared in batches over the preceding months.  With a supply of blocks and linings on hand, I can make short work of fitting them to the guitar's sides and move on quickly to more interesting tasks.

I laminate my tail blocks using three layers of wood, the middle layer of which has its grain oriented at right angles to the two outer layers, parallel with the grain of the sides. For the little additional effort involved, I can feel confident that the block will remain intact and a side crack will be avoided should the guitar ever be dropped on its end pin.

In the belief that setting modest targets fuels motivation and sustains momentum, I'm setting myself the goal of attaching the head and tail blocks and installing the kerfed linings in the week ahead.

Cheers
Pete

Friday, July 1, 2011

The Fingerstyle Guitar - Soundboard Voicing

Like many novice guitar builders I was inclined to overbuild my early guitars, the mortal fear of them imploding tending to override any suspicion that I was robbing them of their full tonal potential. It's been difficult to leave that mindset behind me, but with a conscious effort to "lighten up", and with the wisdom of more experienced luthiers in mind, I'm venturing further from my previous comfort zone with each guitar in an effort to increase their responsiveness. To that end, I've significantly reduced the mass of my soundboard braces, ever mindful of the delicate balance necessary between lightness and strength. Ironically, it's because of advice from those same sources that I'm inclined to leave the soundboard itself a little thicker than I may once have done.


John Mayes' "Advanced Voicing" DVD provided me with a way forward where carving the soundboard braces is concerned. Without a doubt, watching John shave and shape the soundboard braces then tap on the top to assess the changes he'd brought about has given me a much better insight into the process than I'd been able to gain through simply reading about other luthiers' methods in that regard. As John clearly demonstrates, judicious removal of small amounts of mass from one or more braces can make a big difference to the responsiveness of the soundboard.  It's still a somewhat mysterious and inexact science for me, but recent results suggest that I'm heading in the right direction at last.

There's some carving of brace ends and final finish sanding remaining, but essentially, the redwood top is as resonant as I can confidently make it without sacrificing necessary strength. Its pitch when tapped is significantly different to that of the Sitka spruce top I've recently brought to this level of completion and it will be interesting to compare the two guitars when they're strung up. For my own future reference, I intend to document each top's overall weight and brace dimensions as well as record their tap tones with a hand-held Zoom recorder, the thinking being that over time, as I complete more instruments, I'll be able to correlate these measurements with their sound when played.

Cheers
Pete

Postscript:  Since publishing this post yesterday, I've capped the "X" brace intersection with a small piece of spruce and the relative pitches of the two tops when tapped are now much closer.  It explains the startling difference I noticed yesterday and is a great demonstration of how this small addition can significantly increase the overall stiffness of the top.

Sunday, June 26, 2011

The Fingerstyle Guitar - Fun With Hide Glue


This has been my first attempt at using hot hide glue, and although there were some tense moments - including one abortive attempt at attaching the bridge plate - major disasters were averted.

Because hide glue begins to gel quite rapidly once it cools, it's important to apply it and have the piece being glued clamped in position before that happens. Before I glued each brace, I found it useful to have several practice runs without glue to establish the sequence of steps I'd follow and to make sure I knew in advance where and in what order I would position the "go-bar" clamps. Despite the benefit of those dry-runs, I wasn't able to remain cool, calm and collected at all times and I still managed to make a gooey mess on a couple of occasions.  Thankfully, of all the glues I've used, hide glue is by far the easiest to clean up. As I found out on my first attempt at gluing the bridge plate, the worst that can happen is that the soundboard, brace or bridge plate need to be cleaned of glue with a little warm water, ready for a second attempt when things have dried out. The advice I've read repeatedly - and with some relief - is that using hot hide glue gets easier with practice!

Cheers
Pete

Thursday, June 23, 2011

More Fun With Rosettes

After the recent experience of having several instruments under construction at once, I vowed I'd restrict myself to building one instrument at a time once they were completed. That promise was soon broken however, as evidenced by this East Indian rosewood/Sitka spruce guitar which I'm building alongside my claro walnut/redwood fingerstyle instrument.


Where the rosette is concerned, I decided to contrast the spruce top with a dark wood - again using a radial design. Macassar ebony seemed a natural choice, with a dash of red adding some zing to the combination.  Top, back and side purflings will extend this black/red theme.


Cheers
Pete

Sunday, June 19, 2011

The Fingerstyle Guitar - Installing the Rosette

I'd probably still be fitting abalone rosettes to my guitars but for the fact that the shell blanks are now unavailable from my usual U.S. sources.  Perhaps that's a good thing: the radial designs I've adopted make a welcome and attractive change - at least I think so!

Routing the rosette channel

Dremel rotary tools attract criticism from some quarters due to their questionable robustness (this one is my third), but when combined with one of Stew-Mac's soundhole jigs and their router base, they're well suited to the task and I'm able to achieve a near-perfect fit of the rosette and the adjoining purfling rings.  If there's a secret to success, it's in exercising patience and "sneaking up" on the final channel width in tiny increments, checking the fit of the rings after each cut until they slip into the channel with light pressure.

Dry-fitting the rosette and purfling rings

Once the rosette has been glued in place and allowed to dry, I feed the top through my drum sander until the rosette and the rings are at the same level as the top. I can easily check when I've arrived at that point by holding the top at an angle such that the the scratches left by the sander are clearly revealed against the light from the workshop door. I want to see continuous scratches along the full length and across the full width of the top, including the rosette.  Once that's achieved, I bring the top to the desired thickness using the drum sander to remove material only from its inner face.       


The zebrano rosette - glued and levelled


Click on any of the images for a closer look.

Cheers
Pete

Saturday, June 18, 2011

Guitars for Sale - Perhaps!

Either through ignorance, foolishness or a surplus of enthusiasm, I was only too keen to offer my early guitars for sale - thankfully, none of them have come back to haunt me! I've often wondered what became of the instruments I sold so many years ago, so it was with pleasant surprise that I received an email from a past "customer" who discovered this blog and decided to get in touch - thanks Laurence!  It was great to hear from him, but I was a little startled to hear of his continuing affection for the guitar I built him - now more than ten years ago - given the degree to which the quality of my guitars has improved over the intervening years and how those first few instruments must suffer - quite naturally - by comparison to more recent efforts.

Frequent "reality checks" in the years since I built Laurence's guitar have served to keep my feet on the ground and have convinced me of the wisdom of building instruments for my own use, or for friends and acquaintances free of charge.  It's a cautious approach that's allowed me to gather a much better array of jigs and tools and gradually improve my skills to a level comparable to other emerging builders.  If you've followed this blog over the past couple of years you'll know that improving the standard of my finishes has also been a major factor in my decision to prolong my self-imposed apprenticeship.


Perhaps the two guitars I've recently commenced herald a new era and will give me the renewed confidence - hopefully deserved this time - to offer my guitars for sale.  Both are modelled after Martin's iconic "Orchestra Model" (OM) series of instruments and feature combinations of East Indian Rosewood/Sitka Spruce and Claro Walnut/Redwood respectively.

If there's even a shred of truth in what's written about the tonal characteristics of the various wood species, the finished instruments will be worlds apart when they're eventually equipped to sing. Assuming I work on the instruments concurrently and complete them at the same time, I'll be well placed to make useful comparisons and judgements.

Cheers
Pete

Friday, June 17, 2011

The Fingerstyle Guitar - Progress Report #1

By necessity, progress on all of my instruments takes place in fits and starts and typically drags out over many months - or longer!  It's been especially difficult lately to find large chunks of time to devote to guitar building, although I can't complain too loudly: one of the reasons has been a leisurely three-week trip exploring Australia's east coast between Melbourne and Sydney - a long-awaited and enjoyable break from the normal routine.


Diversions and distractions aside, I have managed to spend some time on the claro walnut/redwood guitar I discussed in a recent post.  The back is complete, the sides are bent and, after stealing a few hours away from my day job through the week, I've managed to join the halves of the redwood top and fabricate a zebrawood rosette.  If all goes to plan, I'll inlay the rosette and thickness the top over the coming weekend.  The really fun part - bracing and tuning the soundboard - will follow.

Cheers
Pete

Wednesday, June 15, 2011

Hot Hide Glue

In an effort to find out first hand why so many luthiers favour the use of hot hide glue when modern alternatives are so readily available, I've finally ordered (and received!) some high clarity 192 gram-strength hide glue granules from the U.S.  I'm sure my Titebond, epoxy and superglue will remain indispensable for many tasks, but I'm keen to introduce this most ancient of glue types into my building process, particularly when it comes to attaching braces to instrument soundboards and backs.


My initial order was intercepted by Australia's occasionally-vigilant quarantine service and ultimately destroyed by them (despite my protestations), but it seems they were distracted by other matters while my second order was entering the country.  I'd be feeling a little guilty right now for having circumvented our quarantine laws, except for the fact that other Australian builders report that their shipments are routinely inspected by quarantine personnel before being sealed up and sent on their way without a fuss. If one-pound packages of hide glue posed any real threat to national security I'm sure they would be confiscated on a more consistent basis!

It's been a long time since I've had any need for a baby bottle warmer; the cheap model pictured will see out its days as a handy glue pot.

Some useful links:
Frank Ford - Using Hide Glue
Luthier's Mercantile - Granular Hide Glue
Wikipedia - Animal Glue


Cheers
Pete

Friday, June 3, 2011

The Fingerstyle Guitar - Prototype #1

Not so long ago, I started a thread on the Acoustic Guitar Forum seeking opinions as to the ultimate fingerstyle guitar with respect to design features and materials; there were some interesting and very informative responses. I have to concede that in the past I've erred in seeking out construction tips from other builders to the exclusion of the views of the people who really matter - the players! It seems to me that the Acoustic Guitar Forum is frequented more by guitar players than by guitar builders, so the opinions offered were particularly illuminating. With the benefit of that feedback, I'm setting out to build the best fingerstyle guitar I possibly can within my own limitations and accepting of course that opinions as to what such an instrument might look and sound like will vary markedly.

Perhaps it's my own slightly flawed tendency to focus on the visual aspects of the guitar which made some suggestions stand out from the pack, but within the comments I received I noted an emphasis on the ergonomics of the instrument I was proposing. As well as responsiveness and lightness, a slightly wider string spacing at the bridge and a wider nut stood out as worthwhile features on a guitar destined as a fingerstyle instrument.  Depending on how adventurous I'm feeling, I may attempt an arm bevel for the first time too.

Where wood choices are concerned, I sense a preference for the responsiveness and warmth of cedar or redwood soundboards, while for back and sides, walnut seems a popular choice, perhaps because its higher damping and tendency towards shorter sustain results in greater clarity and separation of notes when in the hands of a fingerstyle player. That being my summation of the opinions offered, I'm opting for a combination of claro walnut and redwood together with the wider string spacings generally preferred by those who responded.  I'm favouring my take on the ubiquitous Martin OM body shape together with that model's 25.4" scale length. 

I hope you'll join me as I begin my quest for the "ultimate" fingerstyle guitar. If the outcome is anything less than brilliant, I can always laugh the offending instrument off as "a prototype" in an attempt to salvage some self-respect!

Cheers
Pete

The Long Wait

As keen as I am to string these guitars up and wave them goodbye, I have no choice but to wait several weeks for the lacquer top-coats to cu...