Monday, August 22, 2011

New Wood Purchases

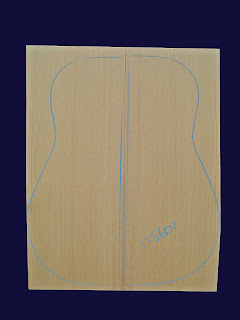
I have a love/hate relationship with our strong Australian dollar at present. It's too convenient an excuse to click the "Buy Now" button when I spot particularly desirable pieces of wood on favourite web sites such as Allied Lutherie's but, of course, it's also of benefit once I've given in to temptation. Resistance is futile, it would seem.

Ample evidence of my recent weakness can be seen below. Those poor souls similarly afflicted with "Wood Acquisition Syndrome" can click the pictures for a closer look. 

European spruce soundboard
European Spruce

Port Orford Cedar soundboard
Port Orford Cedar
European Spruce needs no introduction, but Port Orford Cedar is a relatively uncommon tonewood. Luthier's Mercantile has this to say about it:

Similar in appearance and scent to Alaskan Yellow Cedar, Port Orford Cedar is stiffer, lighter and thus more suitable for soundboards. Indeed, it is highly sought after for the bold, robust, responsive tone that it imparts on an instrument. It is very even textured, with a slight golden-white color and tight, even grain. A great advantage to the builder is that this wood is more immune to splitting than absolutely any other soundboard wood.

The Port Orford Cedar is in transit as I write this and I'm impatient to inspect it, flex it, tap it - and smell it! Aside from its promised tonal and structural advantages, I'm looking forward to experiencing the pungent peppery smell it's said to impart to a completed instrument.  It's almost worth combining it with a back and side set of Claro Walnut for that reason alone given walnut's delicious aroma.  Such an instrument would surely be the ultimate "perfumed guitar"!

Useful links:
Port Ordford Cedar - Stansell Guitars

Cheers
Pete

Tuesday, August 2, 2011

Kerfed Linings

Kerf: a slit or notch made by a saw

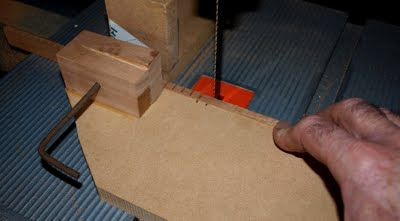
Pre-made kerfed linings are readily available from any number of suppliers, but given their expense and fragility, I prefer to fabricate my own, leaving a little more wood between the termination of each saw cut and the opposite face of the lining than is generally present on those available commercially. Even with that precaution, I like to pre-bend the mahogany strips with the aid of a bending iron to match the contours of the guitar side. Breakages are rare, but if I should happen to snap one, it makes sense to discard it, or at least reserve it for areas where the break won't be visible. Given the attention to detail lavished on the other aspects of a hand-built instrument, I find it incomprehensible when I see pictures of the interior of a guitar in which joins in the linings are in plain view through the soundhole. I'm a little uncomfortable too with saw cuts whose spacing or depth varies noticeably along the length of the strip. Using my band-saw and the crude but effective fixture pictured below, I'm able to produce evenly spaced cuts of a consistent depth.

Making kerfed guitar linings

After several less than satisfactory attempts using a router to apply a rounded profile to what will be the inner corner of the strips, I discovered that by planing a series of facets onto the appropriate edge with a small block plane, I could quickly and easily blend them into a smooth curvature with a sanding block. It reinforces the fact that sometimes, the simple, non-mechanised approach is best!

Cheers
Pete

Sunday, July 31, 2011

A Claro Walnut/Sitka Spruce 000 - Free to Good Home!

I've made great advances with the last two guitars I've completed in terms of build quality and tone and I'm afraid I'm a little lacking in motivation when it comes to completing this one. I guess that's a little strange given my usual passion for guitar building, but considering that I began its construction quite some time ago and would much rather be working on my new instruments, putting into practice important lessons recently learned, I'm inclined to forgive myself for this half-hearted attitude.


The photograph above doesn't do the claro walnut back and sides justice; in its present raw state, the wood looks pretty uninspiring. Under finish, however, its stunning figure will be fully revealed and will be the icing on what I hope will be a very successful cake!

Tapping on this unusually marked Sitka spruce soundboard in its unfinished state gives me reason to be confident. The body is very resonant, the standard of workmanship is acceptable and construction is far enough advanced that I'm sure I can muster the enthusiasm to finish it. This guitar's state of completion will fall into line with my two latest instruments when they are ready to receive bindings. From that point on I'll attempt to complete the remaining steps on all three guitars concurrently.

Click for a closer look.

For what will hopefully be the last time, I plan on finding an appreciative recipient and making a gift of one of my instruments. It's certainly been very satisfying to have delivered my last two guitars to keen players free of charge, but once this guitar finds a new home, foregoing that pleasure and at last deriving some meagre income from my hobby is a prospect that's becoming increasingly attractive.  Semi-retirement (and a new band-saw) beckons!

Cheers
Pete

Sunday, July 10, 2011

The Fingerstyle Guitar - Head Block, Tail Block and Linings

Having braced the top, it's time to temporarily suspend my excitement and spend some time on the rims. For me, this is perhaps the least inspiring stage of construction and the reason I find it preferable to have a ready-made stock of head blocks, tail blocks and kerfed lining strips which I've prepared in batches over the preceding months.  With a supply of blocks and linings on hand, I can make short work of fitting them to the guitar's sides and move on quickly to more interesting tasks.

I laminate my tail blocks using three layers of wood, the middle layer of which has its grain oriented at right angles to the two outer layers, parallel with the grain of the sides. For the little additional effort involved, I can feel confident that the block will remain intact and a side crack will be avoided should the guitar ever be dropped on its end pin.

In the belief that setting modest targets fuels motivation and sustains momentum, I'm setting myself the goal of attaching the head and tail blocks and installing the kerfed linings in the week ahead.

Cheers
Pete

Friday, July 1, 2011

The Fingerstyle Guitar - Soundboard Voicing

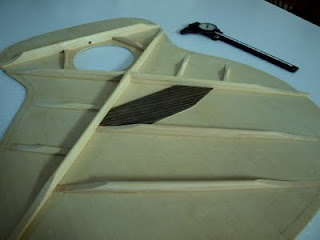
Like many novice guitar builders I was inclined to overbuild my early guitars, the mortal fear of them imploding tending to override any suspicion that I was robbing them of their full tonal potential. It's been difficult to leave that mindset behind me, but with a conscious effort to "lighten up", and with the wisdom of more experienced luthiers in mind, I'm venturing further from my previous comfort zone with each guitar in an effort to increase their responsiveness. To that end, I've significantly reduced the mass of my soundboard braces, ever mindful of the delicate balance necessary between lightness and strength. Ironically, it's because of advice from those same sources that I'm inclined to leave the soundboard itself a little thicker than I may once have done.


John Mayes' "Advanced Voicing" DVD provided me with a way forward where carving the soundboard braces is concerned. Without a doubt, watching John shave and shape the soundboard braces then tap on the top to assess the changes he'd brought about has given me a much better insight into the process than I'd been able to gain through simply reading about other luthiers' methods in that regard. As John clearly demonstrates, judicious removal of small amounts of mass from one or more braces can make a big difference to the responsiveness of the soundboard.  It's still a somewhat mysterious and inexact science for me, but recent results suggest that I'm heading in the right direction at last.

There's some carving of brace ends and final finish sanding remaining, but essentially, the redwood top is as resonant as I can confidently make it without sacrificing necessary strength. Its pitch when tapped is significantly different to that of the Sitka spruce top I've recently brought to this level of completion and it will be interesting to compare the two guitars when they're strung up. For my own future reference, I intend to document each top's overall weight and brace dimensions as well as record their tap tones with a hand-held Zoom recorder, the thinking being that over time, as I complete more instruments, I'll be able to correlate these measurements with their sound when played.

Cheers
Pete

Postscript:  Since publishing this post yesterday, I've capped the "X" brace intersection with a small piece of spruce and the relative pitches of the two tops when tapped are now much closer.  It explains the startling difference I noticed yesterday and is a great demonstration of how this small addition can significantly increase the overall stiffness of the top.

Sunday, June 26, 2011

The Fingerstyle Guitar - Fun With Hide Glue


This has been my first attempt at using hot hide glue, and although there were some tense moments - including one abortive attempt at attaching the bridge plate - major disasters were averted.

Because hide glue begins to gel quite rapidly once it cools, it's important to apply it and have the piece being glued clamped in position before that happens. Before I glued each brace, I found it useful to have several practice runs without glue to establish the sequence of steps I'd follow and to make sure I knew in advance where and in what order I would position the "go-bar" clamps. Despite the benefit of those dry-runs, I wasn't able to remain cool, calm and collected at all times and I still managed to make a gooey mess on a couple of occasions.  Thankfully, of all the glues I've used, hide glue is by far the easiest to clean up. As I found out on my first attempt at gluing the bridge plate, the worst that can happen is that the soundboard, brace or bridge plate need to be cleaned of glue with a little warm water, ready for a second attempt when things have dried out. The advice I've read repeatedly - and with some relief - is that using hot hide glue gets easier with practice!

Cheers
Pete

Thursday, June 23, 2011

More Fun With Rosettes

After the recent experience of having several instruments under construction at once, I vowed I'd restrict myself to building one instrument at a time once they were completed. That promise was soon broken however, as evidenced by this East Indian rosewood/Sitka spruce guitar which I'm building alongside my claro walnut/redwood fingerstyle instrument.


Where the rosette is concerned, I decided to contrast the spruce top with a dark wood - again using a radial design. Macassar ebony seemed a natural choice, with a dash of red adding some zing to the combination.  Top, back and side purflings will extend this black/red theme.


Cheers
Pete

Bridge Day

With a template describing the bridge outline, and an appropriate jig to facilitate routing of the saddle slot, it's a fairly quick and ...